
You plug in a USB drive to transfer files, wait forever, and there’s not even an icon on your computer — this is probably the frustrating moment many people have experienced. Some immediately assume the USB drive is broken, others casually click format and end up losing years of photos. In fact, “USB drive not recognized” is not a single problem, but a collective term for dozens of possibilities ranging from loose interfaces to corrupted file systems. As long as you troubleshoot in order, you can fix most cases yourself without going to a repair shop, and you can also save your data.
First, Match the Symptom: What Kind of “Drive Not Detected” Are You Experiencing?
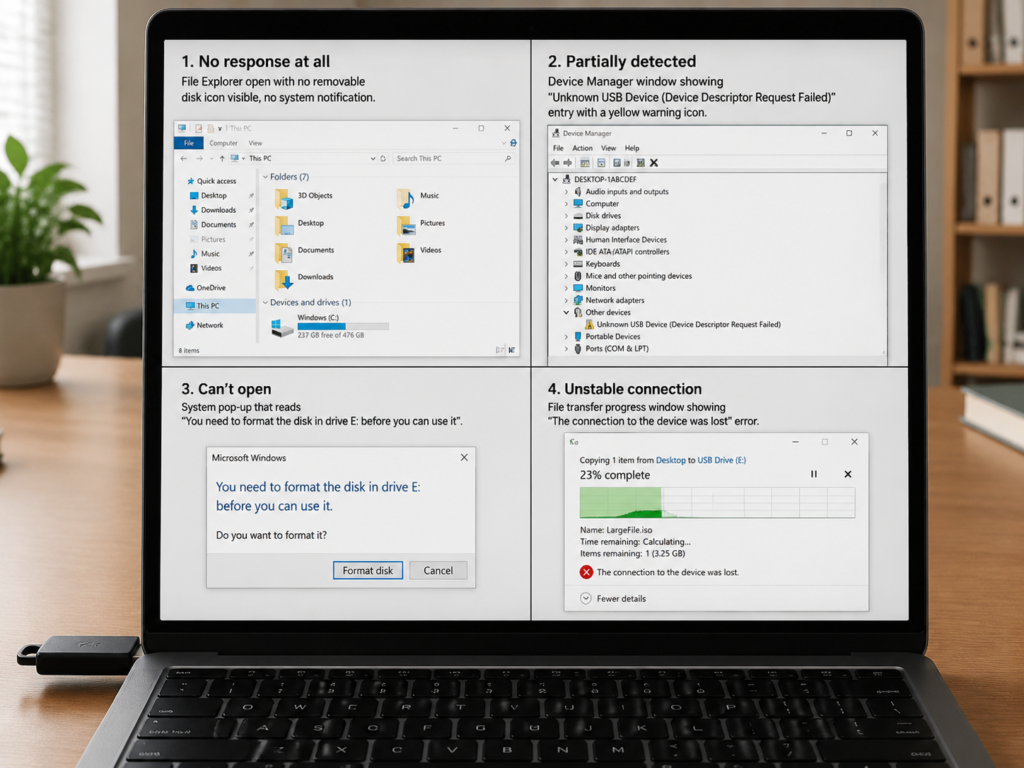
Many people say “the USB drive isn’t detected”, but the actual manifestations vary widely, and the corresponding problems are completely different. Figuring out which type you have first can save you a lot of detours.
The first type is the most panic-inducing: there is no response at all when you plug it in, no system notification sound, the USB drive indicator light does not turn on, and you can’t find a new device even after checking all system tools. This situation is most likely caused by physical contact, power supply, adapter devices, or the USB drive’s own hardware.
The second type is “partially detected”: the computer makes a plug-in notification sound, you can see a USB device connected in Device Manager or System Information, but you can’t find the drive letter in File Explorer, and it may even prompt “Unknown USB Device”. This kind of problem is usually related to identity recognition, drivers, drive letter assignment, or system permission restrictions.
The third type is that you can see the icon but can’t open it: there is a USB drive letter in File Explorer, but double-clicking it reports an error, either prompting “You need to format the disk”, or showing RAW, 0 bytes, parameter error, or inaccessible. This is mostly related to the partition table, file system, encryption status, or format compatibility.
The fourth type is instability: it appears and disappears, disconnects suddenly in the middle of file transfer, drops out with a light touch, or the speed suddenly drops to very slow. For this case, priority should be given to poor contact, insufficient power supply, unstable docking station, or aging flash memory of the USB drive, or it being a fake capacity drive.
Before you start troubleshooting, first remember three bottom lines that can help you save your data, which is more important than knowing how to repair. First, not seeing the drive letter does not mean the USB drive is broken; many times it’s just a loose interface, unassigned drive letter, or system setting issue. Do cross-testing before drawing a conclusion. Second, never click “Format” directly. Formatting will rebuild the file system, and ordinary users will lose the entry to their original files. When prompted to format, first think about whether the data inside is important. Third, if there are important photos, contracts, or work documents, stop immediately, do not continue writing files, do not run repair tools repeatedly, and do not randomly download unknown one-click repair software. Prioritize backing up readable content, or make a disk image, and seek professional data recovery if necessary.
This article covers common recognition issues of ordinary USB flash drives on Windows, macOS, and Linux. Card readers and mobile hard drives can refer to the same troubleshooting approach, but because of different power supply and structure, the judgment criteria are not exactly the same. As for content that ordinary people don’t need and can’t handle, such as chip disassembly, flashing controller firmware, soldering flying leads, and deep configuration of enterprise domain policies, we will not elaborate. This article is suitable for ordinary users who want to upgrade from “step-by-step troubleshooting” to “being able to judge fault levels and operational risks”.
Plain Language Principle: A USB Drive Has to Pass 4 Stages to Be Recognized
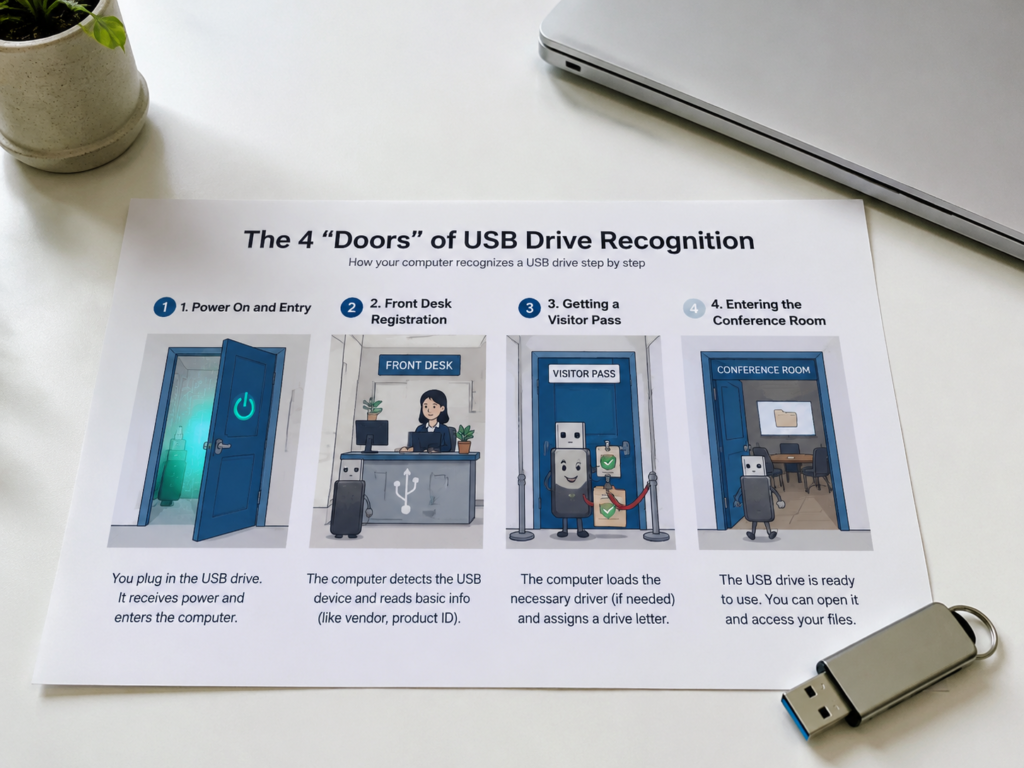
You can compare the process of a USB drive being recognized by a computer to visiting an unfamiliar company: you have to pass through four doors, and getting stuck at any one will result in “not being able to get in”, that is, it cannot be used normally.
The first door is Power On and Entry: After the metal contacts of the USB drive make contact with the computer’s USB port, the computer supplies power to the USB drive. Under normal circumstances, the USB drive’s indicator light will be on or flashing, and the computer may make a plug-in notification sound. If you get stuck at this door, there will be no response at all, the indicator light will not turn on, or it may be recognized occasionally when you change to another port. Common causes include dust in the port, oxidized contacts, the USB drive not being plugged in tightly, weak power supply from the front USB ports of desktop computers, unstable docking stations/adapters, or using a USB-C cable that only supports charging.
The second door is Front Desk Registration: The computer will ask the USB drive “What kind of device are you, how much power do you need, what protocols do you support, what is your capacity”. This process is technically called USB enumeration; you don’t need to remember the name, just know it’s identity verification. Under normal circumstances, the system will recognize this as a “USB Mass Storage Device”. If you get stuck at this door, Windows will prompt “Unrecognized USB Device”, “Device Descriptor Request Failed”, or repeatedly make plug-in/unplug notification sounds. Common causes include abnormal USB drive controller, unstable interface signals, poor quality cables/hubs, or problems with the computer’s USB controller driver.
The third door is Getting a Visitor Pass: The system loads the USB mass storage driver, so that the USB drive can be used as a disk. Under normal circumstances, “USB Mass Storage Device” or the corresponding disk drive entry will be displayed in Device Manager. If you get stuck at this door, a yellow exclamation mark, driver error code will appear in Device Manager, or there will be a sound after plugging in but the capacity cannot be seen in Disk Management. Common causes include abnormal driver cache, USB controller failure, system power-saving policies, or company/school computers disabling USB storage devices.
The fourth door is Entering the Conference Room: After the system reads the partition table and file system on the USB drive, it assigns a drive letter (Windows) or mounts it to Finder/File Manager (Mac/Linux). Under normal circumstances, an icon like “Removable Disk (E:)” will appear in Windows File Explorer, and an external disk will appear in the sidebar of Mac Finder. If you get stuck at this door, situations will occur such as: the capacity can be seen in Disk Management/Disk Utility but not displayed in File Manager; prompting to format; showing RAW; having partitions but no drive letter. Common causes include drive letter conflict, not mounted, corrupted file system, corrupted partition table, incompatible format, or encrypted drive not unlocked.
The terms just mentioned may be a bit unfamiliar to you, so let’s clarify them all at once here, so you won’t be confused during later troubleshooting:
- Drive letter: A disk entry like “E:, F:” in Windows. Without a drive letter, File Explorer may not see the USB drive, but the data is still there.
- Mount: The operation of connecting a disk to the file system in Mac and Linux, just like opening a door for you to enter. Not being mounted does not mean the data is lost.
- Partition table: The “master directory” that records how disk space is partitioned. If it is damaged, the system may know that a device is plugged in, but does not know how to open it.
- File system: The organization rules for files on a USB drive. Common ones are FAT32, exFAT, NTFS, APFS.
- RAW: Not a normal file format, but a “confused state” where the system cannot understand the current file system. It is common when the file system is corrupted or the format is incompatible.
5-Minute Quick Triage: Is the Problem with the USB Drive, Computer, or Adapter?
Now that you understand the principle, don’t rush to change settings or install software. Spend 5 minutes doing a few simple tests, and you can narrow down the problem by more than half.
Step 1: First unplug all docking stations, hubs, and extension cables, and plug the USB drive directly into the native USB port that comes with the computer. For desktop computers, prioritize plugging into the motherboard port on the back of the case for better stability.
Step 2: Test with 2 to 3 different USB ports. You don’t have to find a blue USB 3.x port; a USB 3.x USB drive plugged into a USB 2.0 port can usually be recognized, just at a slower speed.
Step 3: Test with another computer, or a phone/tablet with OTG function. If other devices can recognize it normally, then it’s most likely not a problem with the USB drive, but with the current computer’s settings or ports.
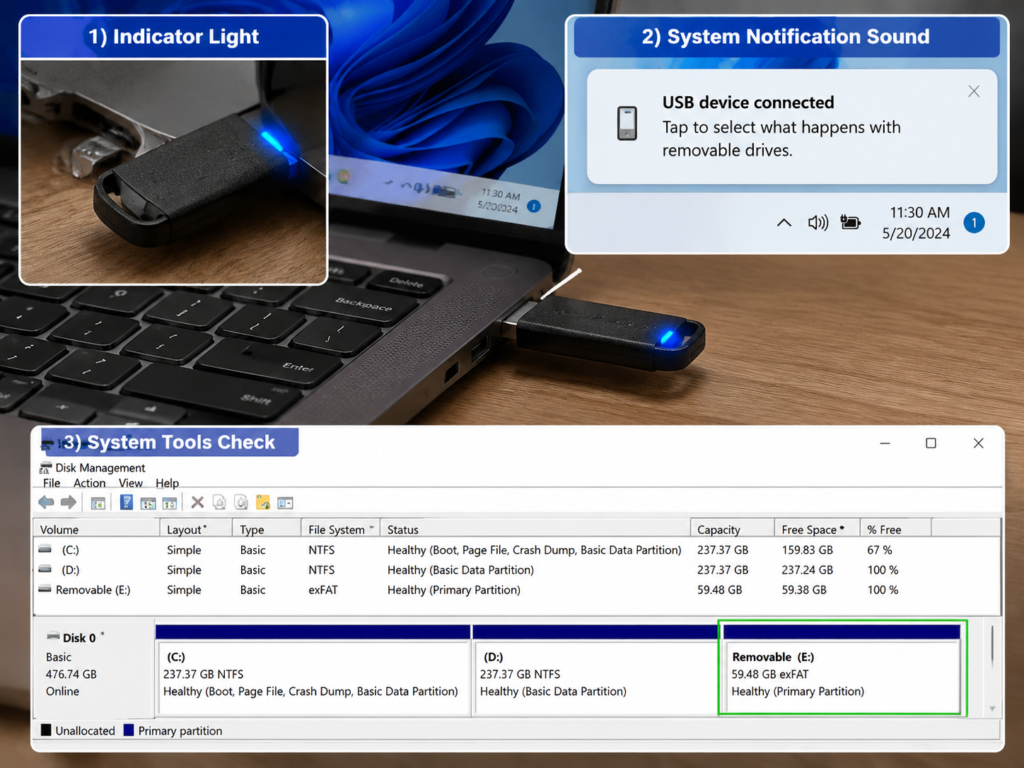
During testing, you can look at three immediate signals to help you judge faster:
The first is the indicator light. If the indicator light does not turn on, it is most likely a power supply or contact problem; but a lit light only means the USB drive is powered on, and does not mean the controller, flash memory, and file system are all good.
The second is the system notification sound. If there is a plug-in notification sound but no drive letter can be found, it means the system has at least detected the plug-in action, and the problem lies in the subsequent driver, drive letter, mount, or file system links.
The third is whether there is a new device in the system tools. For Windows, check Device Manager and Disk Management; for Mac, check System Information and Disk Utility. If the capacity of the USB drive can be seen there, it means at least it is not in a “completely not connected” state.
Based on the test results, you can directly correspond to the following troubleshooting directions:
If multiple devices completely fail to recognize it, prioritize suspecting the USB drive’s interface, controller, flash memory, or other hardware failures. If there is important data, stop self-repair immediately.
If only one computer fails to recognize it, prioritize checking this computer’s USB ports, drivers, power-saving settings, permission policies, drive letters, or system display settings.
If the USB drive can be seen in Disk Management/Disk Utility but not displayed in File Manager, focus on checking drive letter, mount, partition table, file system, encryption, or format compatibility.
If it is only not recognized when plugged into a docking station or front port, and works normally when directly connected, then the problem is mostly with the power supply, adapter, hub, or cable.
First Check the Easiest to Fix: External Connection and Power Supply Issues
80% of USB drive recognition problems occur in the most basic external connection and power supply links, and these are all low-risk operations that you can try casually without losing data, so prioritize troubleshooting them.
First check physical contact. Confirm that the USB drive is fully plugged in; sometimes it won’t be recognized if it’s half plugged in. You can slightly adjust the insertion angle to see if there is occasional recognition, but do not shake it forcefully, so as not to wear out the contacts or loosen internal parts. If the metal contacts of the USB drive are dirty, just gently wipe them with a dry cotton swab; for dust in the computer’s USB port, you can blow it off with a rubber blower or compressed air. Never use liquid cleaners, so as not to flow into the port and burn the circuit. If you see the port is skewed, the contacts are blackened, or the plastic tongue inside is broken, don’t force it in, so as not to damage the computer’s port as well. If the USB drive becomes abnormally hot, has a burnt smell, or the casing is deformed after being plugged in, unplug it immediately and stop using it, don’t take the risk.
Then check adapter devices and cables. Inferior docking stations, USB hubs without external power supply, and overly long extension cables can easily cause insufficient power supply or unstable signals, so prioritize direct connection testing. For USB-C adapters and cables, confirm that they support data transmission. Many people casually grab a Type-C cable that only supports charging, and of course it won’t be recognized at all when plugged in. This is a very common “false fault”. If several devices are plugged into the hub, unplug all the others and only plug in the USB drive to try, to rule out the situation of multiple devices competing for power. If it is a dual-interface USB drive (one end USB-A, one end Type-C), you can test the interfaces at both ends separately to determine if one of the interfaces is broken.
There are also several scenarios where insufficient power supply is particularly likely to occur, you can check against them: USB drives with encryption, fingerprint recognition, and some high-speed large-capacity USB drives require relatively high current to start, and are more prone to instability on hubs or front ports; when a laptop has low battery, is in power-saving mode, or has too many devices connected to the docking station, the power supply of the USB port may be limited, so plug the computer into power and try again; the front USB ports of desktop computers, because they have to go through the cables inside the case, are affected by the motherboard connection and cable quality, and their stability is usually not as good as the rear native motherboard ports.
Only This Computer Doesn’t Recognize It? Check System Settings
If the USB drive works normally on other devices and only one computer doesn’t recognize it, then the problem is most likely with the system settings. We will explain it by system.
Windows System Troubleshooting
First confirm whether the system has actually “seen” the USB drive. You need to check two places at the same time: Device Manager to check the status of USB devices and drivers, and Disk Management to see if a disk with the corresponding capacity appears.
If it is a driver abnormality, find “Unknown USB Device” or USB Mass Storage Device with a yellow exclamation mark in Device Manager, right-click to uninstall, then unplug the USB drive and plug it back in. The system will automatically reinstall the built-in driver. It is not recommended to use third-party driver tools for batch repair, as they may install unnecessary software.
If several USB devices are not working properly, it may be a problem with the USB controller. First try restarting the computer, or check if there is an abnormal mark on the USB controller in Device Manager.
If the USB drive’s partition can be seen in Disk Management but there is no drive letter, then it is a drive letter assignment problem. Just manually assign one — before the operation, be sure to confirm that the selected one is the USB drive through the capacity and disk number, and never modify the system disk by mistake.
Different statuses in Disk Management correspond to different problems: showing “Unallocated” may mean the partition is lost; showing “RAW” mostly means the file system is unrecognizable; showing “No Media/0 Bytes” is more inclined to an empty card reader slot, abnormal controller, or hardware failure; showing “Offline/Read-only” requires figuring out the reason first before changing the status.
Another easily overlooked problem is power-saving settings. Windows has “USB Selective Suspend Setting” by default, as well as the “Allow the computer to turn off this device to save power” option for USB Root Hub. Sometimes the computer will stop the USB drive to save power, so turn off these two settings and try again.
If it is a computer in a company, school, or internet cafe, USB storage devices may be disabled through group policy, registry, or security software. In this case, don’t bother, just consult the administrator.
In addition, if it is a BitLocker-encrypted USB drive, you need to enter a password or recovery key to unlock it. When it is not unlocked, it may only show an encrypted volume and cannot directly access files.
macOS System Troubleshooting
Similarly, first confirm whether the system has recognized the USB drive: open “System Information → USB” to check if there is a corresponding USB drive device, or open “Disk Utility” to see if a disk with the corresponding capacity appears.
Sometimes it just doesn’t show up in Finder, not that it’s really not recognized. Go to Finder’s settings and check “External disks”. This only affects the display entry in the sidebar, and does not represent the status of the USB drive.
If the USB drive or partition can be seen in Disk Utility but is not mounted, select it and click the “Mount” button to try; if mounting fails, write down the error message first, don’t rush to click “Erase”, because erasing will make the data gone.
The “First Aid” function of Disk Utility can repair some directory structure problems, but it will also rewrite the file system. If there is important data, be sure to back it up or make a read-only image first before running First Aid.
When some Macs connect USB or Thunderbolt accessories for the first time, they need to be allowed in “Privacy & Security”, otherwise they can’t be used. Try to use reliable adapters, don’t use cheap inferior adapters that cost a few dollars, which are prone to problems.
There is also the issue of format compatibility. APFS and HFS+ are common formats in the Mac ecosystem, and Windows usually cannot directly recognize or read/write them by default; conversely, for NTFS format USB drives, Mac usually can only read but not write by default. This is not a broken USB drive, but an unsupported format.
Brief Linux System Troubleshooting
Users using a graphical interface can open the system’s built-in “Disks” utility to directly view devices, partitions, mount status, and file system types.
Users familiar with commands can use lsusb to determine whether the device is recognized at the USB layer, use lsblk to determine whether the block device appears, and use dmesg to view kernel error messages when the USB drive is plugged in.
If the device can be seen but cannot be mounted, focus on troubleshooting file system support, permissions, corruption status, and encryption status.
Cross-System Format Compatibility Reference Table
Many times the USB drive is “not recognized” just because of incompatible format. For example, if you plug a Mac-specific format USB drive into Windows, the system can’t recognize it and thinks it’s broken. You can refer to the following table for the support status of common formats:
| File System | Windows Support | macOS Support | Suitable Scenarios | Notes |
|---|---|---|---|---|
| FAT32 | Native read/write | Native read/write | Compatibility with old devices, car infotainment systems, TVs, printers | A single file usually cannot exceed 4GB |
| exFAT | Native read/write | Native read/write | Transferring large files between Windows and Mac, universal for modern devices | Older devices may not support it |
| NTFS | Native read/write | Read-only by default | For use only in Windows environment | Mac writing requires additional software support |
| APFS/HFS+ | Unrecognizable by default | Native read/write | For use only in Mac environment | Windows cannot directly read/write by default |
There are also some dedicated devices, such as voice recorders, dash cams, and TV boxes, that may only support specific formats. If the computer can recognize it but the device cannot, check the device’s manual to confirm the format requirements.
Not Recognized on Multiple Devices? Judge the Problem with the USB Drive Itself
If you have changed several devices and several ports, and the USB drive is still not working properly, then you have to consider that the problem is with the USB drive itself. But before you start, the first thing is not to repair, but to judge the value of the data.
If there is important data inside, immediately stop writing, stop formatting, do not run repair tools repeatedly. Back up the files that can be copied out first, make a read-only image if necessary, or seek professional data recovery services.
If there is no important data, you can try repair, formatting, re-partitioning, and full disk detection in order from low risk to high risk.
If you are not sure whether there is important data, always treat it as “having important data”, and wait until you confirm that recovery is not needed before operating.
Software Fault: Device Can Be Seen, But Files Cannot Be Opened
The typical manifestation of this situation is: the USB drive and its capacity can be seen in Disk Management/Disk Utility, but it cannot be opened in File Explorer, prompting to format, showing RAW, unallocated, or directory corruption.
Common causes include interrupted transmission, abnormal removal, power failure, system crash, which lead to corrupted file system or partition table. It may also be incompatible format, or encrypted drive not unlocked.
The judgment method is very simple: change to multiple computers, the capacity can be seen in Disk Utility on all of them, but it just cannot be opened or mounted normally.
The operation boundary for this situation is: when there is important data, do not format first, and do not prioritize running repair commands that may rewrite the file structure. Back up or make an image first, then consider repair.
Hardware Fault: Ordinary Users Usually Cannot Fix It
If these situations occur, it is most likely a hardware fault that ordinary users cannot fix by themselves: no response at all on multiple devices, indicator light not on; loose or broken interface; abnormally hot after plugging in; burnt smell; the device cannot be seen at all in Disk Utility, or only shows 0 bytes/No Media.
Let me emphasize again: the USB drive light being on only means it is powered on, and does not mean the controller, flash memory chip, and data are all normal.
When encountering a hardware fault, do not plug and unplug repeatedly, do not forcefully straighten the interface, do not disassemble the case and solder by yourself, and do not flash third-party firmware, so as not to expand the damage. If there is important data, seek professional data recovery services; if there is no important data and it is within the warranty period, go to the brand’s after-sales service; for USB drives that have repeated problems, do not store important files on them anymore.
Quality Abnormality: Fake Capacity, Inferior Flash Memory, Aging
Another situation is that the USB drive itself has quality problems, such as expanded capacity drives (fake capacity), using inferior flash memory, or aging after long use. Typical manifestations are: advertised as 128GB but files get corrupted after writing tens of GB; it looks like the copy was successful, but the files can’t be opened after re-plugging; abnormal capacity display; frequent drive dropouts; large speed fluctuations.
To confirm whether it is fake capacity or has bad blocks, if there is no important data, you can use H2testw (Windows) or F3 (macOS/Linux) to do a full disk write-read verification. Note that just copying large files is unreliable; you must re-read and verify to find expanded capacity drives with “fake write success” — many fake drives will trick the system into saying the files are written, but actually they are not stored in the flash memory at all.
If it is confirmed to be fake capacity or has a large number of bad blocks, don’t continue to use it, especially don’t store unique copies such as photos, contracts, and work documents, which you can’t get back if they are lost one day.
Risk Classification of Repair Actions
Many people use various repair tools right away, and end up losing data. You can refer to the classification below to judge which operations you can try with confidence and which require caution:
- Low risk (no data loss, try with confidence): Change ports, remove hubs/docking stations, restart the computer, manually mount, assign drive letters, uninstall the system’s built-in USB driver and re-plug, turn off USB power-saving settings.
- Medium risk (may rewrite the file system, back up data first if there is any): System built-in disk check, macOS Disk First Aid, chkdsk, scanning with legitimate third-party data recovery software.
- High risk (will destroy the original data structure, operate only after confirming no recovery is needed): Formatting, re-partitioning, initializing disk, write verification test.
- Not recommended for ordinary users (extremely high risk, easy to damage the drive): Flashing firmware, low-level formatting with mass production tools, disassembling the case and soldering, shorting the controller, unknown one-click repair tools.
Prerequisites for Formatting and Format Selection
If you confirm that the data is not important, you can format the USB drive to make it usable again. The prerequisites for formatting are: data has been backed up or confirmed to have no important data; the USB drive can be stably seen in Disk Utility; obvious physical damage has been ruled out.
Quick format is fast, mainly rebuilding the file system, suitable for daily reuse, but if you want to do data recovery later, don’t use quick format.
Full format or full disk detection takes a long time, suitable for when you suspect bad blocks, fake capacity, or need to check writability, and may also accelerate the exposure of faults in problematic USB drives.
Format selection can be based on usage scenarios: choose NTFS for Windows-only use; prioritize exFAT for transferring large files between Windows and Mac; choose FAT32 for compatibility with old devices, car infotainment systems, printers; choose APFS for Mac-only use.
Pitfall Avoidance and Prevention: Reduce the Probability of Failure and Data Loss
6 Most Common Misconceptions
When many people encounter a USB drive not being recognized, they will subconsciously do some operations that make things worse. Avoiding these misconceptions can save a lot of data:
- Don’t say the USB drive is broken as soon as it’s not recognized. First do cross-tests on ports, computers, adapters, and system tools; many times it’s just a small problem.
- Don’t click format as soon as you get the prompt. First judge the value of the data, back up if possible, and stop writing if you can’t back up.
- Don’t think that a lit light means the USB drive is normal. A lit light only means it’s powered on; the controller, flash memory, and file system may all have problems.
- Don’t think that USB 3.x USB drives must be plugged into blue 3.0 ports to be recognized. In most cases, they are backward compatible with USB 2.0, just at a slower speed.
- Don’t repeatedly plug and unplug or shake the USB drive forcefully to “try your luck”. This may aggravate contact deformation, loose interface, or solder joint damage.
- Don’t think that all recognition problems are caused by viruses. Viruses may affect file display or create shortcuts, but problems with ports, power supply, format, drive letters, and file systems are more common causes.
5 Good Habits for Daily Use
Developing a few simple habits can greatly reduce the probability of USB drive recognition failures and data loss:
First, click “Safely Remove Hardware/Eject” before pulling out, especially when you have just finished copying large files and the USB drive indicator light is still flashing, to avoid interruption of file system writing.
Second, don’t pull out the drive when transferring files, don’t let the computer sleep or lose power, otherwise it is easy to damage the file system.
Third, try to use the computer’s native ports, and rely less on inferior docking stations, unpowered hubs, and charge-only cables.
Fourth, don’t store important data only on a USB drive. USB drives are suitable for temporary transfer, not as the only long-term backup medium. Important files should be stored in at least two different places.
Fifth, store USB drives that are not used for a long time in a dry, cool, and squeeze-proof place to avoid contact oxidation, moisture, and interface deformation.
When to Give Up Self-Repair
Not all problems can be solved by yourself. When encountering these situations, don’t force it:
If it is not recognized on multiple devices and the device cannot be seen at all in Disk Management/Disk Utility, seek professional recovery if there is important data, and consider replacing it if not.
After repair or formatting, RAW, drive dropouts, and file corruption still occur repeatedly, which means the flash memory may be aging or has quality problems. Don’t store important data on it anymore.
If there is physical damage, abnormal heat, or burnt smell, stop using it immediately to avoid damaging the computer port or expanding the scope of data damage.
If the USB drive is still within the warranty period, prioritize the brand’s after-sales service; if you have data recovery needs, first confirm whether the old drive will be returned when the after-sales service replaces it with a new one, so as not to have the old drive taken away and the data cannot be recovered.
1-Minute Quick Troubleshooting Process
If you are currently encountering the problem of a USB drive not being recognized, you don’t need to remember all the previous content, just follow the steps below step by step:
Step 1: Change ports, remove the docking station, change to a data-supporting adapter, first rule out contact, power supply, and adapter problems.
Step 2: Test with another computer or a phone with OTG, to distinguish whether it is a problem with the current computer or the USB drive itself.
Step 3: Open system tools to confirm the status: Windows checks Device Manager and Disk Management, Mac checks System Information and Disk Utility, Linux checks Disks utility or lsusb/lsblk.
Step 4: Judge the direction based on the status: completely invisible is more likely a hardware fault; capacity can be seen but can’t be opened is more likely a file system, partition, or mount problem; only one computer is abnormal is more likely a system setting problem.
Step 5: First judge the value of the data: if there is important data, back it up first or stop operating; if there is no important data, then try repair, formatting, or detection.
You can also refer to the one-sentence decision table below to quickly find the corresponding solution:
| Symptom | First Step Action |
|---|---|
| No response at all when plugged in, light not on | Change ports, remove Hub, change computer; if no response on multiple devices, it is more likely a hardware fault |
| Plug-in notification sound but no drive letter | Check Disk Management, drive letter assignment, drivers, power-saving settings, and system policies |
| Has drive letter but prompts format/shows RAW | Don’t format first; back up or recover data if there is any, rebuild file system if there is no data |
| Drive drops out mid-transfer, appears and disappears | Check power supply, port, Hub, cable, and USB drive aging; replace if it happens repeatedly |
| Works on Windows but can’t write on Mac | Mostly NTFS write restriction; exFAT format is recommended for cross-platform use |
| Recognized by computer but not by car infotainment/TV | Check the capacity and file system supported by the device, usually FAT32 or exFAT is required |
Don’t panic when you encounter a USB drive not being recognized. Essentially, it is a problem in a certain link from physical power supply to file system. Learn to break big problems into small links, do low-risk tests first, then decide whether to take further action based on the value of the data. You can completely fix most common faults by yourself, and you don’t have to be anxious about losing data anymore.