
If you’ve ever bought a USB-C dock only to run into frustrating issues, you’re not alone. Advertised 10Gbps ports that only hit basic USB stick speeds. 4K 60Hz claims that drop to 30Hz when you plug in your display. Random disconnections when you use two external drives. Multi-display support that doesn’t work on Mac. Worst of all, a trackpad that drifts wildly when charging through the dock.
This comprehensive testing template is built to help you avoid those headaches. Whether you’re a regular user verifying a new dock you just bought, a content creator putting together a reliable review, or a quality control professional testing for compliance, this guide has you covered. It includes simple at-home tests you can run with gear you already own, plus repeatable lab-grade standards for professional use. It works for every consumer USB-C dock on the market, from basic entry-level models to top-tier Thunderbolt 5 and USB4 v2 flagships.
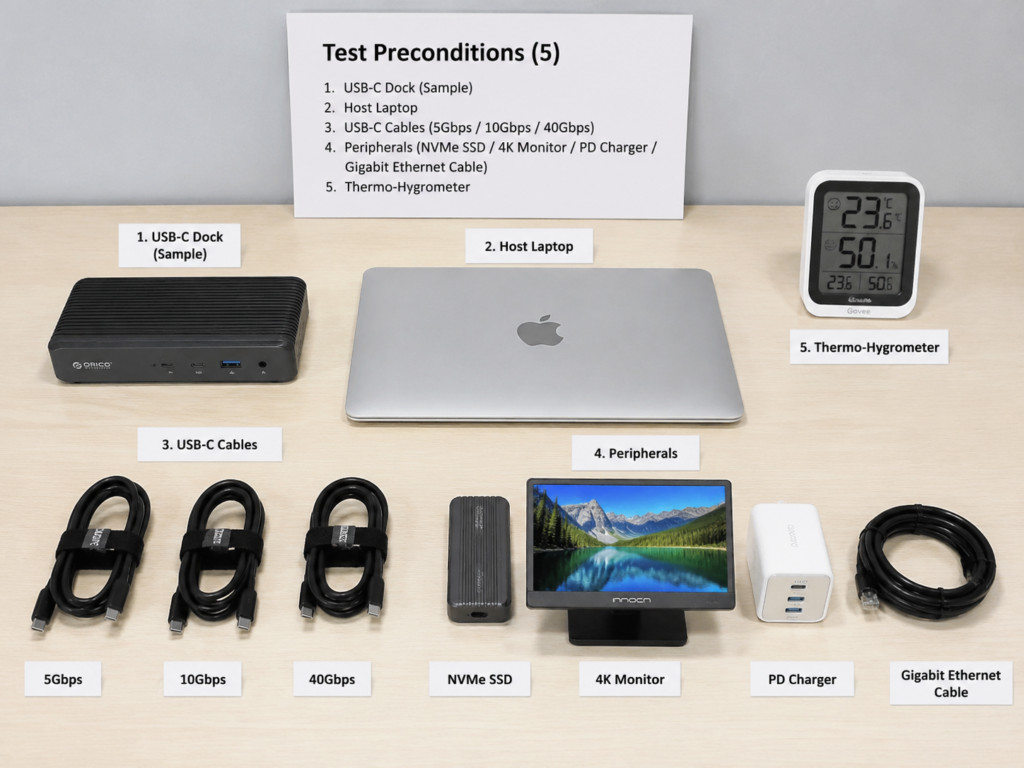
Before you jump into testing, we’ll cover the basics: what kind of dock you have, which products this template doesn’t work for, what pre-test details you need to record to avoid wasted effort, what tools you’ll need based on your use case, and key terms to know so you can follow along accurately.
2. Basic Function Check: Verify Ports, Specs, and Compatibility
Before you dive into performance testing, make sure the dock’s basic functions work as advertised. This is the fastest way to spot obvious fake specs or compatibility dealbreakers.
2.1 Port and Spec Verification
The first step is to confirm the dock actually has the ports and specs it claims to.
- At-home method:
- Count every port (USB-A, USB-C, HDMI, DP, Ethernet, SD/TF card slot, audio jack) and compare it to the product listing. If a port is missing or a different type than advertised, that’s an immediate red flag.
- Test each port with a compatible device to make sure it works at all. For data ports, plug in a high-speed drive: if a port advertised as 10Gbps only hits 30–40MB/s, it’s almost certainly a USB 2.0 port or has a faulty link.
- Don’t trust printed certification logos. Look up the USB-IF or Thunderbolt certification number on the official website to confirm it’s real.
- Professional method:
- Use a USB protocol analyzer to confirm each port’s enumeration speed, power delivery capabilities, and Alt Mode support.
- Flag a product as severely falsely advertised if its core performance is less than 70% of its nominal rating (after ruling out host/cable/peripheral bottlenecks).
- Document which ports share bandwidth — don’t confuse the dock’s total bandwidth with per-port dedicated bandwidth.
2.2 Host and OS Compatibility
A dock that works perfectly on one device might be completely broken on another. Test it with the devices you actually use.
- At-home method: Connect all your daily peripherals to the dock, then plug it into your main host. Use it continuously for at least 30 minutes, doing your normal tasks (typing, browsing, file transfers, video playback). Confirm all devices are recognized, transfers work, display output is stable, and charging works as expected.
- Professional method:
- Test across all major operating systems: macOS, Windows, iPadOS, Android, and handheld gaming OSes.
- Prioritize core host compatibility: if a dock is marketed for a specific user base (like Mac users), compatibility issues with that host should be weighted heavily.
- Mac-specific note: Base M1/M2/M3 Macs have strict limits on the number of external displays they support natively, while Pro/Max/Ultra models support more. For DisplayLink multi-display setups, test driver stability, input latency, and CPU usage separately.
2.3 Hot-Plug and Wake Recovery
A good dock should reconnect reliably when you plug/unplug devices or wake your laptop from sleep.
- At-home method: Plug and unplug each port 5–10 times to make sure the device is re-detected every time. Don’t yank cables or use excessive force. Test sleep/wake: put your host to sleep with the dock connected, then wake it up. Check if all peripherals reconnect quickly without needing to unplug the dock.
- Professional method: Run 50+ plug/unplug cycles per port. Record success rate, recovery time, and any issues like data corruption, display blackouts, network dropouts, or PD renegotiation loops.
3. Core Performance Testing: Data, Video, Network, PD, and USB4/Thunderbolt
Once you’ve confirmed basic functions work, it’s time to test core performance — this is what makes the biggest difference in daily use, and where most docks fall short of their advertised specs.
3.1 Data Transfer Performance
Storage speed is one of the most advertised (and most faked) specs. Be sure to test both single-port speed and multi-port concurrent speed.
- At-home method:
- Plug an NVMe external drive into the port you want to test, then transfer a 10GB+ large file. Record the peak speed, stable speed, and whether the speed drops mid-transfer. Don’t fixate on theoretical maximums — real-world speed is what matters.
- Plug in two high-speed storage devices and transfer files between them. If the speed drops by roughly half compared to single-port use, those two ports share bandwidth.
- For SD/TF card readers, always use a card that matches the reader’s spec. For example, you need a UHS-II card to test a UHS-II reader — if you use a basic U1 card, slow speeds are the card’s fault, not the reader’s.
- Professional method:
- Use tools like CrystalDiskMark, AJA System Test, and fio to test sequential read/write, 4K random read/write, and long-term write speed degradation.
- Record single-port performance, multi-port concurrent performance, and any unexpected disconnections during testing.
3.2 Video Output Performance
Video output is another common area for false advertising: a dock might say it supports 4K 60Hz, but only actually deliver 4K 30Hz, or drop the refresh rate when you turn on HDR.
- At-home method:
- Open your system’s display settings and confirm you can select the advertised resolution and refresh rate. For example, if a dock is advertised as 4K 60Hz, make sure 60Hz is an option — don’t just assume it’s working if the display turns on (it might default to 30Hz).
- Use the display continuously for 30+ minutes: watch videos, do office work, and check for flicker, black screens, or visual artifacts. Test sleep/wake to make sure the display comes back on quickly and correctly.
- For multi-display docks, test mirror mode, extended desktop mode, and mixed-resolution setups to make sure they work for your needs. Mac users should pay extra attention to whether extended desktop mode works, not just mirroring.
- Professional method:
- Test every video mode the product advertises: 1080p high-refresh, 2K high-refresh, 4K 60/120/144Hz, 8K, etc. Don’t just test the highest spec.
Important note: Many products advertise HDMI 2.1, but the HDMI 2.1 standard includes multiple bandwidth tiers — not all HDMI 2.1 ports can hit the full 48Gbps. High-end modes like 4K 120Hz/144Hz or 8K usually require the dock to support FRL (Fixed Rate Link) and DSC, plus a compliant high-bandwidth HDMI cable and a display that supports the same specs. All three are required.
- Record whether HDR works correctly, HDCP support (needed for 4K streaming on services like Netflix), VRR (Variable Refresh Rate) support, color depth, chroma subsampling, and whether DSC is enabled. For MST multi-display setups, note macOS’s limited extended desktop support. For DisplayLink setups, add tests for driver stability, input latency, and CPU usage.
- Use a high-speed camera or professional video analysis tool to measure input lag, frame loss, and display sync — these are hard to notice by eye but make a big difference for gaming and fast-paced content.
3.3 Wired Network Performance
For docks with an Ethernet port, stable, full-speed internet is critical for anyone who relies on a wired connection.
- At-home method: First, know your network environment. For a gigabit Ethernet port, download speeds of ~100–115MB/s are normal, due to protocol overhead — you’ll never hit the theoretical 125MB/s max. For a 2.5G port, you’ll need a 2.5G router/switch and fast enough broadband or a local network server to hit full speed. If you don’t have those, don’t blame the dock for slow speeds.
- Professional method: Use iperf3 to test uplink and downlink throughput, average speed, packet loss, and latency. Also test 24-hour continuous stability and how quickly the network port recovers after sleep/wake.
3.4 PD Charging and Power Stability
PD passthrough is one of the biggest reasons people buy USB-C docks — one cable to your laptop for data, display, and charging keeps your desk clean. But unstable charging can be a major headache.
- At-home method:
- Use a USB power meter to check the power coming into the dock from the charger, and the power the dock negotiates with your host. Many docks advertise “100W input, up to 85W/90W/95W output to host” — the actual power your host gets depends on the cable’s PD rating, your host’s supported PD profiles, and how many other peripherals are connected to the dock. If you have a drive and display plugged in, the dock has to divert power to those, so the host gets less. Don’t call it false advertising based on a single reading — compare it to the dock’s advertised PD output under your current load.
- Run the dock for 1 hour while charging, transferring files, and using an external display. Frequent charging drops, disconnections, or repeated renegotiation (where the charging icon keeps turning on and off) are real signs of a problem.
- Professional method:
- Measure charger input power, dock self-consumption, and actual host received power, then calculate conversion efficiency.
- Test negotiation for all supported PD profiles: 5V/9V/15V/20V/28V, covering common power levels like 100W, 140W, and 240W EPR.
- Use an oscilloscope to measure output ripple, transient response (voltage fluctuation when a high-load device is plugged/unplugged), and overcurrent/short circuit protection.
3.5 USB4/Thunderbolt Specialized Tests
If you’re testing a USB4 or Thunderbolt dock, there are extra high-speed features to check that regular USB-C docks don’t have.
- At-home method: You don’t need to overcomplicate it. Use a 40Gbps certified cable and a Thunderbolt/USB4 NVMe enclosure, then transfer large files to test speed. For a 40Gbps link, real-world large file transfer speeds are usually 2.5–3.5GB/s, depending on the enclosure and SSD inside — not every setup will hit the absolute maximum.
- Professional method: Verify PCIe tunneling and DP tunneling work correctly. Test daisy-chaining (connecting a second dock or display to the first dock’s downstream Thunderbolt port), performance with high-speed external RAID arrays, multi-display concurrent stability, sleep/wake compatibility, and performance across different firmware versions.
4. Reliability and Safety: Long-Term Use, Temperature, and Electrical Protection
Great specs don’t mean much if the dock breaks after a month or becomes unsafe to use. Reliability and safety are just as important as raw performance.
4.1 Long-Term Load Stability
A dock that works fine for 10 minutes might start having issues after hours of use with multiple devices connected.
- At-home method: Plug in all your daily peripherals and use the dock continuously for 4–8 hours. Watch for random disconnections, speed drops, display blackouts, network failures, or charging interruptions.
- Professional method: Run the dock at full load for 24–72 hours. Record performance degradation, error logs, reconnection counts, and both external case and internal chip temperatures.
4.2 Heat and Temperature Assessment
All docks get warm under load, but excessive heat can cause throttling, disconnections, or even safety risks.
- At-home method: A warm case is normal. If the dock is so hot you can’t hold it for more than a few seconds, or if it starts dropping connections or slowing down when it gets warm, that’s a cooling problem.
- Professional method: Record the maximum case temperature, port temperatures, and internal controller temperature. Areas that users touch regularly should stay below ~50–55°C (122–131°F) for comfort. High-temperature hotspots should be evaluated against the dock’s material and safety standards.
4.3 Environmental Adaptability
Docks are used in all kinds of environments — hot summer desks, offices with lots of electronics, etc.
- At-home method: You don’t need to create extreme test conditions. Just pay attention to how the dock performs in real-world scenarios, like on a hot desk in summer or near a high-power Wi-Fi router.
- Professional method: Test in 0°C (32°F) low-temperature, 40°C (104°F) high-temperature, high-humidity, and high-EMI environments. Check function recovery, transfer speed stability, display stability, and PD negotiation stability after exposure.
4.4 Mechanical Durability
A well-built dock should stand up to daily plugging and unplugging, being carried in a bag, etc.
- At-home method: Check for loose ports, stiff or fragile cable strain relief, sharp edges on the case, and smooth, solid plug/unplug feel.
- Professional method: Use standardized test fixtures to run USB-C plug cycle life tests, cable bending tests, case abrasion resistance tests, drop tests, and packaging protection tests.
4.5 Electrical Safety and EMC
Electrical issues can damage your expensive laptop or peripherals — don’t skip these checks.
- At-home method: Watch for burning smells, abnormal buzzing or humming, trackpad drift when charging, screen flickering, or frequent charging disconnections. If the dock’s metal case tingles when you touch it, that’s a current leakage risk — stop using it immediately.
- Professional method: Test overvoltage protection, overcurrent protection, short circuit protection, reverse polarity protection, ESD (electrostatic discharge) resistance, surge protection, and EMC pre-compliance. Don’t rely solely on CE/FCC markings — verify them against official test reports.
5. User Experience: Portability, Build Quality, Drivers, Noise, and Extra Features
Even a dock with perfect specs can be annoying to use every day if the design is bad. User experience testing checks how the dock fits into your daily routine.
5.1 Design and Portability
The ideal design depends on how you use the dock:
- Direct-plug compact models: The most important thing is whether they block adjacent ports on your laptop. If plugging in the dock makes your headphone jack or second USB-C port unusable, that’s a big problem.
- Cable-attached portable models: Check if the cable is the right length for your use, if it’s flexible enough to store easily, and if the strain relief feels sturdy.
- Desktop models: Check if the bottom has anti-slip feet to keep it from sliding around, if the port layout is easy to access, and if the power adapter is bulky enough to block other outlets on your power strip.
5.2 Noise and Heat Experience
- For fanless docks: The main concern is case temperature, and whether overheating causes throttling or disconnections (covered in more detail in the reliability section).
- For fan-equipped docks: Listen to the noise level from about 1 meter (3 feet) away. For office use, the fan should be barely audible, with no high-pitched whine that gets annoying over time.
5.3 Usability
Small design details make a big difference in daily use:
- Status indicator lights shouldn’t be too bright — a blinding LED that glares at you at night is a major annoyance.
- Plugging and unplugging cables should feel solid, not wobbly or loose.
- Driver-free docks are always better, since you can just plug them in and use them. If the dock requires drivers (like DisplayLink or Ethernet drivers), test how easy they are to install, if they uninstall cleanly, and if they still work after OS updates.
5.4 Extra Features
Many docks add extra features beyond basic ports: built-in M.2 SSD slots, UHS-II card readers, independent fast-charging ports, 3.5mm audio jacks, Kensington lock slots, built-in desktop stands, and more. Add points for these based on how useful they actually are — more ports don’t equal a better dock if the core functions are unstable.
6. Scoring System and Buying Advice
Now that you’ve run all the tests, how do you score the dock, and how do you pick the right one for your needs?
6.1 100-Point Scoring Weight Reference
We recommend scoring docks across four categories, for a total of 100 points. You can adjust the weights based on the dock’s target use case:
- Basic Function & Compatibility: 20 points — Checks if ports match advertising, certifications are real, and common devices work correctly.
- Core Performance: 35 points — The most important category, covering data transfer, video output, network, PD charging, and high-speed features.
- Reliability & Safety: 25 points — Covers long-term stability, heat management, electrical safety, and durability.
- User Experience: 20 points — Covers portability, build quality, noise, usability, and extra features.
Important note: If a dock doesn’t have a certain feature (for example, an entry-level dock with no Ethernet port, or a non-Thunderbolt dock), don’t give full points for that category. Instead, reallocate the weight to match the product’s target use case. For example, for an entry-level office dock, move the points from Thunderbolt-specific tests to compatibility and stability. Otherwise, comparing entry-level docks to flagship models will give you meaningless scores.
6.2 Automatic Red Flags (Hard Pass)
If a dock has any of these issues, don’t buy it — no matter how good the specs look or how cheap it is:
- Safety risks: Signs of short circuits, burning smells, or electric tingling on the case (current leakage).
- Severe false advertising: Core performance is less than 70% of the advertised rating, after ruling out host/cable/peripheral bottlenecks. For example, a 40Gbps Thunderbolt dock that only hits 10Gbps.
- Core use case not supported: If you bought the dock specifically for a key feature (like multi-display extended desktop on Mac) and it doesn’t work, it’s useless for you.
- Frequent long-term failures: Constant disconnections, black screens, or charging drops that can’t be fixed by replacing the cable or updating the firmware.
6.3 Scenario-Based Buying Recommendations
There’s no single “best” USB-C dock — only the best one for your specific needs:
- Office/Student Users: Prioritize docks with USB-A ports, HDMI, PD charging, and an SD card reader. Focus on good compatibility and low heat — you don’t need ultra-high bandwidth for basic office work.
- Mac Users: First, check how many external displays your Mac’s chip supports natively. If you need multiple displays, understand the difference between native Thunderbolt/USB4 multi-display and DisplayLink solutions — they have very different latency and driver requirements.
- Gamers: Prioritize stable 2.5G Ethernet, low video output latency, full-bandwidth HDMI/DP ports, and support for VRR (Variable Refresh Rate).
- Content Creators: Prioritize Thunderbolt/USB4 models with a high-speed card reader, stable multi-display output, and no speed drops or disconnections during long file transfers.
- Permanent Desktop Use: Prioritize self-powered docks with a good port layout, proven long-term stability, and reliable performance with multiple devices connected at once.
Appendix: Test Result Log Template
Use this template to record all your test results for easy reference and comparison:
| Category | Details to Record |
|---|---|
| Sample Information | Brand, model, firmware version, advertised port specs, certification numbers |
| Host Information | Device model, OS version, native port capabilities |
| Cable Information | Bandwidth rating, length, PD power rating |
| Data Transfer Tests | Single-port speed, multi-port concurrent speed, speed drop issues |
| Video Output Tests | Resolution, refresh rate, HDR/DSC support, flicker/black screen issues |
| Network Tests | Throughput speed, latency, packet loss, long-term stability |
| PD Charging Tests | Input power, actual host received power, negotiated profiles, fluctuation issues |
| Temperature Records | Ambient temperature, case hotspot temperature, internal temperature (if measured) |
| Anomaly Records | Screenshots, system logs, steps to reproduce, resolution attempts |
At the end of the day, testing USB-C docks isn’t about chasing the highest specs or the best score. It’s about finding a dock that fits your actual needs, works reliably, and is safe to use. Whether you’re a regular user verifying a new purchase or a professional reviewer sharing results with your audience, the key is to record your test conditions clearly and focus on the features that matter most to your use case. Do that, and you’ll be able to pick the perfect dock and avoid the fake, low-quality products that plague the market.