
The most frustrating thing about buying a docking station is this: the marketing says 4K 60Hz, but when you plug in a monitor you only get 30Hz; it claims 100W PD charging, but the actual power delivered to your laptop is less than 60W; it lists a dozen ports, but plugging in a large USB drive blocks the two next to it. If you want to test it yourself, you might worry you don’t have professional equipment to get accurate results, or spend hours testing without knowing whether the problem is with the docking station, your computer, or the cable.
This review template is designed for ordinary users, digital beginners, and independent review creators. You don’t need lab-grade equipment; as long as you control variables and record results step by step, you can get results that are reference-worthy for daily use. It can be used to inspect products for returns or exchanges, and also make comparisons between different products fairer.
1. Basic Understanding of the Review Template: First Figure Out What to Test and What Problems It Can Solve
Before starting the test, clarifying the positioning, scope of application, and basic concepts of this template can avoid 90% of misunderstandings and misjudgments later.
Positioning and Uses of This Template
This is a reusable testing framework for ordinary users, digital beginners, and independent review creators. Its core idea is to use unified equipment, unified steps, and unified recording methods to reduce subjective errors, so that test results of different docking stations have a relatively fair basis for comparison.
It can solve the three most common problems: first, compare with advertised parameters to judge whether the docking station has exaggerated specifications; second, when encountering problems such as disconnection, screen flickering, or slow speed, quickly locate whether the problem lies with the docking station, computer, cable, monitor, system settings, or the peripheral itself; third, leave reproducible evidence for purchase, product inspection, returns and exchanges, or content creation.
Of course, we must also clarify its boundaries: this test, which can be operated by ordinary users, cannot replace USB-IF, official Thunderbolt certification, or compliance testing by professional laboratories, but it can fully cover the most common performance, compatibility, and reliability issues in daily use, and is sufficiently referenceable for ordinary consumers.
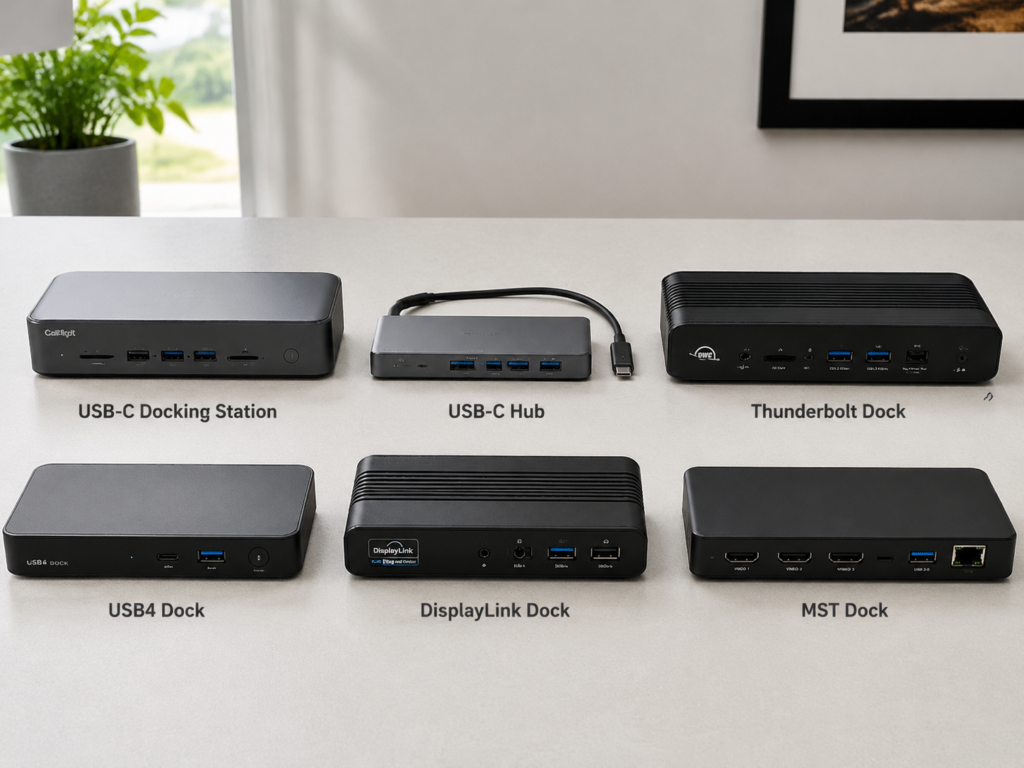
First, Clarify: What Do You Have in Hand? A Docking Station, Hub, or Thunderbolt Dock?
Many people can’t tell the difference between different types of expansion products. Before testing, first match your product type so you can choose the right test items:
- Docking Station: The most fully functional, usually with video output, PD charging, Ethernet port, card reader, and multiple USB ports. It focuses on desktop “one-cable connection” — just one cable to the computer, and you can connect all your desktop peripherals.
- USB-C Hub: More portable, with fewer ports, most do not require external power and are powered by the computer’s USB-C port. Suitable for business trips and temporary expansion.
- Thunderbolt Dock: Uses the Thunderbolt 3/4/5 protocol, with very high upstream bandwidth. Suitable for multi-screen output, high-speed hard drives, and professional desktop scenarios, and usually more expensive.
- USB4 Dock: Based on the USB4 protocol, commonly available in 20Gbps and 40Gbps specifications. Its actual capabilities depend on the host, cable, and the implementation of the dock itself, and it does not necessarily have all the functions of a Thunderbolt dock.
- DisplayLink Dock: Compresses video signals via software and transmits images through USB, which can bypass the native multi-screen limitations of some computers. Suitable for office and document scenarios, but not for high-frame-rate gaming or low-latency creation, and compatibility with some encrypted videos is average.
- MST Dock: Splits one video signal into multi-screen output through DisplayPort MST technology. Support is common on Windows computers, while macOS has limited support for MST extended desktop mode, and in many cases can only use mirror mode.
Which Products Are Not Recommended to Directly Apply This Template?
This template is designed for general-purpose USB-C / Thunderbolt / USB4 docking stations. Do not directly apply the full template to the following products; at most, refer to some test items:
- Single-function adapters, single card readers, single HDMI adapters and other accessories with only one function do not require complete multi-port and stability testing;
- Desktop built-in expansion cards, PCIe capture cards, external GPU docks (eGPUs). These products have their own performance bottlenecks and testing logic, and are not in the same category as ordinary docking stations;
- The built-in KVM and USB Hub functions of monitors can refer to interface and speed tests, but cannot be directly scored according to the full standards of a docking station;
- Enterprise-specific docks, docking stations with old proprietary interfaces (such as the square-port dock for old ThinkPads). Their compatibility is highly dependent on specific models, and separate manufacturer-specific compatibility tests need to be supplemented.
Plain-Language Quick Reference for Core Terms
These terms will be mentioned frequently in later tests. Let’s explain them clearly in plain language first. You don’t need to memorize them by rote; just come back and check if you forget:
- USB Power Delivery (PD Charging for short): A universal power supply protocol for USB-C ports, supporting bidirectional power supply. It can charge both computers and other small devices. Common power levels include 60W, 65W, 85W, 100W, 140W, etc.
- PD Input / PD Output: The “100W PD power supply” in many advertisements refers to the “input power” that the charger delivers to the docking station, not the “host output power” that the docking station delivers to the computer. For docking stations without independent power supply that rely on PD input, their own operation and power supply to downstream ports will consume part of the power, so the output to the computer is usually lower than the advertised input power; however, some desktop docking stations with independent power supply provide a fixed output power to the host. Specifically, it must be based on the “Host output power” marked in the manual, not just the words “100W input”.
- DP Alt Mode: Not all USB-C ports can output video directly. Only USB-C ports that support DP Alt Mode can transmit video signals through a Type-C cable. Otherwise, even if the docking station has HDMI/DP ports, it won’t work when you plug in a monitor.
- MST: A technology that splits one video signal into multiple channels for multiple screens. Most Windows computers support it, while macOS has limited support for MST extended desktop mode, and in many cases can only make multiple screens display the same content.
- DSC (Display Stream Compression): It is equivalent to “compressing” the video signal a bit before transmission, so that higher-definition, higher-refresh-rate images can be transmitted under the same bandwidth. However, it can only be used if the computer, docking station, and monitor all support it.
- Shared Bandwidth: Multiple ports share the total bandwidth of the same “upstream highway”. When used at the same time, they all have to compete for the road, and the speed will drop. For example, if two high-speed USB ports transfer files at the same time, each will be slower than when used alone.
- Hot Plugging: Plugging and unplugging devices directly while the computer is turned on. A good docking station will not crash, lose disk connection, or flicker after plugging and unplugging, and can return to normal without restarting.
- Link Negotiation: When the computer, cable, docking station, and peripherals are connected together, they will automatically negotiate “what speed and power we use”. The final actual result will accommodate the weakest link, so it may be lower than the maximum nominal value of any single device.
Protocol and Bandwidth Quick Reference Table
The speed and video capabilities of a docking station are essentially related to bandwidth. Here we list common protocols and actual speeds to help you judge the upper limit against advertised parameters:
| Protocol Name | Theoretical Bandwidth | Daily Actual Continuous Transfer Speed | Main Uses |
|---|---|---|---|
| USB 2.0 | 480Mbps | Approx. 40-60MB/s | Keyboards, mice, headphones, low-speed peripherals |
| USB 3.2 Gen1 (USB 3.0) | 5Gbps | Approx. 350-450MB/s | Ordinary USB flash drives, portable hard drives |
| USB 3.2 Gen2 | 10Gbps | Approx. 700-1000MB/s | High-speed portable SSDs, main speed for ordinary users |
| USB 3.2 Gen2x2 | 20Gbps | Approx. 1500-2000MB/s | Requires full-link support, not supported by most computers |
| USB4 | 20Gbps / 40Gbps | Corresponds to USB/Thunderbolt speeds of the same bandwidth | Depends on specific implementation, does not necessarily have full Thunderbolt functionality |
| Thunderbolt 3/4 | 40Gbps | High-end Thunderbolt SSDs can approach or exceed approx. 2500-3000MB/s under ideal conditions; actual speed depends on PCIe lanes, SSD, enclosure, docking station, and system; not all Thunderbolt docks can achieve this speed on every downstream port simultaneously | High-speed storage, multi-screen, professional desktop scenarios |
| Thunderbolt 5 | Up to 80Gbps for standard bidirectional links; up to 120Gbps level in specific display bandwidth enhancement mode | Requires full-link support, actual available bandwidth is affected by mode and device implementation | New generation of professional high-bandwidth scenarios, currently low adoption rate |
It should be noted that Thunderbolt 5 requires full-link support from the host, cable, docking station, and system to run at the corresponding mode. As long as one link does not meet the standard, it will drop to the next lower speed. The speed references in later data tests are also based on the actual performance in this table.
Clarification of Common Review Misconceptions
Many people have several common misunderstandings about docking station reviews. Let’s clarify them in advance to avoid detours:
- Misconception: Only tests with professional laboratory equipment are accurate. Reality: As long as you control variables (same computer, same cable, same peripheral), repeat the test 2-3 times, and fully record test conditions, results from ordinary equipment are completely referenceable for daily use, they just cannot replace official certification tests.
- Misconception: The more ports a docking station has, the better. Reality: More ports may mean more severe shared bandwidth, insufficient power distribution, greater heat generation, and even ports being so crowded that large USB drives or card readers can’t be plugged in. What suits your own usage scenario is the best.
- Misconception: The advertised parameters are the actual performance you can get. Reality: Advertised values are theoretical maximums under ideal conditions. Actual speed, power, and video capabilities are affected by many factors such as computer, cable, peripherals, temperature, and drivers, and will most likely be a bit lower than the nominal values.
- Misconception: Thunderbolt docks, USB4 docks, and ordinary USB-C docks can be compared together. Reality: Their protocols, prices, and target scenarios are completely different. They should be compared in groups — ordinary USB-C docks with ordinary ones, Thunderbolt with Thunderbolt, and DisplayLink as a separate category. Otherwise, the comparison is completely unfair.
- Misconception: If the monitor lights up, the video output is up to standard. Reality: Lighting up is only the most basic requirement. You also need to check whether the actual resolution is the advertised 4K, whether the refresh rate is 60Hz, whether the color depth is sufficient, whether HDR can be turned on, whether there is screen flickering, and whether sleep/wake works normally. If any of these are missing, it is not up to standard.
2. Pre-Review Preparation: Reduce Errors and Ensure Reproducibility
Many people can’t wait to plug the docking station into their computer to test it as soon as they get it, only to end up using a cable that only supports charging for data transfer, or the computer’s own port doesn’t support 4K 60Hz. The test results are either inaccurate or unfairly blame the product. Doing a good job of pre-review preparation can reduce 80% of test errors and make the results more referenceable.
Test Equipment Preparation
The core of testing is “controlling variables” — only when all supporting equipment is consistent can the test results of different docking stations be comparable. You don’t need to buy very expensive professional equipment; just prepare commonly used equipment and record their models clearly.
- Host: The computer you use to connect to the docking station. Be sure to record the brand and model, CPU/chip model, system version, and the protocol type of the port (for example, ordinary USB-C, USB4, or Thunderbolt 3/4/5). Many times, slow speed or poor video performance is actually because the computer’s own port doesn’t support it, not the docking station’s problem.
- Test Cables: Don’t just grab any USB-C cable to use. First confirm the charging power, data rate, and video output capability supported by the cable. When testing Thunderbolt or USB4 docking stations, prioritize using original or certified cables, otherwise the cable itself will become a bottleneck.
- Storage Device: The portable SSD or high-speed USB drive used to test speed must be faster than the maximum speed advertised by the docking station. For example, if you want to test a 10Gbps docking station, you need an SSD with continuous read/write speeds of over 1000MB/s, otherwise what you measure is the speed of the USB drive, not the upper limit of the docking station.
- Display Device: Prepare at least one monitor that supports 4K 60Hz to test the most common video specifications. If you want to do a multi-screen review, also record the resolution, refresh rate, and interface version of each monitor (for example, HDMI 2.0 or DP 1.4).
- Power Supply Device: Use a PD charger that meets the nominal power of the docking station, or the original power adapter, and record the rated power clearly. If you use a charger with insufficient power, the measured power supply results will definitely be inaccurate.
- Common Peripherals: Just prepare according to your own usage scenario, such as keyboard and mouse, camera, headphones, Ethernet cable, SD card, TF card, game controller, or printer. These are used to test interface compatibility and multi-port load.
- Optional Tools: It’s of course better if you have a USB-C power meter, infrared thermometer, stopwatch, router or NAS, and spare blank test drive, but not having them doesn’t affect basic testing. Alternative methods without professional tools will be covered later.
Recommended Software Tools
Software is used to quantify test results. You don’t need to install all of them; just choose a few commonly used ones according to your needs, most of which are free.
- Windows Users: Commonly used tools include CrystalDiskMark (tests hard drive speed), H2testw (tests storage capacity and stability), USBTreeView (checks USB device protocol and speed), the system’s built-in Device Manager, Display Settings, Task Manager, and iperf3 for testing Ethernet ports.
- macOS Users: You can use the system’s built-in System Information, Activity Monitor, and the diskutil command in Terminal. For speed testing, Blackmagic Disk Speed Test and AmorphousDiskMark are commonly used, and iperf3 is also used for Ethernet port testing.
- Cross-Platform General Methods: You can test without software, for example, manually copy large files over 10GB or more than 1000 small files to check speed, use a file verification tool to confirm whether data is corrupted, and use online video conferencing or local 4K video playback to test video stability.
- DisplayLink Product Specifics: If you are testing a DisplayLink docking station, be sure to record the version of DisplayLink Manager or the driver. During testing, also observe CPU usage, mouse latency, and playback limitations of DRM video.
Test Environment Control Requirements
The environment may seem unimportant, but it actually has a great impact on test results, especially for items like heat generation, speed, and Ethernet ports.
- Room Temperature: It is recommended to test in an environment of 20-25°C. Especially for heat testing, the actual room temperature must be recorded — the shell temperature measured at 30°C in summer and 10°C in winter differs greatly and is not referenceable.
- Power Supply: Prioritize plugging directly into a wall outlet, or use a good-quality power strip. Do not share the same outlet with high-power appliances such as air conditioners and electric heaters, otherwise voltage fluctuations may affect the results of power supply tests.
- System Status: Turn off unnecessary background tasks before testing, such as ongoing downloads, background updates, and extra browser tabs. Set the power mode to high performance or best performance, and keep the laptop’s battery sufficiently charged to avoid the computer slowing down due to power saving, which affects test results.
- Network Environment: When testing the Ethernet port, be sure to use iperf3 testing on the local area network, do not use public network speed test websites — your home broadband itself has fluctuations, and the measured results cannot reflect the true level of the docking station’s Ethernet port at all.
- Repeatability: For key items such as speed, power supply, and video stability, test at least 2-3 times, record the average and abnormal values. Do not draw conclusions after only one test, after all, occasional fluctuations are normal.
Product Basic Information Verification and Initial Inspection
When you get the docking station, don’t rush to unpack and test it right away. First do basic verification and appearance inspection. This can not only avoid getting a defective product, but also record the product’s nominal parameters clearly, so there is a basis for later comparison.
- Nominal Parameter Verification: First look at the product detail page or manual, and record information such as the number of ports, port positions, supported protocols, video specifications, PD input/output power, whether there is independent power supply, and supported systems. Compare them one by one during actual testing later.
- Packaging and Accessories Inspection: Check whether the accessories in the box are complete, such as the included connecting cable, power adapter, manual, and warranty card. Some desktop models also come with spare foot pads. If the accessories are incomplete, especially if the original cable or power supply is missing, it may affect the test results.
- Appearance Initial Inspection: Carefully check whether the shell is deformed or scratched, whether the ports are skewed or loose, whether the included cable is damaged, and whether the anti-slip pads on the bottom are firm. If the product you just got has a loose port problem, it will definitely fail the later stability test.
- Firmware and Driver Confirmation: First check whether this docking station requires driver installation and whether there is an available firmware upgrade. For formal reviews, it is recommended to first record the out-of-the-box default firmware/driver version, complete the basic initial test and record initial abnormalities, then upgrade to the latest version and retest according to the manufacturer’s official instructions — after all, most ordinary users will not upgrade the firmware immediately after getting the product. Only testing the performance after upgrade may mask the default out-of-the-box experience, and will also affect the fair comparison of different products. Record the corresponding firmware and driver versions clearly throughout the test for later comparison.
Safety Precautions
Although testing a docking station is not a dangerous thing, some basic safety rules must be followed to protect both the equipment and your own data and personal safety.
- Never use inferior chargers, damaged cables, or power adapters of unknown origin. At best, they will damage the docking station and computer; at worst, there is a risk of fire.
- For storage tests, be sure to use a hard drive with backed-up data. Especially for tests such as abnormal power failure and hot plugging, you must use a blank test drive. If data is corrupted, the loss outweighs the gain.
- Do not perform dangerous tests such as disassembly, short circuit, forced overload, or poking ports with metal objects. Ordinary users do not have professional protection, and can easily damage equipment or even get injured.
- During heat testing, do not touch high-temperature areas for a long time. If the shell temperature exceeds 55°C, be cautious; if it exceeds 60°C, stop long-term full-load testing to avoid burns or equipment damage.
3. Beginner Must-Test Part 1: Appearance and Daily Usage Experience
Many people think appearance is “a metaphysical thing only people who care about looks pay attention to”, but in fact, workmanship, port layout, and detail design directly determine whether it is comfortable to use daily, and may even indirectly affect stability. The appearance initial inspection in Chapter 2 is to check “whether there is a defect and whether it can be used”. This part tests “whether it is easy to use and whether it suits your usage scenario”. You don’t need professional tools; you can draw conclusions by touching and plugging it in. It doesn’t account for a high weight in beginner reviews, but it can help you avoid many pitfalls of “good parameters but frustrating to use”.
Appearance and Workmanship Experience
First look at the shell material and feel: is it metal, plastic, or composite material? Does it have sharp burrs that scratch your hand? Does it get fingerprint smudges easily and collect dust easily? Don’t think “material doesn’t matter” — metal shells usually have better heat dissipation, but feel cold in winter and are prone to fingerprints; plastic shells are light and don’t show fingerprints, but if the heat dissipation design is poor, heat trapped inside can easily cause speed drops. If you leave it on your desk long-term, the heat dissipation advantage of a metal shell is more obvious; if you take it out often, the lightness and scratch resistance of a plastic shell may be more practical.
Then look at assembly quality: Run your finger along the seams of the shell to see if the gaps are uniform, or if one side is wider and the other narrower. Gently press the shell and around the ports with your finger to see if there is any abnormal noise or looseness. Gently shake each port with your hand to see if there is obvious looseness. Uneven seams and abnormal noise when pressed are mostly mold accuracy issues, which do not necessarily affect function, but if the port itself is loose, it will easily break with frequent plugging and unplugging. People who often take it out on business trips should pay special attention to this point.
Then test anti-slip stability: If it is a desktop model, place it on your usual desk, plug in all commonly used cables (video cable, Ethernet cable, power cable), and gently tug the cable to see if the docking station is easily dragged. If it is a vertical model, touch the top with your finger to see if it tips over easily. If a desktop model is too light and has poor anti-slip pads, it will wobble for a long time every time you plug in a USB drive. Over time, uneven stress on the ports can easily cause poor contact problems.
Finally, look at the heat dissipation design: Are there heat dissipation holes on the shell? Are there raised foot pads on the bottom to leave space for air circulation? If it is a metal shell, can the entire shell conduct heat? Some plastic-shell docking stations have their bottom completely flat against the desk and no heat dissipation holes. When fully loaded, heat cannot escape, which can easily cause disk drops and disconnections. If you use it under high load for a long time, pay special attention to this point.
Reasonableness of Port Layout
The number of ports on the parameter sheet is only the “theoretical maximum”. Whether they can all be used in practice depends on whether the layout is reasonable. For this step, you must actually plug in your commonly used devices, don’t just imagine based on pictures.
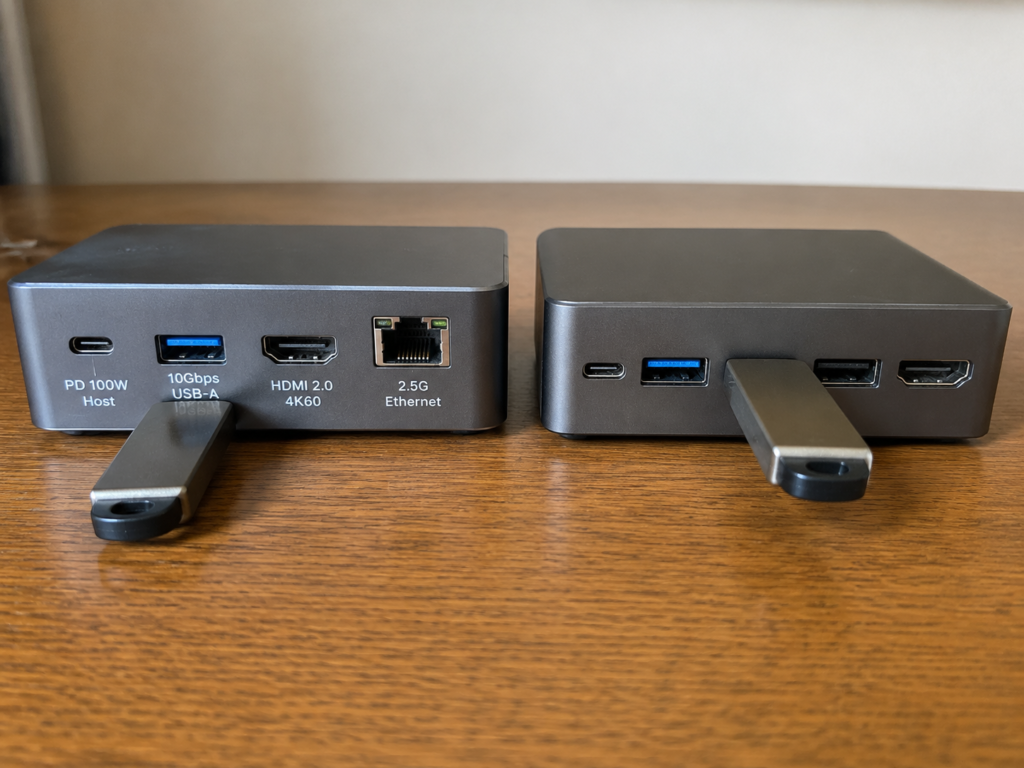
First test port blocking: Take your commonly used large USB drive, thick-headed HDMI/DP cable, and SD card reader, plug them into adjacent ports respectively, and see if they block each other. For example, if two USB ports are too close together, plugging in a large USB drive takes up two positions, so the second port is useless. Also note whether the blocked port is a high-speed or low-speed port — if it’s a USB 2.0 low-speed port that’s blocked, the impact is small; if it’s a 10Gbps high-speed port or card reader that’s blocked, the impact on user experience is big. Record how many groups of ports block each other, what type of ports are blocked, then judge whether it’s acceptable against your own usage habits.
Then look at the reasonableness of port positions: Are the ports for frequently plugged/unplugged devices, such as USB drives, card readers, and headphones, on the front or side of the docking station? So you don’t have to reach behind the desk every time. And are cables that are rarely unplugged, such as power cables, Ethernet cables, and video cables, concentrated on the back for easy cable routing and hiding? For example, if a desktop model puts all ports on the back, you have to lift the docking station every time you plug in a USB drive, which is very troublesome to use; if a portable model puts the video port on the front, it sticks out when the cable is plugged in, which is not convenient to put in a bag.
Then look at port labels: Is there a clear label next to each port? For example, do USB ports have 5Gbps/10Gbps speed labels, do PD ports have labels indicating input or output, which port supports video output, does the Ethernet port have a label for gigabit or 2.5G? Many beginners can’t tell port specifications when buying a docking station. If there are no labels at all, you have to try them one by one every time you use it, and the probability of encountering pitfalls is much higher.
Finally, look at the design of the main connecting cable: If it is an integrated cable, is the length sufficient? Is the cable too stiff, so that it sticks up when plugged into the computer and is easy to loosen? If it is a detachable cable, is it a standard USB-C or Thunderbolt port? Can you replace it with a longer, higher-specification cable yourself? For example, if a portable model’s cable is only 10cm long, the docking station can only hang in mid-air when the computer is on the desk, and is easily knocked off; if a desktop model has a detachable cable, it is more convenient to replace it with a longer Thunderbolt 4 cable later.
Portability and Desktop Adaptability
Docking stations are basically divided into two categories by positioning: “portable business trip models” and “desktop permanent models”. The evaluation criteria for the two are completely different. Don’t use the requirements of a portable model to pick a desktop dock, and don’t complain about portability based on the weight of a desktop dock.
First look at the adaptability of portable models: If it is a docking station focused on portability, first weigh it and measure its size. Can it easily fit into the side pocket of a computer bag or a pocket? Does the included cable have a storage design? Will it stick out and scratch the lining of the bag? People who travel frequently may be particularly sensitive to weight. A docking station over 200g will feel burdensome after carrying it for a long time. If the cable can’t be stored, it is also easy to get tangled with the computer and mouse.
Then look at the adaptability of desktop models: If it is a permanently desktop docking station, see how much desk space it takes up, whether it crowds the space for the keyboard and mouse. Is cable routing convenient, will it be messy after plugging cables into the back ports? Is the included power adapter large, will it occupy two adjacent sockets on the power strip? For example, if the desk space is already small, a large and heavy docking station will look particularly crowded, and if the adapter takes up two sockets, the other ports on the power strip are wasted.
Also test the usability of mobile office scenarios: When not connected to external power and only powered by the computer’s USB-C port, can the core functions still be used? For example, do the functions you commonly use, such as video output, Ethernet port, and card reader, require power to turn on? If you often go to places like coffee shops and meeting rooms where you can’t find an outlet, then a docking station that requires power to use video is completely unsuitable for mobile office scenarios.
Practicality of Detail Design
Many small designs are usually unremarkable, but you only know how much they affect the experience when you actually use them. This part is all “bonus points/deductible points”, no need to test parameters, but it can show whether the product is well-made.
First look at the indicator light: Is the docking station’s indicator light bright? Is it dazzling? Can you tell from the light status (such as color, flashing/steady on) whether it is powered on, connected to the computer, or the Ethernet port is not connected to the network? Some docking stations have particularly bright indicator lights. When used with the lights off at night, they cast a patch of light on the desk, which is very glaring; others only have a power light, so when something goes wrong, you don’t know at all whether it’s no power, no computer connection, or a broken Ethernet port, which is very troublesome to troubleshoot.
Then look at the power switch: Is there an independent power switch? Turn it off directly when not in use, no need to unplug the plug every time. If there is a sudden power failure and then power is restored, can the docking station automatically reconnect to the computer, or do you have to manually plug and unplug the main connecting cable? If a desktop model is plugged into the power strip long-term, having an independent switch is much more convenient. If it can automatically reconnect after a power failure, you can just turn off the main switch of the power strip after work, and it will be ready to use when you turn on the computer the next day, no extra operation needed.
Then look at the anti-theft lock slot: Does it have an anti-theft lock slot? This function may not be useful for personal home use, but if the docking station is placed in a company’s public workstation, meeting room, or open office area, having an anti-theft lock slot allows you to lock it with a computer lock to prevent it from being taken away casually. Enterprise users can pay special attention to this point.
Finally, look at the manual and instructions: Does the manual or product detail page clearly state the compatible systems, limitations of each port, requirements for multi-screen combinations, and driver download address? For example, many beginners don’t know the native multi-screen limitation of M-series Macs. If the manual clearly states “macOS only supports single-screen expansion, dual-screen requires DisplayLink driver installation”, it can avoid many after-sales disputes. If the manual only says “supports multi-screen” and doesn’t mention any limitations, then it’s most likely hiding tricks, and you should pay special attention during the review.
4. Beginner Must-Test Part 2: Core Function Verification (Accounts for approx. 70% of review weight)
This part is the “core job” of the docking station, and also the focus of the review, directly determining whether it can be used and how well it works.
Port Connectivity and Basic Compatibility Test
First confirm that each port works normally, don’t test extreme performance right away:
- Single Port Test One by One: Plug the corresponding device into each USB-A, USB-C, HDMI, DP, Ethernet port, card reader, and audio port to confirm normal recognition — for example, a USB drive can be read when plugged into a USB port, a monitor lights up when plugged into HDMI, and the Ethernet port can access the internet when plugged with a cable.
- Hot Plugging Test: With the computer turned on, plug and unplug the main connecting cable of the docking station, as well as commonly used peripherals (such as USB drives, monitors), 3 times each. Observe whether there is crash, disconnection, slow recognition, and whether a restart is needed to recover.
- Multi-Port Simultaneous Load: Plug in all commonly used devices — monitor, keyboard and mouse, portable SSD, Ethernet cable, PD power supply — use them together for a few minutes to confirm there is no conflict, such as the USB port not working when the Ethernet port is plugged in.
- Recognition Speed: How long does it take for the system to recognize the device after plugging it in? If it obviously exceeds 10 seconds, or repeatedly pops up and reconnects, it should be recorded as abnormal.
- Abnormality Record: Every time a problem occurs, record clearly the occurrence conditions, which port, what peripheral was used, and whether it can be reproduced, so that it is convenient to troubleshoot the cause later.
Video Output Capability Test
This is the item that most people care about, and also the one where it’s easiest to encounter pitfalls. First remember a core principle: Video output capability is jointly determined by the host port, docking station specifications, cable, monitor port, and system settings. If any link fails, the highest specification cannot be achieved.
- Single Screen Test: Verify one by one according to the product’s advertised specifications, such as 1080p 60Hz, 1440p 60Hz, 4K 30Hz, 4K 60Hz, 8K 30Hz, etc. Be sure to confirm the actual resolution and refresh rate in system settings, don’t just look at the monitor lighting up.
- Multi-Screen Test: Record the maximum number of screens that can be connected, and the actual resolution and refresh rate of each. Be sure to distinguish between mirror mode (two screens display the same content) and extended mode (two screens display different content) — many products’ advertised “multi-screen” actually only supports mirroring, which is useless at all.
- Color and Display Functions: Check as needed whether HDR can be turned on, what the color depth is, whether the color format is correct, whether HDCP passes (whether you can watch encrypted videos like Netflix), and whether there is VRR or high refresh rate support.
- Short Stability Test: Play 4K video continuously for 30 minutes, or open a bunch of office windows, and observe whether there is screen flickering, black screen, screen distortion, or disconnection.
- Sleep/Wake: After the computer sleeps and then wakes up, see if the monitor can automatically recover, whether you need to re-plug the cable — this is particularly important for daily use, you can’t have to plug and unplug the docking station every time you wake up the computer.
- Special Note for Mac Users: Many base-model Apple Silicon MacBooks have a limited number of native external displays. The specific number supported depends on the chip model, machine model, system version, and whether the lid is closed — for example, some M3 MacBook Air models can support two external displays under specific system and lid-closed conditions. During the review, be sure to confirm against Apple’s official specifications and current system settings, don’t generalize. DisplayLink docking stations can bypass some native multi-screen limitations, but require driver installation, which brings certain latency and increased CPU usage. Some DRM video services may experience black screens, inability to play, or only downgraded playback. Performance varies across different browsers, apps, and driver versions. It is best to record specific scenarios and retest to confirm during the review. Don’t buy a docking station that only supports MST only to find it doesn’t meet your Mac’s multi-screen needs.
Generally speaking, if the product’s nominal resolution and refresh rate combination can run stably for more than 30 minutes under corresponding conditions, and sleep/wake can recover normally, it is considered qualified.
Data Transfer Speed Test
When testing speed, you must control variables, otherwise the results are not referenceable: use the same host, same cable, and same high-speed SSD uniformly to test each high-speed port separately.
- Large File Test: Copy a single large file over 10GB (such as a movie, compressed package), and record the average write and read speed — this better reflects continuous transfer / sustained transfer performance, and is suitable for observing the average speed during long file copying, speed drop after cache exhaustion, and transfer stability; peak speed can be referenced in combination with short-term continuous read/write results from CrystalDiskMark or Blackmagic.
- Small File Test: Copy more than 1000 small files (such as documents, photos, short videos), and observe the magnitude of speed drop and stuttering — this is closer to the real experience of daily office work, after all, we rarely transfer large files all the time.
- Software Speed Test: Use CrystalDiskMark or Blackmagic Disk Speed Test to record continuous read/write and random read/write speeds, the data is more intuitive.
- Multi-Device Simultaneous Transfer: Connect two high-speed storage devices at the same time to transfer files together, and observe whether the total bandwidth drops significantly — this is the effect of shared bandwidth.
- Card Reader Test: Use high-speed SD/TF cards to test read/write speed, pay attention to distinguishing between UHS-I and UHS-II card slots — don’t plug a UHS-I card into a UHS-II slot and then say the card reader is slow.
Qualified speed reference: The actual continuous speed of a 5Gbps port is commonly 350-450MB/s, and a 10Gbps port is commonly 700-1000MB/s; if it is far lower than the speed when directly connected to the computer under the same conditions, you should suspect that the docking station has a bottleneck.
Special reminder here: The naming of USB 3.x is particularly confusing. For example, “USB 3.2” may be 5Gbps Gen1, or 10Gbps Gen2. Don’t just look at the name, be sure to judge by the actual speed.
PD Power Supply and Reverse Charging Capability Test
This is the hardest hit area with the most marketing tricks, so be sure to distinguish between input and output.
- Power Path Record: First clearly record the rated power of the charger, the input power of the docking station, the output power to the computer, and the power supply capability of downstream USB ports. Don’t confuse them.
- No-Load Reverse Charging: Only connect the computer and power supply, see if the system shows charging. If you have a power meter, record the reading; if not, check the system’s charging estimate.
- Full-Load Reverse Charging: Connect the monitor, SSD, Ethernet port, keyboard and mouse at the same time, then see if charging is interrupted and if the power drops — passive or PD pass-through docking stations commonly reduce the available power to the computer due to their own and downstream devices’ power consumption; desktop docks with independent power supply or fixed host output power may not drop significantly, which shall be subject to the manual’s labeling and measured power.
- High-Load Charging While Using: Let the computer run high-load tasks (such as video editing, running large software), and observe whether there is power loss, charging interruption, or whether the docking station restarts.
- Small Device Power Supply: Test charging low-power devices such as headphones, mobile phones, and small fans to see if it is stable.
- Passive Mode: Without connecting external power, only powered by the computer’s USB-C port, see which functions still work — for example, some docking stations can only use USB data ports without power, and video and Ethernet ports cannot be used.
Qualified reference: For a docking station with 100W input, the common output power to the computer is about 85W, and some products may only have 60-70W; be sure to refer to the “host output power” clearly marked in the manual, not just the advertised “input power”.
Ethernet Port, Audio and Additional Function Test
Although these functions are not core, they are also very important for daily use:
- Gigabit / 2.5G Ethernet Port: Use iperf3 to test throughput on the local area network, record link negotiation rate, Ping latency, and packet loss rate — don’t use public network speed testing, broadband fluctuations will affect the results.
- Long-Term Network Stability: Hold a video conference, transfer files to NAS, or download continuously for 30-60 minutes, and observe whether there is network disconnection and whether reconnection is needed.
- Audio Port: Plug in headphones to listen for background noise, electrical hum, check if left and right channels are correct, and if the microphone can input normally.
- KVM Function: If it has KVM, test the switching speed of keyboard/mouse and display, and whether there is key loss or disconnection.
- Firmware Upgrade: See if there is an official firmware upgrade tool, and whether the upgrade process is clear. Before upgrading, first record the current firmware version, discovered abnormal phenomena, and the peripheral combination used for testing. Operate strictly according to the manufacturer’s tool instructions. Do not power off or plug/unplug the docking station during the upgrade process to avoid equipment damage. After upgrading, retest the original abnormal items to confirm whether the improvement comes from the firmware upgrade, and clearly state the firmware version used for the test in the conclusion — many small problems are indeed fixed by manufacturers through firmware, but the default version that ordinary users get may not have these fixes, so you cannot directly take the post-upgrade performance as the out-of-the-box default experience.
- DisplayLink Specifics: Record the DisplayLink Manager or driver version, observe CPU usage, mouse latency, and sleep/wake performance during normal use; when testing DRM video, record the specific service name, browser or app used, and system version. Performance may vary greatly in different scenarios, and it is recommended to retest 2 times to confirm.
5. Intermediate Improvement: Reliability and Boundary Judgment (Accounts for approx. 30% of review weight)
If you have completed the previous beginner must-test items, and want to further judge whether the docking station can withstand long-term high-intensity use and whether it will fail in complex scenarios, you can do this part of intermediate-level testing. This part focuses on reliability, boundary performance, and compatibility, helping you avoid products that “have basic functions that work, but fail at critical moments”.
5.1 Long-Term Load Stability Test
Many docking stations work fine when first used, but start to disconnect or lose disk connection after being on for a few hours — this is poor long-term stability. For daily office work, creation, or permanent desktop use, the docking station is often on all day, so long-term load testing is necessary.
- Test Method: Simulate the most commonly used load combination in daily life, generally connecting 1-2 monitors at the same time (outputting at the nominal highest specification), portable SSD with continuous or intermittent read/write, PD reverse charging the computer, Ethernet port with continuous data transmission, and common peripherals such as keyboard and mouse, running continuously for 2-4 hours. For office scenarios, you can combine multi-window office work and video conferencing; for creation scenarios, you can combine material transfer and background rendering.
- Observation and Recording: Record the maximum shell temperature, display output status, USB device recognition status, Ethernet port connection status, and power supply status every 30 minutes. Pay special attention to abnormalities such as disconnection, screen flickering, disk drop, network disconnection, automatic restart, device recognition failure, and sudden speed drop. The time and trigger conditions of the abnormality should also be recorded clearly.
- Applicable Conclusion: If there are no obvious abnormalities after 2-4 hours of continuous full load, it means the docking station is competent for long-term office, creation, meeting, and permanent desktop scenarios; if functional abnormalities occur frequently, you need to consider whether it is insufficient heat dissipation design, insufficient power margin, or hardware quality problems.
5.2 Heat, Noise and Temperature Performance Test
The heat generation of the docking station not only affects the feel, but may also cause speed drops, disconnections, and even safety hazards. This part of the test can help you judge whether the product’s heat dissipation design is qualified.
- No-Load Temperature Test: Only connect the computer and power supply, no other peripherals. After 30 minutes of normal operation, measure the maximum temperature of the shell (usually near the ports, at the main control chip position). If you don’t have an infrared thermometer, you can touch the shell with your hand and record whether it is too hot to hold, and whether you can keep touching it for more than 10 seconds.
- Full-Load Temperature Test: Turn on video output, high-speed data transfer, PD charging, and Ethernet port transmission at the same time. After 1 hour of continuous operation, measure the maximum shell temperature again, and observe whether there is speed drop or disconnection caused by high temperature.
- Noise Test: In a quiet indoor environment, listen close to the docking station for electrical hum, coil whine, or fan noise. If there is a fan, also record the fan start/stop temperature, speed level, and noise level.
- Qualified Reference and Boundary: A temperature below 55°C in areas frequently touched by humans is relatively safe. Be cautious if it exceeds 55°C, and it is recommended to stop long-term full-load testing if it exceeds 60°C to avoid burns or equipment damage. Special note here: Docking stations with metal shells may feel hotter than plastic shells due to good thermal conductivity, but this is not necessarily abnormal — as long as the temperature is within the safe range and there are no accompanying functional abnormalities, it’s fine; but if high temperature is accompanied by disk drop, screen flickering, network disconnection, or sudden speed drop, it means there are obvious defects in the heat dissipation design, and points need to be deducted.
5.3 Multi-Port Full Load and Shared Bandwidth Test
The single-port maximum speed on the parameter sheet is often the ideal value when only one port is working. When multiple ports are used at the same time, it will most likely slow down due to shared bandwidth. This part of the test is to help you figure out the actual usage boundary of the docking station.
- Bandwidth Stress Test: While outputting to multiple screens (such as dual 4K60), use a high-speed SSD to copy large files, and observe whether the video stutters or flickers, and whether the storage speed drops significantly. You can also connect a card reader and a second high-speed storage device at the same time to see the total bandwidth allocation.
- Power Stress Test: Connect multiple power-consuming devices at the same time, such as high-speed SSD, mobile phone charging, card reader, external fan, and observe whether any devices experience disk drop, repeated recognition, or insufficient power supply. Passive docking stations are especially prone to problems in this regard.
- Upstream Bottleneck Difference: Ordinary USB-C 5Gbps/10Gbps docking stations have limited upstream bandwidth, so the speed drop when multiple ports are used together is more obvious, which is a normal phenomenon; Thunderbolt/USB4 docking stations theoretically have more sufficient upstream bandwidth and should have better performance, but the specifics still depend on the internal design — some Thunderbolt docks’ downstream ports also share bandwidth in groups, not all ports can run at full speed at the same time.
- Conclusion Writing: Don’t just generally write “multi-port use will slow down”. Be sure to write clearly the specific port combination and the magnitude of the drop, for example, “when HDMI 4K60 + USB-C SSD + SD card reader are used at the same time, the SSD’s continuous read speed drops from 920MB/s to 430MB/s”, then judge whether this speed drop will affect the target scenario — for example, it has no impact if you just transfer documents for office work, but it is not enough for creation scenarios where you often transfer multiple large materials at the same time.
5.4 Anti-Interference and Signal Stability Test
Docking stations have many ports and complex signals. If the shielding design is poor, interference problems are prone to occur, affecting daily usage experience.
- USB 3.x and 2.4GHz Interference Test: When transferring files via high-speed USB 3.x, observe whether the Bluetooth mouse and 2.4G wireless keyboard/mouse have stuttering, drifting, or missing keystrokes. You can place the 2.4G receiver in different positions for comparison, such as directly plugged into the docking station, placed far from the docking station with an extension cable, or plugged into the computer’s native port, to see if the interference level changes.
- Video Signal Interference Troubleshooting: If video flickering or screen distortion occurs during testing, replace with a good-quality, shielded HDMI/DP cable and retest to rule out problems caused by the cable’s own poor shielding. Don’t directly attribute it to the docking station.
- Wireless Device Interference Auxiliary Test: You can place the docking station near the router or wireless mouse receiver for testing, but this can only be used as an auxiliary reference. Don’t attribute all abnormalities to wireless interference; be sure to first rule out other factors such as cables, peripherals, and drivers.
- Typical Interference Phenomena: Mouse drifting, keyboard missing keystrokes, hard disk drop, video flickering, Ethernet port momentary disconnection — these may all be related to interference, but need to be checked one by one through controlled variables to confirm.
5.5 Cross-System and Cross-Device Compatibility Test
The same docking station may perform very differently on different systems and different devices. This part of the test can help you judge how wide its scope of application is.
- Windows System Test: Check whether it works without drivers, whether multi-screen extended mode is normal, whether the Ethernet port requires additional driver installation, whether functions can recover normally after sleep/wake, whether there are abnormal devices with yellow exclamation marks in Device Manager, and whether there have been blue screens or crashes.
- macOS System Test: Record devices with Intel chips and Apple Silicon chips separately. Pay special attention to the native multi-screen limitations of M-series chips, system permission authorization (such as USB device permissions, screen recording permissions), the installation and operation of DisplayLink drivers, as well as the stability of sleep/wake and lid-closed use.
- ChromeOS Test: Only test functions explicitly supported in the product’s advertising. Focus on whether video output, USB device recognition, Ethernet port, and PD power supply are normal. Do not demand functions that the product does not claim.
- iPadOS / Android Test: Similarly, only test functions explicitly supported by the product. Pay attention to whether the display ratio of the external screen is stretched, whether the docking station powers the device or the device reverse-charges the docking station, whether the file system can be recognized normally, and the limitation that some functions (such as DisplayLink multi-screen) cannot be used because drivers cannot be installed.
- Cable Compatibility Test: Test with USB-C cables of different specifications respectively, such as ordinary charging cable, 5Gbps data cable, 10Gbps data cable, Thunderbolt 4 cable, observe the impact on video output, data speed, and power supply, to see if the docking station has a high fault tolerance for cables.
5.6 Simple Durability Test
Docking stations are devices that are frequently plugged and unplugged. If the ports become loose or the cable breaks after a few months of use, no matter how strong the parameters are, they are useless. Ordinary users don’t need to do professional aging tests; doing a few simple durability tests can roughly judge whether the product’s workmanship is reliable.
- Port Plugging Test: Repeatedly plug and unplug the main connection port and the 1-2 most frequently used USB ports 100 times (simulating the force and angle of daily plugging and unplugging). Then observe whether the ports have obvious looseness or poor contact, whether the device is recognized normally after insertion, and whether there is repeated disconnection.
- Cable Bending Test: If it is a docking station with an integrated cable, gently bend it 20 times at the connection position between the cable and the body at a normal angle for daily use. Do not perform destructive operations such as extreme folding or hard bending. After bending, test whether the cable has poor contact or unstable recognition.
- Desktop Stress Test: For desktop docking stations, you can slightly move the body and gently tug the plugged-in cables to observe whether the docking station slides or tips over easily, and whether the ports have obvious stress deformation.
- Test Boundaries: Ordinary users should not do professional destructive tests such as drop, torsion, disassembly, salt spray, extreme temperature and humidity. They are easy to damage the equipment, and there is no professional equipment to quantify the results, so they have little reference value.
5.7 Low-Risk Abnormal Recovery Test
In daily use, it is inevitable to encounter sudden power failure, computer sleep, and plugging/unplugging peripherals. A good docking station should be able to quickly return to normal, instead of requiring repeated plugging and unplugging or even restarting the computer.
- Safety Prerequisite: This part of the test must use a blank test drive. Close all important files before the test to avoid data damage caused by power failure during writing. Do not use a hard drive with important data for testing throughout the process.
- Power Failure Recovery Test: Unplug the docking station’s power supply in a non-writing state, wait 10 seconds, then restore power. Observe whether video, Ethernet port, and USB devices can be automatically re-recognized, and whether the main connecting cable needs to be re-plugged.
- Sleep/Wake Test: Test whether all functions of the docking station can recover normally after the computer sleeps, closes the lid, and wakes up. Whether there is a black screen on the monitor, loss of USB devices, or Ethernet port disconnection, and how long it takes to return to normal.
- Peripheral Plugging/Unplugging Impact Test: After plugging/unplugging the monitor or portable SSD, check whether the functions of other ports are affected. For example, whether the USB port disconnects after unplugging the monitor, or whether the Ethernet port drops after plugging in the hard drive.
- Not Recommended Test Items: Do not perform dangerous tests such as short circuit, forced wrong insertion of ports, or over-specification overload. Do not use valuable hard drives or important data for abnormal tests to avoid irreversible losses.
6. Review Result Organization: How to Score and Compare Fairly
After testing a bunch of data, you need to organize them into meaningful conclusions, not just pile up numbers.
Scene-Based Scoring Weight Reference
Different users have completely different needs for docking stations, so a one-size-fits-all scoring system does not work. You can adjust the weights according to your own scenarios:
| Usage Scenario | Weight Distribution Reference |
|---|---|
| Daily Office Use | 25% display stability, 20% port compatibility, 20% PD charging, 15% overall stability, 10% Ethernet & audio, 10% build & design |
| Creative & Design Work | 25% data transfer speed, 25% video output, 20% long-term stability, 15% PD charging, 10% card reader, 5% build & design |
| Business Travel & Commute | 25% portability, 25% core functionality, 20% stability, 15% power delivery, 10% heat performance, 5% build & design |
| Home Desktop Setup | 25% port variety, 20% stability, 20% power delivery, 15% extra features, 10% heat performance, 10% build & design |
| Professional Multi-Screen Work | 35% video capability, 20% system compatibility, 20% stability, 15% power delivery, 10% data transfer speed |
Qualified, Good, and Excellent Grading Standards
There is no need for a complicated 100-point system; grading based on real-world performance is sufficient:
- Qualified: All core ports function properly, advertised key features work as described under specified conditions, and there are no frequent disconnections, unexpected drive drops, or overheating issues.
- Good: Core functions run stably; transfer speed and power delivery are close to the average level of similar products; simultaneous multi-port use causes no noticeable degradation in user experience.
- Excellent: Video output, data transfer, power delivery, Ethernet, sleep/wake recovery, and long-term full-load performance are all reliable; usage limitations are clearly stated in the manual; and cross-device compatibility is robust.
- Not Recommended: Presents issues such as frequent drive disconnection (risk of data corruption), intermittent video blackouts, repeated PD charging interruptions, abnormal overheating, false protocol claims, or driver/firmware problems that severely disrupt basic functionality.
Hard Rejection (One-Vote Veto) Criteria
If any of the following issues is confirmed, the product is directly not recommended regardless of other advantages:
- High rate of storage drive disconnection that may cause data loss or corruption;
- Repeated PD charging interruptions or abnormal computer restarts caused by the docking station;
- Excessively high 外壳 temperature accompanied by functional failures or obvious safety hazards;
- Advertised core capabilities (such as Thunderbolt, USB4, or 4K 60Hz output) cannot be achieved in testing with fully compliant host and peripherals;
- Severe driver or firmware compatibility issues that impair basic daily use.
Fair Comparison Rules
Docking stations must be compared within the same category, otherwise the comparison is meaningless:
- Same price range: The price difference between compared products should ideally not exceed 20%–30%; if it does, the price segment difference must be clearly stated.
- Same protocol category: Compare standard USB-C docks with USB-C docks, USB4 docks with USB4 docks, Thunderbolt docks with Thunderbolt docks, and treat DisplayLink products as a separate category.
- Identical test conditions: Results are only comparable when tested with the same host, cables, peripherals, monitor, system version, and room temperature.
- Same usage scenario: Do not evaluate portable travel models against the standards of professional desktop docks, nor judge multi-screen workstation docks by the criteria of lightweight hubs.
- Same nominal conditions: If a feature requires an external power supply, specified cables, or driver installation per the product specification, conclusions must be drawn only after testing under those required conditions.
Common Sources of Test Error
Unexpected test results are not always the fault of the docking station. Rule out these factors first:
- Host limitations: The computer’s port does not support the corresponding protocol, or its native video output capability is insufficient;
- Cable limitations: The cable only supports charging and cannot carry high-speed data or video signals;
- Peripheral limitations: The SSD, USB drive, SD card, monitor, or Ethernet cable itself does not meet the required specification;
- System limitations: Drivers, permission settings, sleep policies, power management, or native multi-screen restrictions (e.g. on macOS);
- Environmental influences: High ambient temperature, background tasks, network fluctuations, or unstable mains power;
- Operational errors: No repeated tests, only looking at peak speed values, or failing to record the conditions when abnormalities occur.
7. Pitfall Avoidance Guide: Common Tricks in Specifications and Marketing
Common Traps in Specification Sheets
- Advertises “4K support” without specifying the refresh rate — the actual output may only be 4K 30Hz.
- Promotes “8K capability” without disclosing that it requires DP 1.4, DSC, a specific host model, or single-display operation.
- Vaguely labels USB 3.2 Gen1 as “USB 3.2”, misleading users into assuming 10Gbps or 20Gbps bandwidth.
- Claims a 100W power rating without distinguishing between 100W input power and the actual output power delivered to the host computer.
- Markets multi-display support without clarifying mirror vs. extended mode, Windows/macOS compatibility differences, or MST/DisplayLink functional limitations.
- Lists a 2.5G Ethernet port without noting whether driver installation is required or whether the port can reliably negotiate a stable 2.5Gbps link.
- Conceals shared bandwidth design: only publishes the maximum single-port speed, with no mention of performance degradation when multiple ports operate simultaneously.
How to Identify Common Marketing Gimmicks
- Misleading total port count: low-speed USB 2.0 ports, charging-only ports, and memory card slots are all counted toward the total number of “expansion ports”.
- Peak-specification misdirection: only showcases the full performance of a single port under ideal conditions, without explaining the limits of concurrent multi-port use.
- Vague compatibility claims: states “Mac compatible” without calling out the native multi-display limitations of Apple Silicon chips.
- Distracting with niche features: emphasizes eye-catching selling points such as 8K output, RGB lighting, or 2.5G Ethernet, while downplaying core concerns like power delivery reliability, video stability, and thermal performance.
- Thunderbolt compatibility confusion: “works with Thunderbolt computers” is not equivalent to “Thunderbolt-native docking station”. Compatibility does not mean the dock itself operates on the Thunderbolt protocol.
Common Mistakes to Avoid During Testing
- Only testing single-port performance, without evaluating simultaneous multi-port operation.
- Focusing solely on peak transfer speed, while ignoring sustained transfer performance and small-file transfer efficiency.
- Failing to verify the host port’s protocol, and testing a standard USB-C port as if it were a Thunderbolt port.
- Failing to confirm cable specifications, and using a charging-only cable to test high-speed data transfer or 4K 60Hz video output.
- Only verifying that the display powers on, without checking actual refresh rate, sleep/wake recovery, and long-term output stability.
- Judging Ethernet port performance via public internet speed tests, which are heavily affected by broadband fluctuations and remote server conditions.
Common Abnormalities and Troubleshooting Workflow
- 4K output limited to 30Hz: Check sequentially — host port video capability, docking station video specifications, HDMI/DP cable version, monitor interface version, and system refresh rate settings.
- Dual displays only work in mirror mode: Verify whether it is caused by macOS MST limitations, native external display caps on M-series Macs, or the dock’s MST-only architecture.
- Unexpected storage drive disconnection: Rule out insufficient power supply, loose cable connections, poor port contact, overheating under full load, and storage enclosure compatibility issues.
- Intermittent Ethernet disconnection: Inspect the Ethernet cable, switch/router status, driver installation, EEE energy-saving settings, and system sleep/wake configuration.
- Slower-than-expected charging: Check the charger’s rated power, cable E-Marker chip support, the docking station’s host output power rating, and the computer’s power management strategy under high load.
- Bluetooth mouse stuttering or lagging: Investigate USB 3.x high-speed transfer interference, receiver placement, the benefit of an extension cable, and the docking station’s internal shielding design.
- Black screen after system sleep/wake: Review system power settings, monitor input source selection, docking station firmware version, and whether re-plugging the main connecting cable is required to restore video output.
8. Reusable Tools and Method Summary
This section condenses all the previous content into actionable, ready-to-use checklists to help you get started quickly.
10-Minute Quick Inspection Checklist
If you want to quickly verify a new docking station out of the box without running a full test, just check these items:
- Port connectivity: Plug the corresponding device into each port one by one to confirm normal system recognition;
- Video output: Connect your primary monitor and verify the actual resolution and refresh rate in system settings;
- Data speed: Test one core high-speed USB port with a fast SSD to confirm the speed is not significantly below the typical level for its specification;
- PD charging: Plug in the PD power adapter to confirm the computer charges steadily, with no interruption when other ports are under load;
- Multi-port simultaneous use: Run the monitor, SSD, keyboard/mouse, Ethernet, and power delivery together for 5–10 minutes.
If all items above pass, the docking station can be considered qualified for basic daily use. Any abnormality in core functions requires retesting with detailed condition records.
Complete Review Step-by-Step Order
Follow this sequence to test systematically without missing key items:
- Step 1: Record the product’s nominal specifications, host device details, system version, test cables, peripherals, and environmental conditions;
- Step 2: Inspect appearance, port layout, user manual, and included accessories;
- Step 3: Test core functions: connectivity, video output, data transfer, PD charging, Ethernet, audio, and additional features;
- Step 4: Test reliability: long-term load stability, heat performance, shared bandwidth behavior, anti-interference, sleep/wake recovery, and cross-system compatibility;
- Step 5: Document all abnormalities, retest key issues, draw final conclusions, and provide recommendations for applicable usage scenarios.
- Step 6: Score by Target Scenarios and Summarize Suitable User Groups, Unsuitable Groups, and Pre-Purchase Verification Items
Article Conclusion Writing Template
- One-sentence verdict: State clearly who this docking station is suitable for and who it is not recommended for.
- Key strengths: Only include advantages verified by actual testing, such as stable 4K 60Hz output, sufficient PD reverse charging, and reliable Ethernet connectivity.
- Key limitations: Specify the exact triggering conditions, for example: speed drop during dual SSD simultaneous transfer, limited dual-display support on macOS, relatively high outer shell temperature under full load.
- Pre-purchase verification: Confirm whether the host supports Thunderbolt/USB4/DP Alt Mode, whether the cables meet the required specifications, and whether multi-display expansion is required.
- Scoring verdict: Assign scores based on specific usage scenarios, and do not mix portable hubs with desktop Thunderbolt docks in the same comparison.