
Whether you use a Windows laptop for work, a MacBook for video editing, or an iPad with an external monitor for streaming shows, if you’ve ever used a USB-C docking station, you’ve most likely encountered this frustrating moment: all cables are plugged in, but the monitor stays black, or the system can’t find the second display at all, and you fumble around for half an hour with no clue what’s wrong. What’s even more confusing is that sometimes the docking station’s USB ports and Ethernet port work fine—you can read a USB flash drive and connect to the internet—but the HDMI port just has no response.
In fact, although these problems seem complicated, they essentially boil down to a broken link somewhere in the video chain. As long as you follow the right direction, most problems can be solved without replacing hardware, and you don’t need to understand complex technical principles.
First, Match Your Symptom: What Type of “Detection Failure” Are You Experiencing?
Before you start troubleshooting, take 30 seconds to match your symptom and see which category your problem falls into—different faults have completely different troubleshooting directions, which can save you a lot of detours.
5 Typical Scenarios Covered in This Article
The first is the most confusing: The system cannot detect the external display at all. There is no option for a second display in Windows or macOS display settings, but the docking station’s USB, Ethernet, and card reader may all work normally, as if the HDMI port doesn’t exist.
The second is Detected but black screen/no signal: The monitor model is visible in the system, and there is a record in Device Manager, but the screen is black, prompting “No signal” or “Check signal cable”.
The third is Intermittent detection: It may work after plugging and unplugging, suddenly disappears after waking from sleep, or drops out when many peripherals are connected and the load is high, working on and off.
The fourth is Only works at low specifications: 1080P is fine, but the screen goes black when 4K, high refresh rate, or HDR is turned on, or it can only be used at very low specifications.
The fifth is Only fails with specific combinations: It works when you change the computer, monitor, or docking station, and only fails when a specific set of devices is used together.
These Issues Are Not the Focus of This Article
If you are experiencing screen flickering, garbled display, snow spots, or image quality calibration issues where the resolution/refresh rate does not meet the advertised specs after stable display, this article will not focus on these; however, for specification boundary issues that affect HDMI detection, such as “1080P works, but 4K/high refresh rate/HDR does not work or directly prompts no signal”, these will be explained in detail in the corresponding sections. If there is only sound but no image, or only charging but no data transmission, troubleshooting directions will also be prompted in relevant sections, and will not be expanded separately.
Why Classify Symptoms First?
The reason we first clarify the fault type is that the root causes of different faults are completely different: for example, if it is completely undetectable, it is most likely that the computer’s USB-C port has no video capability, the docking station type is wrong, the driver is not installed, or the uplink cable is faulty; if it is detected but has no signal, it is more likely that the monitor input source is not selected correctly, the HDMI cable is broken, or the resolution and refresh rate exceed the specifications; if it drops out intermittently, priority should be given to checking power supply, power management, cable contact, or firmware. Finding the right direction first means you don’t have to reinstall the system right away or waste money buying a new docking station directly.
Beginner’s Must-Know: Why Plugging In Doesn’t Guarantee It Works
Many people think “since it’s a USB-C port, it will work if you plug it in”—this is the biggest misconception. To understand where the problem lies, you first need to know: the video signal from the computer to the monitor is a complete chain, and if any link in the middle breaks, the picture will not appear.
5 Core Nodes of the Video Link
You can think of the video signal as a transmission route from the computer to the monitor, with 5 core nodes in the middle. Any one of them getting stuck will cause the picture to fail to output:
The first is the computer’s USB-C port: it is the starting point of the signal and must have video output capability, otherwise it cannot send video signals.
The second is the USB-C uplink cable: the transmission channel connecting the computer and the docking station, which must support the corresponding video or data transmission specifications, and cannot only support charging.
The third is the docking station’s video chip: responsible for converting the signal transmitted via USB-C into a format recognizable by the HDMI interface; without this chip, video conversion is not possible.
The fourth is the HDMI cable: the transmission line connecting the docking station and the monitor, whose bandwidth needs to match the target resolution, refresh rate, and color format.
The fifth is the monitor’s HDMI input port: it is the end point of the signal, the correct input source must be selected, and the port itself must support display parameters of the corresponding specifications.
USB-C Is Just a Form Factor, Not a Function
It should be clarified here: USB-C is only the physical shape of the interface, and does not represent a fixed function—even for USB-C ports, some only support charging, some can transmit data, some can output video, and some support high-speed Thunderbolt/USB4 protocols. The normal operation of the docking station’s USB and Ethernet ports does not mean that the HDMI module will definitely work, because the video link is a separate set of capabilities.
3 Common Solutions for Docking Station HDMI Output
Currently, there are three main technical solutions for USB-C docking stations to output HDMI, with very large differences. If you buy or use the wrong one, faults are very likely to occur:
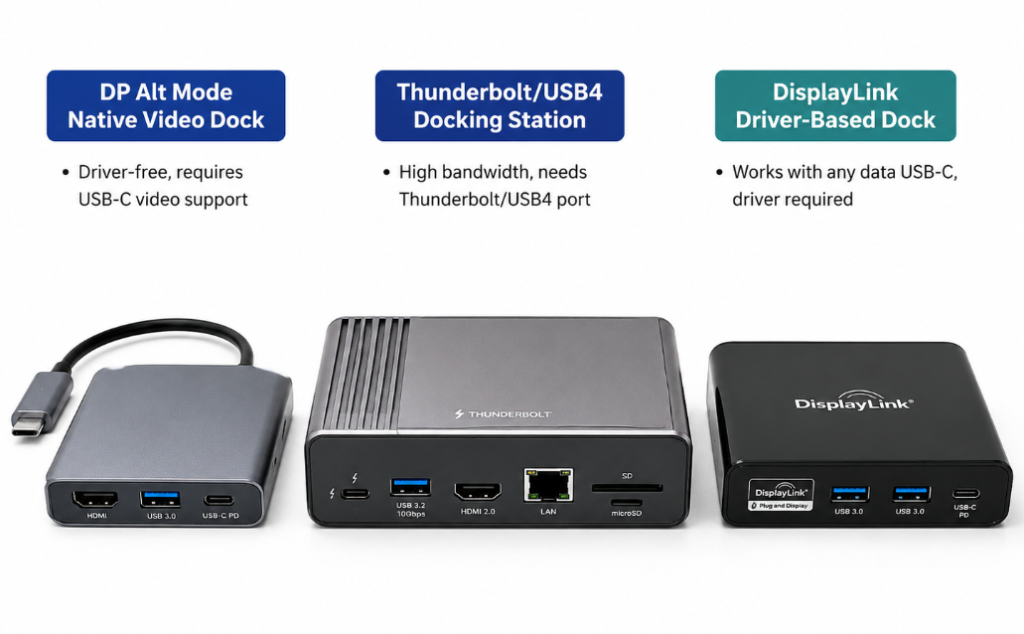
The first is DP Alt Mode native video docking stations. You can think of it as “directly borrowing the lane”: the computer’s graphics card directly transmits DisplayPort video signals through the spare pins of the USB-C port, and the chip in the docking station only needs to convert the DP signal to HDMI. The advantage of this solution is that it almost never requires driver installation, has low latency, and stable picture; but the premise is that your computer’s USB-C port must support DP Alt Mode (that is, video output function), otherwise it cannot transmit video signals at all.
The second is Thunderbolt/USB4 docking stations. This is equivalent to a “high-speed dedicated line”, with much larger bandwidth than ordinary USB-C, capable of transmitting data, video, and charging at the same time, commonly found in high-end laptops and professional docking stations. But note: not all Thunderbolt docking stations can output HDMI when plugged into an ordinary USB-C port; it depends on whether the docking station has compatibility with ordinary DP Alt Mode. Otherwise, when plugged into an ordinary USB-C port, only data functions may be available, and video cannot be used.
The third is DisplayLink driver-based docking stations. This is equivalent to “compressed transmission”: it does not rely on the computer’s native video output, but compresses the picture into ordinary USB data, transmits it to the docking station via USB-C, and then the DisplayLink chip in the docking station decompresses it into an HDMI signal for output. The advantage is that it can be used as long as the computer has a USB-C port that can transmit data, even if the port does not support video; but the disadvantage is that official drivers must be installed, macOS also requires screen recording permission to be enabled, and because it is compressed transmission, there may be latency or black screen when playing games, watching high-frame-rate videos, or playing copyright-protected content. For managed devices in companies, schools, and other institutions, if installation of third-party drivers is prohibited, screen recording permissions are restricted, or external display policies are limited, this solution may not be usable even if the hardware supports it.
Key Conditions That Must Be Met Simultaneously
For the docking station’s HDMI to work normally, these conditions must be met simultaneously: on the computer side, either the USB-C port supports video, or a DisplayLink docking station is used with the driver installed; the docking station itself actually has HDMI video output function, not a pure data dock with only USB and Ethernet ports; both the USB-C uplink cable and HDMI cable meet the specifications; the correct input source is selected on the monitor; and the system’s display mode, permissions, and drivers are all working properly.
4 Most Common Misconceptions
Many people fall into pitfalls because of several taken-for-granted wrong perceptions:
- Misconception 1: If USB-C can charge, it must be able to connect to a monitor. Wrong—charging, data, and video are three independent sets of capabilities. Being able to charge does not mean it can transmit video. Many phone charging cables and computer charging USB-C ports do not support video output.
- Misconception 2: If the docking station’s USB port works normally, HDMI should have no problems. Wrong—USB data and video output use different chips and different protocols. Normal USB only means the data path is good; the video path may be completely disconnected.
- Misconception 3: Advertised “4K” equals 4K 60Hz. Wrong—many low-cost docking stations advertise 4K, but it is actually 4K 30Hz. Even when connecting multiple displays, the specification of a single port will be further reduced. You must check the refresh rate clearly when buying.
- Misconception 4: Thunderbolt docking stations work with any USB-C port. Wrong—Thunderbolt docking stations can only output video when plugged into a port that supports Thunderbolt/USB4, or an ordinary USB-C port that supports DP Alt Mode (and the docking station is compatible). When plugged into a port that can only charge or transmit data, it is normal for the video function to not work.
5-Minute Quick Fix: Start with the Lowest-Cost Troubleshooting
If you just encountered the problem, don’t rush to check drivers or replace hardware. Spend 5 minutes doing these steps, and many contact, input source, power supply, and display mode problems can be ruled out at this stage.
1-Minute Check to Rule Out Operation Errors
First do the simplest check: unplug all interfaces (USB-C, HDMI, power cable) and plug them back in fully. Especially if the computer or docking station has a thick protective case, it is easy for the plug to not be fully inserted, resulting in no signal. Then manually press the button on the monitor to switch to the corresponding HDMI input source—for example, if you plugged into HDMI 1, switch to HDMI 1. Don’t rely entirely on automatic detection; the automatic detection of many old monitors is often unstable.
If you lightly touch the cable and the screen goes black or re-detects, it is most likely a contact problem—either the cable is broken, or the interface is loose. If your docking station has a removable uplink cable, first try replacing it with a full-featured USB-C cable that you are sure can transmit video. Many people grab a random phone charging cable to use, so of course there’s no video output.
Adjust Connection Order and Restart the Link
Many times detection fails because the device connection order is wrong, causing signal negotiation to get stuck. You can first reconnect in the normal recommended order:
- First connect the PD power supply to the docking station to ensure sufficient power;
- Use an HDMI cable to connect the docking station and the monitor (keep the monitor off/in sleep mode);
- Plug the docking station into the computer’s USB-C port;
- Finally turn on or wake up the monitor, and manually switch to the corresponding HDMI input source.
After the connection is complete, press Win+P on Windows to switch to “Duplicate” or “Extend” mode; on macOS, go to「System Settings > Displays」, hold down the Option key, and click “Detect Displays”.
If it still doesn’t detect in the above order, perform a reset operation: unplug the monitor’s power cable, wait 10-30 seconds, then plug it back in (this is equivalent to resetting the monitor’s EDID “identity information” and clearing the stuck detection state). At the same time, restart the computer to avoid abnormal driver status caused by sleep or hot swapping, then reconnect in the normal recommended order.
Rule Out Power Supply and Peripheral Interference
The HDMI module of a docking station is relatively power-hungry. If you connect a bunch of peripherals (such as external hard drives, USB flash drives, Ethernet cables, card readers) and don’t connect an external power supply to the docking station, it is very likely that the HDMI cannot be powered due to insufficient power supply, resulting in detection failure or dropouts.
You can first unplug all other peripherals from the docking station, leaving only HDMI and the power supply (if there is one), to see if it lights up. For multi-port, dual-display docking stations, those connected to high-speed peripherals like external hard drives, or those that also power the computer, it is more recommended to connect an original or sufficiently powerful PD power supply; single-port USB-C to HDMI small adapters can usually be powered by the computer. When power supply is insufficient, HDMI is more prone to not lighting up, dropping out, or failing to recover after sleep.
Lower Display Specifications to Test for Display
If it still doesn’t work, first lower the target to the minimum, and try to see if 1080P 60Hz works—turn off all high-bandwidth features such as HDR, high refresh rate, 10-bit color depth, and variable refresh rate.
If 1080P works, it means the hardware is not broken, just a specification mismatch or insufficient bandwidth. Don’t rush to replace things; we will talk about how to troubleshoot specification issues later. If 1080P also doesn’t light up at all, continue with systematic link troubleshooting below.
Systematic Troubleshooting Along the Link: Find the Root Cause from Easiest to Hardest
If you’ve tried all the quick fixes and it still doesn’t work, then we’ll go through the 5 video link nodes mentioned earlier, troubleshooting one by one from easiest to hardest, to find the real problem.
Computer Side: Confirm If the USB-C Port Supports Video Output
The first thing to check is whether your computer’s USB-C port actually supports video output—if it doesn’t support it at all, then using an ordinary DP Alt Mode docking station will definitely not produce a picture.
How to confirm? The most intuitive way is to look at the markings next to the interface: if there is a DisplayPort logo, a lightning-shaped Thunderbolt logo, or a USB4 logo, it most likely supports video output. But note that this is only a reference, not 100% accurate; the final say is always the official website specifications.
The most reliable method is to check official specifications: you can search for your computer model plus keywords like “USB-C video output”, “DP Alt Mode”, “Thunderbolt”, “external display support”, and check the technical specifications page on the brand’s official website, which will clearly state what functions each USB-C port supports.
The most accurate method is to verify with a known working device: for example, find a confirmed working USB-C monitor, or a reliable USB-C to HDMI adapter, plug it into your computer and test. If it lights up, it means your USB-C port supports video; if not, then the port doesn’t support it, or there is a driver problem.
Here are a few common pitfalls to note: not all USB-C ports on the same computer may support video. Some computers only support video on the USB-C port closest to the charging port, and the others can only charge or transmit data; many front USB-C ports on desktop computers, or ordinary USB-C ports additionally expanded on the motherboard, only have data functions and no video output connected to the graphics card, so video docking stations cannot be used; also, on some gaming laptops or business laptops, the USB-C video output runs through the integrated GPU. If you disable the integrated GPU in Device Manager, turn off the Type-C DisplayPort function in the BIOS, or the integrated GPU driver is broken, it will cause HDMI to fail to produce a picture.
Special Restrictions for Mac and Mobile Devices
If you use a Mac, iPad, or Android device, there are some special restrictions different from Windows:
- External display limit for Apple Silicon Macs: Many base-model Apple Silicon MacBooks have a limited number of native external displays, commonly 1. However, this varies by chip generation, model (Air/Pro/mini, etc.), system version, and whether it is used with the lid closed. The specifics must be based on Apple’s official technical specifications for the corresponding model. If you need to connect more displays than the native limit, you can use the DisplayLink solution as a workaround.
- macOS restrictions on MST multi-display: Simply put, MST is a technology that “splits one video interface into multiple lanes to output multiple independent pictures at the same time”, and many Windows dual-display docking stations use this solution. But macOS does not support independent multi-display expansion via ordinary MST. When this type of docking station is plugged into a Mac, it may only support mirrored display, or only light up one screen. This is a system limitation, not a broken docking station.
- Restrictions for iPad/Android devices: Not all iPads or Android phones/tablets with a USB-C port can cast screens. The device itself needs to support DisplayPort Alt Mode, desktop mode, or corresponding video output capabilities. Some devices only support mirrored display or have limited resolution. For specifics, check the official specifications of the corresponding model.
Docking Station Side: Type, Specifications, Firmware, and Hardware Status
After confirming that the computer is fine, next check the docking station itself:
First, confirm that what you bought is actually a “video docking station”. Many low-cost docking stations only have USB ports, Ethernet ports, and card readers, with no HDMI video conversion chip at all—they are pure data docks, so of course they can’t produce HDMI pictures. Don’t just look at the words “USB-C docking station” when buying; check clearly whether it has HDMI output function.
Then, confirm the core parameters of the docking station: you can check the product detail page or official website to verify. In addition to the video solution (DP Alt Mode/Thunderbolt/USB4/DisplayLink), also check the HDMI version (2.0/2.1), maximum resolution and refresh rate for single/dual displays (e.g., 4K60/4K30), whether it supports MST multi-stream transport, DSC display compression, as well as whether driver installation is required and whether firmware updates are provided. If it is a DisplayLink docking station, install the driver and enable the corresponding permissions as required earlier in this article.
Next, check for firmware updates: many times after a system update, or when changing to a new computer or new monitor, the docking station’s old firmware will be incompatible, leading to detection failure. Prioritize downloading the stable version of the firmware for the corresponding model from the brand’s official website; be sure to confirm the model matches before updating, and for managed enterprise devices, please contact the administrator first to confirm permissions. Only consider rolling back firmware if the manufacturer explicitly provides a downgrade tool or officially recommends an older version; otherwise, do not flash mismatched firmware on your own to avoid damaging the device.
How to judge if the docking station’s HDMI hardware is broken? If you connect the docking station to multiple computers that are confirmed to support USB-C video output, and all other interfaces (USB, Ethernet) work normally, only HDMI has no response at all, and you have ruled out problems with the cable and monitor, then it is most likely that the docking station’s HDMI chip or interface is broken.
Specification Mismatch: Don’t Just Look at the HDMI Version
The problem many people encounter is not broken hardware, but specification mismatch—you think it can do 4K 60Hz, but in reality, if any link in the entire chain can’t meet that spec, it won’t light up. A special reminder here: HDMI 2.0/2.1 is only a reference clue for interface capability, and does not mean the entire device implements all the bandwidth and functions of that version. The final achievable specification is jointly determined by the bandwidth of the computer’s USB-C port, the docking station’s video chip, the number of DP Alt Mode lanes, whether it supports DSC display compression (a technology that can transmit higher resolution and refresh rate under the same bandwidth with almost no image quality loss), the specification of the HDMI cable, the specification of the monitor’s HDMI port, and even whether the corresponding HDMI enhanced/high-speed mode is enabled in the monitor menu.
For example, being able to do 4K 60Hz with a single display does not mean it can still do 4K 60Hz when connecting dual displays, because bandwidth is shared during multi-display output. Many docking stations drop to 4K 30Hz or 1080P when connecting dual displays. Also, many low-cost docking stations advertise “4K” but actually only support 4K 30Hz. If you force 4K 60Hz, it definitely won’t light up. If you need high refresh rates, such as 2K 144Hz or 4K 120Hz, you should even more check the explicit specifications of the docking station, and don’t buy it just because it has an HDMI port.
USB-C Uplink Cable: A Common Blind Spot for Docking Stations with Removable Cables
If your docking station has a removable uplink cable, you must check this step—many people fail here:
Never use an ordinary phone charging cable as the docking station’s uplink cable—many phone charging cables only support charging and USB 2.0 data, and do not support video or high-speed data at all. When plugged in, they can only charge, so of course HDMI cannot be detected.
Prioritize using the original uplink cable of the docking station. If the original cable is lost, buy a cable clearly marked “full-featured USB-C cable”, “USB4 cable”, or “Thunderbolt 3/4 cable”—these support video transmission. In addition, cables that are too long, of poor quality, or have severely worn interfaces can also cause unstable signals, resulting in intermittent detection or failure to light up in high-specification modes.
HDMI Cable and Monitor Side: The Most Easily Overlooked Minor Issues
Next, check the monitor and HDMI cable, which are most easily overlooked:
First, try replacing it with a shorter HDMI cable that you are sure is good—long, old, or low-quality cables are prone to signal attenuation leading to failure in high-bandwidth modes like 4K, high refresh rate, and HDR. 1080P may be fine, but high specifications won’t work.
Then manually select the monitor’s input source, and try a different HDMI port on the monitor—many monitors don’t have all HDMI ports supporting high specifications. For example, some monitors only support 4K 60Hz on the HDMI 1 port, and only 4K 30Hz on the HDMI 2 port. Plugging into the wrong one will prevent it from lighting up.
You can also use other devices with HDMI output, such as a TV box, game console, or laptop with HDMI, to directly connect to the monitor and confirm that the monitor and HDMI cable themselves are good—if it doesn’t light up when connected to other devices, then it’s a problem with the monitor or HDMI cable, not the docking station.
Another situation is EDID read failure: that is, the system cannot read the monitor’s “identity information”, so it may not detect the monitor, or give a strange resolution. At this time, powering off and restarting the monitor, changing the cable, or changing the HDMI port can usually solve the problem.
If the screen only goes black when playing copyright-protected content like Netflix, Disney+, or Blu-ray, and the desktop display is normal, then it is most likely an HDCP copyright protection incompatibility, not broken hardware.
If there is an HDMI switch, capture card, or multiple layers of adapters in the link (such as USB-C to DP then to HDMI), first bypass these devices and test with a direct connection. The longer the link, the higher the probability of negotiation failure.
System and Driver Side: Device Is Powered On but No Image
If there are no hardware problems, then it may be a system or driver issue:
Windows users first go to “Settings > System > Display”, scroll down to find the “Detect” button, click it to let the system re-find the monitor, and then confirm that the display mode is not “PC screen only”. Then right-click the Start menu, open “Device Manager”, and check if there are any devices with yellow exclamation marks under “Display adapters”, “Universal Serial Bus controllers”, or “Thunderbolt controllers”. If there are, update the corresponding drivers—prioritize downloading stable official drivers matching the specific model from the official websites of the computer, graphics card, and docking station brands; for managed enterprise devices, please confirm installation permissions first. If HDMI is not recognized after waking from sleep, you can go to “Power Options” and turn off “USB selective suspend setting”, then go to Device Manager, find the corresponding USB controller and graphics card, right-click Properties, and uncheck “Allow the computer to turn off this device to save power” under “Power Management”. In addition, only some Windows computers, devices with Thunderbolt security level enabled, or when connecting a new Thunderbolt docking station for the first time, need to approve authorization in「Thunderbolt Control Center」or the manufacturer’s security pop-up; for ordinary DP Alt Mode adapters or already authorized devices, there is no need to prioritize troubleshooting this item.
Mac users should prioritize updating to the stable official system pushed by Apple; if compatibility issues occur after updating, first check the official compatibility announcements of the docking station or DisplayLink, and update the corresponding drivers/firmware. If you really need to roll back the system, be sure to back up all data first, and operate strictly in accordance with Apple’s official support documentation. It is not recommended for ordinary beginner users to downgrade on their own.
Users with DisplayLink docking stations, go to「System Settings > Privacy & Security > Screen Recording」, check to allow DisplayLink Manager. After setting, you can quit and reopen DisplayLink Manager, or restart the computer for it to take effect.
If you use a company or school computer, first test the docking station with a personal computer to see if it works, then contact the IT administrator to confirm policy restrictions.
Quick Troubleshooting for Typical Scenarios: Narrow Down the Scope Directly by Symptom
If you don’t want to troubleshoot step by step, you can directly narrow down the scope according to the following common scenarios:
- Docking station USB/Ethernet ports work normally, only HDMI doesn’t light up: Prioritize checking the video-specific link. ① Confirm that the computer’s USB-C port supports video output; ② Check if the docking station is a pure data dock; for DisplayLink models, check according to the driver and permission requirements earlier in this article; ③ For models with removable cables, confirm that the uplink cable is a full-featured USB-C cable.
- System can detect the monitor, but prompts no signal: Prioritize checking the end of the link. ① Confirm that the monitor input source is selected correctly and the HDMI cable is normal; ② Lower to 1080P 60Hz, turn off HDR to test, to rule out specification overlimit; ③ Power off and restart the monitor to rule out stuck EDID negotiation. If the screen is only black when playing copyrighted content, troubleshoot as an HDCP compatibility issue.
- 1080P works, 4K/high refresh rate/HDR doesn’t work: Mostly a specification or bandwidth issue, not hardware damage. ① Verify whether the docking station’s explicit specifications support the target specification; ② Check whether the HDMI cable and the corresponding HDMI port on the monitor meet the standard; ③ Confirm whether simultaneous use of multiple displays causes bandwidth sharing and speed reduction.
- HDMI not recognized after waking from sleep: Prioritize checking power supply and power management. ① Confirm that the docking station has sufficient power supply and is not connected to too many power-hungry peripherals; ② Windows users check USB selective suspend and device power management settings; ③ Update the matching model’s graphics card, USB/Thunderbolt drivers, and docking station firmware.
- Same docking station works on Windows but not on Mac: Prioritize checking system restrictions and solution compatibility. ① Confirm whether it is an MST multi-display docking station (macOS does not support ordinary MST independent multi-display); ② For DisplayLink models, check drivers and screen recording permissions as earlier in this article; ③ Confirm that the number of external displays does not exceed the native support limit of Apple Silicon models.
- Works when connected to a TV, but not when connected to a monitor (or vice versa): Mostly a display device compatibility issue. ① Verify input source, HDMI port specifications, resolution and refresh rate settings; ② Manually fix to 1080P 60Hz for testing, to avoid automatic negotiation to an incompatible mode; ③ Test by changing the HDMI port, changing the cable, and powering off and restarting the display device.
- Cannot be recognized on company/school computers: Prioritize checking enterprise policy restrictions. ① Confirm whether installation of DisplayLink drivers is prohibited or screen recording permissions are restricted; ② Confirm whether Thunderbolt device authorization is required, or whether the administrator has disabled the external display policy; ③ First use a personal computer to verify whether the docking station is normal, then contact the IT administrator to confirm.
Use the Substitution Method to Accurately Locate the Fault Source
After troubleshooting to the end, if you are still not sure what is broken, you can use the “substitution method”. This is the most accurate fault location method and can avoid unnecessary expenses.
Three-Step Substitution Method to Locate the Fault Source
You can follow these three steps to narrow down the scope step by step:
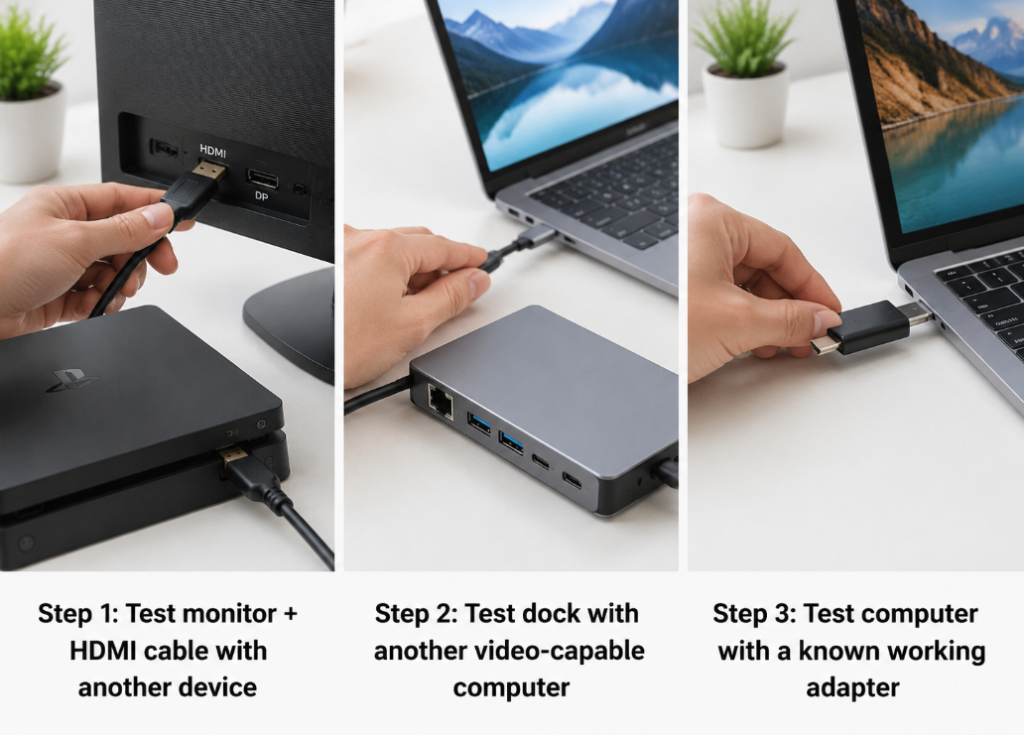
Step 1: Connect the HDMI cable and monitor to other devices with HDMI output, such as a laptop, TV box, or game console, to see if they display normally. If yes, it means the cable and monitor are good; if not, it’s a problem with the cable or monitor.
Step 2: Connect your docking station to another computer that is confirmed to support USB-C video output, and see if HDMI works. If it works, it means the docking station is good, and the problem is with your computer or settings; if not, it means there is a problem with the docking station or the uplink cable.
Step 3: Use another confirmed working USB-C to HDMI adapter or docking station, plug it into your computer, and see if it lights up. If it lights up, it means your computer’s USB-C port is good, and the problem is with the original docking station or uplink cable; if it doesn’t light up, it means there is a problem with your computer’s USB-C port, drivers, or settings.
Faster Direct Verification Method
If you have other devices, you can verify even faster: for example, if your computer has a native HDMI or DP port, directly connect the monitor with an HDMI cable, and you can immediately confirm whether the monitor and HDMI cable are good; if your monitor has USB-C video input, use a full-featured USB-C cable to directly connect to the computer, and you can confirm whether the computer’s USB-C video output is normal; if you have an ordinary small USB-C to HDMI adapter, use it to plug directly into the computer, bypassing the docking station, and you can immediately know if it’s a problem with the docking station.
Priority Order of Low-Cost Fixes
After finding the general direction, follow this order to fix, to spend as little money as possible:
First priority (completely free): Try a different USB-C port on the computer, replace with a short good HDMI cable, manually switch the input source, restart the computer and monitor.
Second priority (almost no cost): Connect PD power to the docking station, unplug other peripherals, lower to 1080P 60Hz for testing.
Third priority (takes time, no cost): Update the matching model’s stable graphics card driver, USB/Thunderbolt drivers, DisplayLink driver, and docking station firmware.
Fourth priority (costs money): Replace the USB-C uplink cable, replace the docking station, switch to a native HDMI/DP or DisplayLink solution.
How to Interpret the Results
Finally, how to judge where the problem really is?
- It works normally after replacing the monitor and cable: Most likely there was a problem with the original monitor’s input source, HDMI port, EDID, or cable.
- The docking station works normally after replacing the computer: Most likely there was a problem with the original computer’s USB-C port capability, drivers, system settings, or permissions.
- The computer works normally after replacing the docking station: Most likely the original docking station had insufficient specifications, old firmware, a broken HDMI module, or a problem with the uplink cable.
- All combinations are unstable, working on and off: Focus on checking power supply, long cables, multiple layers of adapters, system power management, or loose hardware interfaces.
When to Replace Hardware or Change the Solution
Not all problems can be solved by adjusting settings. When it’s time to replace, you have to replace; when it’s time to change the solution, you have to change. It is not recommended to keep debugging repeatedly and waste time.
Situations Where You Should Replace the Docking Station
If the substitution method confirms that the docking station has no HDMI output when connected to multiple video-capable computers, then the hardware is broken and it’s time to replace it. If the docking station’s advertised specifications can’t meet your needs—for example, you want 4K 60Hz or high refresh rate, but it only supports 4K 30Hz, or dual displays only work as single display—then it’s also time to replace it. If the docking station brand no longer updates firmware and has always had poor compatibility with new systems or new computers, it is also recommended to replace it. Also, if the HDMI port is physically loose, flashes on and off when plugging/unplugging, or the interface is obviously broken, don’t keep using it.
Situations Where You Should Replace the Cable
If you are using a USB-C cable of unknown specification, a phone charging cable, or a cable that is too long for a docking station with a removable cable, try replacing the cable first. If the HDMI cable works at 1080P but is unstable under 4K, high refresh rate, or HDR, also replace the cable. If you lightly touch the cable and the screen goes black, has no signal, or re-detects, then the cable is broken or the interface is worn out—replace it quickly.
Situations Where You Should Change the Solution
If your computer’s USB-C port clearly does not support video, and you are not currently using a DisplayLink docking station, then no amount of adjustment will help—you need to switch to a DisplayLink solution, or use the computer’s native HDMI/DP port. If you use a company computer that doesn’t allow installing DisplayLink drivers, then don’t bother with driver-based docking stations—switch to a native video solution, or ask IT for permission. If you use a Mac and your multi-display needs exceed the number of native supported displays, ordinary MST docking stations cannot achieve independent multi-display, so you can choose the DisplayLink solution (you need to accept the driver, permission, and performance boundaries), and don’t blindly buy ordinary Thunderbolt docking stations to try to break the limit. If you are gaming or doing professional design, with very high requirements for latency and frame rate, then DisplayLink’s compression solution may not be suitable for you—you need to use a native DP Alt Mode or Thunderbolt docking station, or connect directly with a native cable.
More Stable Alternative Connection Methods
If you have a choice, prioritize these solutions in order of stability from highest to lowest:
First, if the computer has a native HDMI or DP port, directly connect the monitor with a cable—there is no intermediate conversion, so the probability of problems is the lowest and stability is the best.
Second, if the computer’s USB-C supports video and the monitor also has USB-C video input, connect directly with a full-featured USB-C cable—only one conversion, so stability is good. Note: If the monitor’s USB-C port supports DP Alt Mode input and is marked as providing sufficient PD power for the computer, then it can transmit video and charge at the same time; otherwise, it only serves as video input, and the computer still needs a separate power supply.
Third, if you only need single-display HDMI output, choose a reliable USB-C to HDMI adapter—it has a shorter link than a multi-port docking station, and it is easier to rule out power supply and peripheral interference, provided that the computer’s USB-C port supports DP Alt Mode/video output.
Fourth, if the computer’s USB-C supports video and you also need multiple interfaces like USB and Ethernet, choose a reliable DP Alt Mode docking station—driver-free and low latency.
Fifth, if the computer’s USB-C does not support video, or Mac multi-display needs exceed the native limit, choose a DisplayLink docking station, but you have to accept the boundaries of drivers, permissions, and performance.
Sixth, if you have high-specification multi-display needs (such as dual 4K60, high refresh rate), prioritize choosing a Thunderbolt/USB4 docking station, but confirm that both the computer and the docking station support the output specifications you want.
Pitfall Avoidance Guide: What to Check When Buying and Using in the Future
After understanding these, when buying or using a docking station in the future, as long as you check these points, you basically won’t encounter the problem of “HDMI not detected” again.
Check Your Computer’s Capabilities Before Buying a Docking Station
First figure out whether your computer’s USB-C port supports DP Alt Mode, Thunderbolt, or USB4; whether all USB-C ports support video, or only a certain port; if you use a Mac, first check how many external displays your model natively supports, and whether you need DisplayLink; if you use a company or school computer, first confirm whether you can install third-party drivers, authorize Thunderbolt devices, and enable screen recording permissions—don’t buy it and then find you can’t use it.
Check Docking Station Specifications Before Buying
When buying, don’t just look at price and number of interfaces. Focus on these points: what is the video solution—DP Alt Mode, Thunderbolt/USB4, or DisplayLink; what is the maximum resolution and refresh rate of HDMI output, note that single-display and dual-display specifications may be different; which systems are supported—whether Windows, macOS, ChromeOS, iPadOS, and Android are explicitly supported; whether driver installation is required, and whether the brand’s official website provides driver and firmware updates; whether there is a PD power port, and whether an external power supply is needed under full load.
Check Specifications Before Buying Cables
For the USB-C uplink cable, prioritize using the original one from the docking station. If you buy it yourself, choose a video cable clearly marked as full-featured USB-C, USB4, or Thunderbolt 3/4—don’t buy those cheap charging cables that cost a few dollars. Choose HDMI cables according to the resolution and refresh rate you want; for 4K 60Hz and above, don’t use old or too long cables. For long-distance connections, prioritize active HDMI cables or fiber optic HDMI cables for better stability.
Daily Usage Recommendations
In daily use, try to reduce multiple layers of adapters. Don’t use complex links like USB-C to DP then to HDMI, plus a switch and capture card—the simpler, the more stable. For long-term use of multi-port docking stations, it’s best to connect a PD power supply to reduce dropouts caused by power supply fluctuations. After a major system update, if HDMI is not detected, prioritize updating the matching model’s stable graphics card driver, DisplayLink driver, and docking station firmware—most compatibility issues can be resolved. Don’t judge quality solely by price; the key is to match your computer’s interface, the docking station’s protocol, and your display needs. No matter how expensive a Thunderbolt docking station is, if it’s plugged into an ordinary USB-C port that doesn’t support video, HDMI won’t work.
Frequently Asked Questions (FAQ)
Finally, we have compiled a few of the most frequently asked questions, with quick answers:
1. The USB port of the USB-C docking station works normally, why is there no response from HDMI?
USB and HDMI use different transmission links: normal USB only means the data path is fine. The video path also requires the computer’s USB-C port to support video, the docking station to have an HDMI conversion chip, the uplink cable to support video, and the display device to negotiate normally. A problem in any link will cause HDMI to have no response.
2. USB-C can charge, why can’t it cast the screen?
Charging and video output are two independent sets of capabilities of the USB-C port, with no necessary connection. Many USB-C ports or cables only support charging/data transmission and do not have DP Alt Mode video output capability, so they cannot cast the screen.
3. What is the difference between a DisplayLink docking station and an ordinary USB-C to HDMI adapter?
Ordinary DP Alt Mode docking stations rely on the native video output of the computer’s USB-C port, are driver-free and have low latency, but require the computer’s USB-C port to support video. DisplayLink docking stations transmit compressed pictures via USB data, do not rely on native video output, and can be used as long as the USB-C port can transmit data. But they require driver installation, and macOS also needs to enable screen recording permission. Their performance is slightly inferior to native solutions, making them suitable for scenarios where the USB-C port has no video or where multi-display workarounds are needed.
4. Why did the docking station’s HDMI work before but stop working after a system update?
It is most likely caused by changes in drivers or system permissions. For example, graphics card/Thunderbolt drivers are incompatible after a Windows update, screen recording permissions are reset after a macOS update, or the DisplayLink driver version is too old to support the new system. Prioritize updating the stable version of the driver and docking station firmware matching the device model, and check the permission settings.
5. Why can a 4K monitor only display 1080P or 4K 30Hz?
Mostly caused by link specification mismatch. Common reasons include the docking station itself only supporting 4K 30Hz, the HDMI cable not meeting standards, the monitor being plugged into the wrong low-specification HDMI port, multi-display bandwidth sharing causing speed reduction, or insufficient bandwidth of the computer’s USB-C port. You can troubleshoot one by one according to the specification matching section earlier in this article.
6. Will replacing the docking station definitely solve the problem of HDMI not being detected?
Not necessarily. If the problem is that the computer’s USB-C port does not support video, the company device has policy restrictions, the monitor’s HDMI port is damaged, or the cable is unqualified, replacing any number of docking stations will be useless. It is recommended to first use the substitution method to clearly locate the fault source, then decide whether to replace it, to avoid unnecessary expenses.
Summary
To troubleshoot USB-C docking station HDMI detection problems, you can proceed step by step according to three layers of logic:
① First classify the fault type: Is it completely undetectable, detected but no signal, intermittent dropout, works at low specifications, or only fails with specific device combinations? Different symptoms correspond to different troubleshooting directions, to avoid blind operations.
② Verify step by step along the link: Start with the five core nodes: computer USB-C port capability, docking station type and firmware, USB-C uplink cable, HDMI cable and monitor, and system drivers and permissions. Use the substitution method to accurately locate the fault source, and don’t replace hardware right away.
③ Solve targeted problems: If the computer’s USB-C port has no video output, you can switch to a native HDMI/DP interface or DisplayLink solution; if the docking station has insufficient specifications, replace it with a model matching the target resolution and refresh rate; if you pursue high stability or gaming high-refresh experience, prioritize native HDMI/DP, USB-C direct connection, or reliable Thunderbolt/USB4 solutions, and minimize multiple layers of adapters.