
Have you ever run into this situation: you just got a new USB-C to HDMI adapter, fumbled around plugging it between your laptop and TV for ages, and the screen only shows a line of “No Signal”, or stays completely black. The product page clearly says “compatible with all Type-C devices” — why doesn’t it work for you?
Actually, most of the time, the adapter isn’t broken — you might have overlooked a most basic fact: USB-C is just the shape of the port, it does not mean it can output video. It’s just like three-prong power outlets: some only have electrical wiring for charging, while others also have Ethernet or cable TV connections, with completely different functions.
First, Figure Out What Kind of “Not Working” You’re Experiencing
When you run into a problem, don’t rush to replace accessories first. Matching your issue to the right category will save you a lot of unnecessary trouble.
The first type is complete no signal, which is also the most common: the monitor keeps showing “No Signal” or is black, while the computer or phone itself runs normally, but the system cannot detect the external display; if you are using a docking station, charging, USB flash drives, and internet connection may work fine, only the HDMI port doesn’t work; some cases have the monitor flash on briefly then go black, which is usually related to handshake failure between devices, bandwidth mismatch, or unstable power supply.
The second type is picture present but abnormal: for example, screen flickering, garbled display, color deviation, or intermittent disconnection; or the resolution and refresh rate do not meet expectations — you clearly bought a 4K monitor, but it only outputs 1080p; some have cropped screen edges or incorrect aspect ratio, which is common with TV overscan settings; if you notice obvious mouse lag, it may be related to the TV’s image processing mode, the docking station’s chip, or the refresh rate.
The third type is failure in specific scenarios: for example, it works normally when you switch to another computer or another adapter; USB-C direct to HDMI works fine, but not when connected via a docking station; the desktop displays perfectly, but goes black as soon as you play encrypted streaming services like Netflix, Disney+, or Apple TV+; or the external screen goes black when you close your laptop lid, and comes back when you open it.
A special reminder here: being able to charge and transfer files does not mean being able to output video. USB-C charging, data transfer, and video output are three independent port capabilities. Video output usually requires support for DisplayPort Alternate Mode (DP Alt Mode for short), Thunderbolt, or USB4.
5 Necessary Conditions for USB-C to HDMI to Work Properly
The entire connection path of USB-C to HDMI is like a series circuit: if any link breaks, there will be no display; display specifications are like water flow in a pipe — the narrowest point determines the final upper limit. For it to work properly, all 5 conditions must be met:
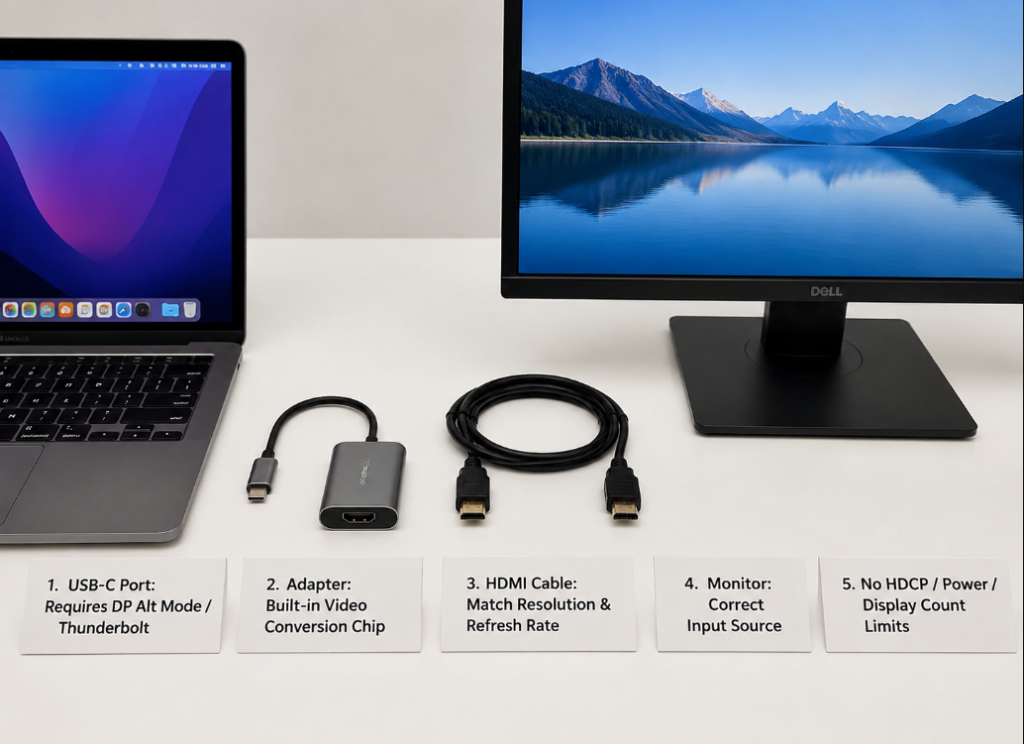
The Device’s USB-C Port Must Support Video Output
Mainstream USB-C to HDMI adapters rely on DP Alt Mode — you can think of USB-C as a multi-lane road: ports that support DP Alt Mode set aside several lanes specifically for video signals, and without these lanes, you can’t connect an external display.
Many people think speed labels like “USB 3.2”, “10Gbps”, or “5Gbps” mean you can connect a monitor, but actually these only represent file transfer speed and have nothing to do with video output. Usually Thunderbolt 3/4 and USB4 ports support video output, but the final reference should always be the device’s official specifications; many computers have two USB-C ports, only one of which is a “full-featured port”, while the other may only support charging and file transfer.
The Adapter, Docking Station, or All-in-One Cable Must Support Video Conversion
USB-C to HDMI is not just a simple change of plug shape — there must be a chip inside to convert the DP video signal from USB-C to an HDMI signal. A common problem with low-cost accessories is not that they don’t work at all, but that they have poor chip compatibility, disconnect when overheating, have exaggerated specifications, and are unstable at high resolutions.
Also note the differences between different solutions: Thunderbolt-specific docking stations may not work when plugged into a regular USB-C port, but regular USB-C video adapters are usually compatible when plugged into a Thunderbolt port; there is also a DisplayLink-based docking station, which is essentially a USB external graphics card that requires driver installation. The advantage is that it can break the external display number limit of some devices, but it has worse latency and compatibility with copyrighted video.
The HDMI Cable and Monitor Specifications Must Match
The entire path is “device USB-C port → adapter/docking station → HDMI cable → monitor/TV”, and the final resolution and refresh rate are determined by the link with the lowest specifications.
In common cases, HDMI 1.4 usually supports up to 4K@30Hz, HDMI 2.0 usually supports up to 4K@60Hz, and HDMI 2.1 can support higher modes like 4K@120Hz or 8K; but whether it can run at full capacity actually depends on the device, adapter, cable, monitor port, and color depth/HDR settings. Special note: a product page that only says “supports 4K” does not mean it supports 4K@60Hz, let alone HDR, 10-bit color depth, or VRR (Variable Refresh Rate).
System Display Settings and Monitor Input Source Must Be Correct
Many times the hardware is fine, it’s just the settings that are wrong: you need to select the correct HDMI input source on the monitor — for example, if the cable is plugged into the HDMI 2 port, you need to switch the input source to HDMI 2; if a Windows computer is stuck in “PC screen only” mode, of course the external screen won’t turn on — you need to press Win+P to switch to “Duplicate” or “Extend”; on Mac, you need to confirm the external display is detected in the Displays section of System Settings; if you want a TV to run 4K@60Hz, you usually also need to enable high-bandwidth options like “Enhanced HDMI Mode”, “HDMI UHD Color”, or “Deep Color” in the TV settings.
No Content Protection, Power Supply, or External Display Quantity Limits
There are also some hidden limitations that can cause abnormalities: for example, when HDCP (High-bandwidth Digital Content Protection) is incompatible, the desktop may work normally, but playing encrypted video will cause a black screen — you can think of this as the anti-piracy mechanism of video platforms: as long as any link in the entire chain does not support the corresponding version of HDCP, the screen will go black. Docking stations without independent power supply may experience HDMI disconnection due to insufficient power or bandwidth when connected to hard drives, Ethernet ports, and multiple USB devices at the same time; whether it’s a Mac, Windows thin-and-light laptop, or phone/tablet, they all have their own upper limit on the number of external displays, and exceeding it will make them unusable.
Quick Troubleshooting by Symptom: Check the Most Likely Causes First
You don’t have to check all 5 conditions every time. Based on your symptoms, you can prioritize checking the most common causes:
| Fault Symptom | Priority Troubleshooting Direction |
|---|---|
| Monitor has completely no signal, shows No Signal | First confirm if the USB-C port supports video output, then check the monitor input source, HDMI cable, adapter, and system display mode |
| Can charge and transfer files, but no display | High probability that the USB-C port does not support video output function |
| Picture present but only 1080p, cannot reach 4K/high refresh rate | First check if the adapter clearly labels the target resolution + refresh rate, then check the HDMI cable and monitor port specifications |
| Screen flickering, garbled display, intermittent disconnection, black screen after overheating | Adapter quality, chip overheating, cable too long, insufficient power supply |
| Desktop normal, black screen when playing encrypted streaming media | HDCP content protection compatibility issue |
| External screen goes black when laptop lid is closed, recovers when lid is opened | Power policy, lid-close sleep settings |
The Three Most Common Fault Causes
Top 1: The USB-C Port Itself Does Not Support Video Output
This is the most common of all faults. Many people spend ages changing cables and docking stations, only to finally discover that their device’s USB-C port has no video output function at all.
5-Minute Quick Judgment Method
First check the port markings: ports with a monitor icon, DP logo, or lightning (Thunderbolt) logo next to them usually support video or high-speed expansion; ports with only a battery/charging logo most likely do not support video.
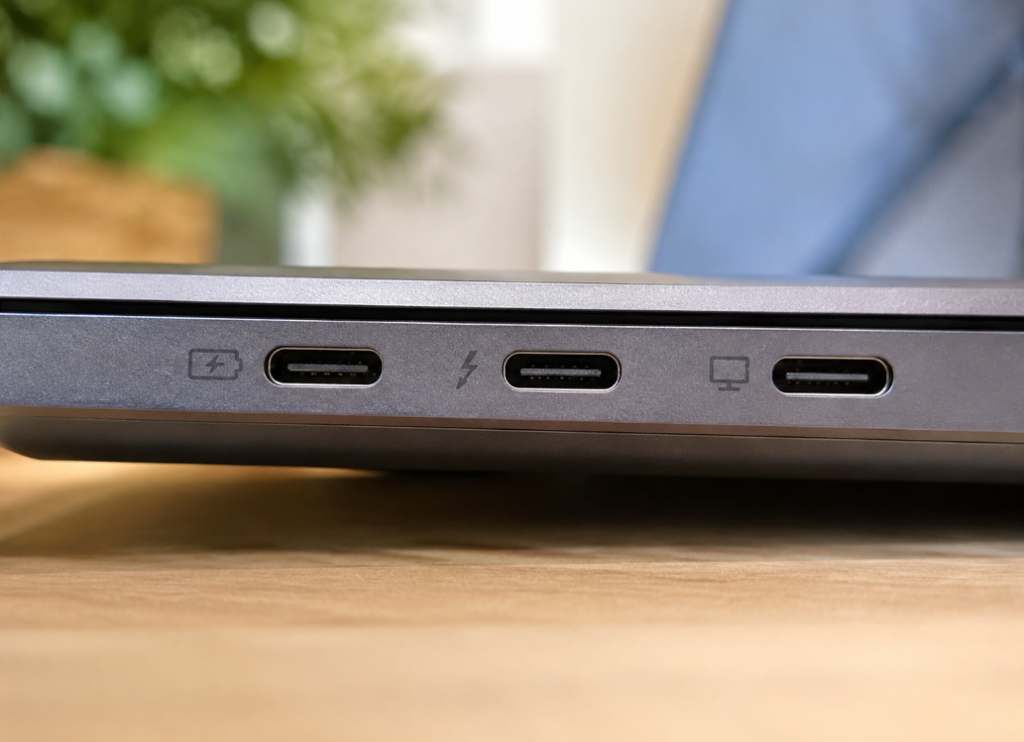
Then check official specifications: search for keywords like “DisplayPort Alt Mode”, “DP Alt Mode”, “USB-C video output”, “Thunderbolt”, or “external display” on the device’s official website or in the manual — it only supports video if there is a clear statement. Note differences within the same series: for the same computer model, port functions may vary by configuration — for example, the low-end version may only have a charging port, while the high-end version has a full-featured port.
Finally, you can test and verify: use a confirmed working USB-C to HDMI adapter and monitor, plug into this port to test; if the device has multiple USB-C ports, try another one — very often only one specific port supports video.
Which Devices Commonly Do Not Support USB-C Video Output
Entry-level Windows thin-and-light laptops are the “hardest hit area”: many low-cost models have USB-C ports that only support charging and data transfer. The front USB-C ports on many desktop computers are just USB data ports routed from the motherboard, and are not connected to the video output path of the graphics card or motherboard; a few special motherboard/case solutions require checking the manual for confirmation.
A large number of mid-to-low-end Android phones also do not support wired video output, even if they have a Type-C port — you need to confirm model by model. Entry-level tablets and low-end Chromebooks also require checking official specifications, and cannot be assumed to support it.
The situation for some gaming laptops is more complicated: different USB-C ports may be connected to different controllers, and discrete GPU direct mode, hybrid graphics mode, and BIOS settings all affect external display.
Also note the device’s video output upper limit: some base model Apple Silicon MacBook models natively support only one external display. Different M1/M2/M3 models and Pro/Max versions have different limits, which must be based on Apple’s official technical specifications. To break the limit, you can consider a DisplayLink docking station, but you need to install drivers and accept limitations in latency, gaming, and copyrighted playback compatibility. Devices like the Nintendo Switch have special dock, power, and protocol requirements, and most ordinary USB-C to HDMI adapters won’t work.
If you confirm that the USB-C port does not support video, then no matter how expensive an HDMI cable or how good a regular adapter you buy, it won’t work — don’t waste your money.
Top 2: Mismatched Adapter Accessories, HDMI Cable, or Docking Station
After ruling out port issues, the second most common cause is buying the wrong accessories or having insufficient specifications.
Wrong Type Purchased or Solution Mismatch
Ordinary USB-C charging cables and data cables can only transmit power and files, they cannot output video — don’t expect plugging in an adapter to turn them into video cables. Whether it’s an adapter, all-in-one cable, or docking station, it must clearly label support for video output, as well as the corresponding resolution and refresh rate.
Thunderbolt docking stations, USB4 docking stations, regular USB-C docking stations, and DisplayLink docking stations are not the same thing. Before buying, be sure to confirm that your computer’s port and system are compatible.
Specification Mismatch Causes “Seemingly Broken” Issues
Many times the accessory isn’t broken — it’s that the specifications you require exceed its upper limit — for example, 4K@30Hz working does not mean 4K@60Hz will work; 4K@60Hz SDR working does not mean 4K@60Hz HDR 10-bit will be stable. To run high-specification modes, the device, adapter, HDMI cable, and monitor port must all meet the requirements.
Also, when a docking station is connected to multiple displays, the specification of a single HDMI port may decrease, for example from 4K@60Hz to 4K@30Hz or even 1080p. This is caused by bandwidth sharing, not a fault.
Quality, Overheating, and Physical Damage
After an adapter or cable is bent, squeezed, or dropped, the internal wires may be broken, which manifests as disconnection with a light touch. HDMI cables that are too long, too thin, or too old are more prone to flickering or black screens at high resolutions. If it’s a fiber optic HDMI cable, note that it has a direction: the Source end must be connected to the playback device, and the Display end to the monitor — plugging it in reverse will result in completely no signal. Low-cost adapters have poor chip heat dissipation, and will disconnect when overheated after long use, then recover when cooled down.
Special Issues with Docking Stations
Docking stations are more prone to problems than single adapters. First is insufficient power supply: docking stations without independent power supply may have unstable HDMI when connected to multiple high-power devices. Second is bandwidth sharing: simultaneous use of multiple displays, Ethernet ports, external hard drives, and high-speed USB devices will occupy video bandwidth, leading to frequency reduction or disconnection. Then there is driver dependency: DisplayLink docking stations must have corresponding drivers installed, and usually need to be updated synchronously after major system version updates. In addition, firmware compatibility is easily overlooked: some docking stations require firmware upgrades to be stably compatible with M-series Macs, new systems, or new devices.
Finally, note the limitation of cascading: ordinary USB-C video signals that rely on DP Alt Mode cannot be transmitted through a USB-A hub, so connecting a regular HDMI video adapter after a USB-C to USB-A hub is usually not feasible; only DisplayLink/USB graphics card type USB-A to HDMI adapters are another solution, which usually require drivers, and latency and copyrighted video compatibility also need to be confirmed separately.
Top 3: Monitor, System Settings, Driver, or Content Limitations
If the ports and accessories are fine, then it’s most likely a problem with settings or hidden limitations.
Monitor and TV Side Settings
First confirm which port the HDMI cable is plugged into, then select the corresponding input source in the monitor menu. Many people plug into HDMI 2 but select HDMI 1, so of course there’s no signal. After plugging in a new device, wait 10 to 20 seconds — some monitors have a slower handshake speed.
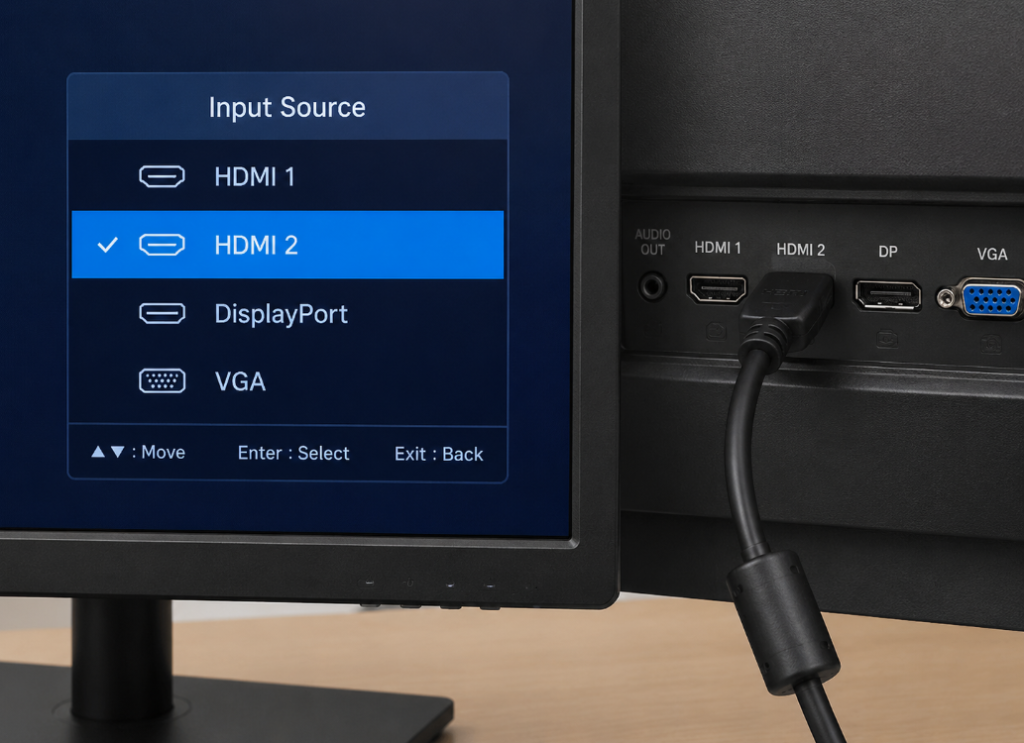
If you’re connecting a computer to a TV, it’s recommended to enable PC mode or game mode, which can solve problems like cropped screen edges and high latency; if you want to run 4K@60Hz, be sure to check if options like enhanced HDMI, advanced signal format, and Deep Color in the TV are turned on — they may be off by default.
Windows Computer Troubleshooting
First press Win+P to confirm it’s not in “PC screen only” mode, try switching to “Duplicate” or “Extend”; then go to “Settings > System > Display”, click “Detect” to see if the system recognizes the external monitor; if it still doesn’t work, first lower the resolution to 1080p@60Hz, turn off HDR, and if 10-bit color depth, VRR/Variable Refresh Rate, or high refresh rate were originally enabled, also turn them off or downgrade first — this can quickly determine if the problem is triggered by insufficient bandwidth or insufficient link specifications. After confirming basic display works, then gradually increase the specifications; finally, you can try updating or rolling back graphics card drivers, chipset drivers, and Thunderbolt/USB4 controller drivers.
Note that being able to display in Safe Mode only means low resolution and basic drivers are working, it does not prove there are no issues with high resolution, HDR, or high refresh rate — you still need to go back to normal mode for troubleshooting.
macOS Troubleshooting
Open “System Settings > Displays” to see if the external display appears; if you don’t see it, hold down the Option key, and a “Detect Displays” button will appear in the interface — click it manually to detect. You can try restarting the Mac, monitor, and docking station, and re-plug the entire connection path. After a major system version update, if the docking station is abnormal, remember to check the docking station firmware, DisplayLink drivers, and corresponding security permission prompts — for DisplayLink docking stations, especially check the Privacy & Security permissions in System Settings, such as Screen Recording and Accessibility authorization, and restart after installing or updating drivers. Regular DP Alt Mode adapters do not require these settings. Also, note the device’s native external display quantity limit — don’t force connect more displays than the upper limit.
Phone, Tablet, and Streaming Media Limitations
For Android phones, you must confirm model by model whether they support wired video output. There are big differences between different price points of the same brand — don’t assume Type-C can cast screen; some Android phones also require manually enabling desktop mode or screen casting mode to work.
The external display capability of iPads depends on the model, port, and iPadOS version. Older models may only support mirroring, while newer models and newer systems support extended display.
If the screen only goes black when playing encrypted streaming media like Netflix, Disney+, or Apple TV, first suspect HDCP content protection compatibility or link version issues; the problem may lie in the HDCP support of the adapter, docking station, HDMI cable, monitor HDMI port, or playback device. You shouldn’t directly conclude the cable is completely broken — you can initially distinguish this by confirming desktop and local video playback work normally.
Easily Overlooked Rare Causes
If you’ve checked all the above and it still doesn’t work, you can look at these rare but easy-to-fall-into pitfalls.
First is poor physical port contact or damage. Dust, oxidation, or bent pins in the USB-C or HDMI port can cause intermittent issues; if the USB-C only works when plugged in one direction and not the other, it’s most likely a problem with the contacts of the port or adapter; if the port is loose and disconnects at the slightest touch, it may be due to damaged solder joints from long-term pulling, which requires repair.
Second is power supply and power policies. A laptop with low battery or power saver mode enabled may reduce the stability of external display; when a docking station supplies power to the computer in reverse, some devices may experience unstable charging and display at the same time — you can try powering the computer separately, or switch to a docking station with independent PD power supply; if you use an external screen with the laptop lid closed, you must connect power, an external keyboard and mouse, and also turn off the lid-close sleep setting, otherwise it will sleep and go black as soon as you close the lid.
Then there is EDID display handshake abnormality. EDID is short for Extended Display Identification Data, which is equivalent to the monitor’s “ID card”, storing information about its supported resolutions and refresh rates. The computer outputs appropriate signals based on this ID card. If the adapter or docking station transmits this ID card incorrectly, the computer may output a signal that the monitor does not recognize, resulting in a black screen. This situation can be solved by changing the HDMI cable, changing the monitor port, lowering the resolution, restarting the monitor, or updating the docking station firmware.
Finally, there is the special device environment. Devices in enterprises or schools may restrict external displays through security policies to prevent data leakage — this situation cannot be solved by individuals, you need to confirm with IT; in addition, don’t judge whether there is a problem with the USB-C hardware link in a virtual machine or remote desktop — the display settings you see in remote desktop do not represent the physical output state of the local machine, you must test back in the host’s local system.
Step-by-Step Troubleshooting: 6 Steps to Locate Most Problems
Don’t try randomly. Troubleshooting in order from simple to complex is the most efficient.
Step 1: 30-Second Basic Check
First do the most mindless things: confirm the monitor is powered on and the correct HDMI input source is selected; confirm both USB-C and HDMI ends are fully plugged in; unplug and re-plug once, wait 10 to 20 seconds; try another HDMI port on the monitor, or another USB-C port on the computer; finally restart the computer, monitor, and docking station — many times it’s just a temporary handshake failure, and a restart fixes it.
Step 2: Confirm if the Port Supports Video
Check the device’s official specifications to confirm if this USB-C port has DP Alt Mode, Thunderbolt, USB4, or a clear video output description; if it’s a phone or tablet, first check if the model has wired screen casting or desktop mode; if it’s a front USB-C port on a desktop computer, focus on confirming whether it is connected to the graphics card’s video path, or only has USB data function. If the port itself does not support video, a regular adapter cannot solve it, so there’s no need to try further.
Step 3: Minimal System Test
Unplug all peripherals from the docking station: USB flash drives, hard drives, Ethernet ports, card readers — leave only HDMI; use a short, confirmed working HDMI cable; use a known good USB-C to HDMI adapter to connect directly to the monitor, not through the docking station; first set the resolution to 1080p@60Hz, turn off HDR, VRR, and high color depth, confirm basic display works, then gradually increase specifications. If the minimal system works, it means the problem is with the docking station or other peripherals.
Step 4: Cross-Test to Locate the Fault Point
The substitution method can quickly narrow down the fault range: plug the same adapter into another device confirmed to support video output — if it works, the problem is most likely with the original device’s port or settings; if it doesn’t work, prioritize suspecting the adapter or HDMI cable. Connect the same device to another monitor — if it works, check the original monitor’s input source, port, or settings; if it doesn’t work, continue troubleshooting the device and adapter. Try another USB-C port on the same device — if it works, it means the original port either doesn’t support video or is already damaged. Replace with another confirmed working HDMI cable — if it works, it means the original cable has specification or quality issues.
Step 5: Verify Specifications and System Settings
Confirm whether the resolution and refresh rate upper limits of the four ends (device, adapter, HDMI cable, monitor) match; for Windows, check Win+P mode, display settings, graphics card and Thunderbolt drivers; for Mac, check display settings, detect displays, docking station firmware or DisplayLink drivers; for TVs, check enhanced HDMI mode, PC mode, and overscan settings.
Step 6: Handle Special Scenarios
If it’s streaming media black screen, test with desktop and local video to confirm if it’s an HDCP content protection issue; if multiple displays don’t work, check the device’s native external display quantity limit, and if it’s not enough, consider the DisplayLink solution; if it’s lid-close black screen, adjust power and lid-close sleep policies; if it’s an enterprise device, ask IT if there are external display restrictions; if the port disconnects at the slightest touch, check for physical damage and repair if necessary.
Should You Replace Accessories? Don’t Buy Randomly, Check These Situations First
Many people buy new adapters and new cables as soon as they encounter a problem, but actually most of the time there’s no need to replace them at all. You can judge by this standard:
If these situations apply, you can prioritize replacing the USB-C to HDMI adapter: first, you’ve confirmed the device port supports video, and the monitor and HDMI cable are also normal, but there’s still no signal; second, low resolution displays fine, but as soon as you increase the resolution, the screen flickers or goes black; also, the adapter clearly disconnects after overheating, then recovers when cooled; finally, the same adapter is unstable on multiple devices.
If these situations apply, prioritize replacing the HDMI cable: 1080p is normal, but as soon as you go to 4K or high refresh rate, there’s flickering, snow spots, or black screen; the HDMI cable is very long, very thin, very old, or has been bent or squeezed before; you’re using a fiber optic HDMI cable and aren’t sure if the direction is correct.
If these situations apply, you can consider replacing the docking station: USB-C to HDMI direct connection is normal, but as soon as you connect the docking station there’s no signal or frequency reduction; the docking station disconnects after connecting multiple devices, even with independent power supply added; updating DisplayLink drivers and docking station firmware still doesn’t make it stable; the docking station’s nominal specifications are lower than your target resolution and refresh rate.
But there are several situations where you absolutely should not blindly replace accessories: the USB-C port itself does not support video output; the phone or tablet model itself does not support wired video output; the number of external displays has already exceeded the device’s native upper limit; enterprise security policies disable external display; only streaming media has a black screen but the desktop is normal — prioritize troubleshooting as an HDCP issue, it’s not a broken cable.
Purchase and Usage Pitfall Avoidance Guide
Confirm Device Capabilities Before Buying
First find out about your own device: does the USB-C port have DP Alt Mode, Thunderbolt, or USB4? How many external displays does it support at most? What resolution and refresh rate do you need (for example, 4K@60Hz, 2K@144Hz)? If your target is 4K@120Hz, 8K, HDR, or 10-bit color depth, don’t just look at monitor support — also confirm that the device’s USB-C/Thunderbolt/USB4 port, adapter chip, HDMI cable, and monitor HDMI input port all meet the corresponding specifications. If it’s a phone or tablet, be sure to confirm model by model whether it has wired video function — don’t buy just because it has a “Type-C port”.
Understand the Keywords on Product Pages
Don’t just look at the word “4K” — be sure to see clearly if it’s 4K@30Hz, 4K@60Hz, or higher; see clearly if it supports your system, such as Windows, macOS, iPadOS, Android, ChromeOS; see if drivers need to be installed: regular DP Alt Mode adapters are usually driver-free, DisplayLink ones must have drivers installed; if you plan to use the docking station long-term, also check its PD power supply capacity and long-term load capacity.
Cables and Monitors Must Also Match
For high resolution and high refresh rate, prioritize choosing HDMI cables from reliable brands with appropriate length — the longer the cable, the greater the signal loss; different HDMI ports on a monitor or TV may have different specifications, prioritize using the input port labeled with the highest specification; if it’s a TV, confirm that enhanced HDMI mode can be enabled, otherwise you can’t run full 4K@60Hz.
Reduce Faults in Daily Use
Don’t let the adapter hang under stress, as it can easily pull and damage the device’s USB-C port; don’t bend cables for a long time, as the internal wires can easily break; pay attention to heat dissipation when using the docking station under high load for a long time, don’t cover it with things; after major system version updates, remember to synchronously check the docking station firmware and related drivers to avoid compatibility issues.
Common Misconceptions Reminder
Many people have several common misconceptions about USB-C to HDMI, let’s clarify them all at once:
First, thinking all Type-C ports can connect to monitors. Actually, Type-C is just the port shape — whether it can output video depends on whether it has DP Alt Mode, Thunderbolt, or USB4 video capabilities.
Second, thinking that being able to charge means the cable and port are fine. Actually, charging, data, and video are three different sets of port capabilities and protocols — one working does not mean the others will work.
Third, assuming the adapter is broken as soon as there’s no signal. Actually, a port that doesn’t support video, wrong monitor input source, or incorrect system settings can all cause no signal.
Fourth, thinking that a product page labeled 4K means it can run 4K@60Hz. Many products marked 4K actually only support 4K@30Hz, and the specifications will be even lower during multi-display expansion.
Fifth, thinking all ports on a docking station can run at full speed simultaneously. Actually, docking stations are limited by USB-C link bandwidth, chip, power supply, and heat dissipation, and often share performance.
Final Note
When you encounter problems like no signal or black screen with USB-C to HDMI, first confirm the port’s video capability and the monitor’s input source, then troubleshoot step by step in the order of basic check, minimal system, cross-test, and specification verification — this will quickly locate the root cause of the problem and avoid blindly replacing accessories.