
Before heading out in the morning, you find your phone didn’t charge at all after being plugged in all night. The laptop you brought on a business trip shows no response after being connected to the charger for ages. Or the charging connects and disconnects repeatedly, requiring you to adjust the angle of the plug over and over — many people’s first reaction to a USB-C charging fault is “the charger is broken”, and they rush to buy a new one. Only after replacing it do they find the problem was just a broken cable, lint clogging the port, or even just the device being so deeply drained that it hadn’t “woken up” yet.
USB-C ports all look the same, but charging involves negotiation between three parties: the charger, the cable, and the device. A problem in any link can lead to no charging, slow charging, or intermittent charging. In this article, we start with the most common fault symptoms, teach you step by step how to troubleshoot, distinguish between real and false faults, and even judge for yourself whether you need to replace accessories or send the device for repair.
First, Match the Symptom: What Kind of Charging Fault Are You Experiencing?
Different fault symptoms have very different underlying causes. Locating the issue by matching your own situation first can save you a lot of detours. Common USB-C charging faults can be roughly divided into 5 categories, each with a different priority troubleshooting direction:
| Fault Type | Typical Symptoms | Priority Troubleshooting Direction |
|---|---|---|
| Complete failure to charge | No charging icon, no vibration/indicator light prompt, no battery level increase after 30 minutes of charging | Power outlet, broken cable core, deeply drained device, port contact issue |
| Slow charging / battery drains while charging | Shows charging but battery level increases extremely slowly; battery level drops when gaming, editing videos, or turning on a hotspot | Insufficient power, protocol mismatch, high device load, temperature protection |
| Intermittent charging | Connects and disconnects repeatedly; requires adjusting the plug angle or pressing the plug to stay stable | Dirty port, loose plug, broken internal cable core, poor contact of adapters |
| Failure only with specific combinations | Can charge phones but not laptops; cable can transfer data but not fast charge; a certain USB-C port can transfer video but not charge | Power/protocol compatibility, port function role limitation |
| Accompanied by abnormal signals | Charger/cable/device is hot to the touch, has a burnt smell, smokes; port is blackened; or system prompts “accessory not supported” or “liquid detected” | Stop using immediately to ensure safety, then conduct further troubleshooting |
Before starting formal troubleshooting, it is recommended to spend two minutes noting down 4 types of information, which can avoid wasting money on blindly replacing accessories:
- Device information: For small accessories like phones, tablets, laptops, earphones/watches, record the specific model, officially recommended charging power, or original charging method
- Charger information: Nominal power (W), number of USB-C ports, whether it supports PD/PPS, whether it is original or a legitimate brand
- Cable information: Whether it is a C-to-C or A-to-C cable, whether it is marked with 60W/100W/240W specifications, whether there are accessories like adapters, docking stations, or magnetic heads connected in between
- Fault background: Whether the fault appeared suddenly or gradually worsened; whether the device was dropped, exposed to liquid, or exposed to direct sunlight before; or whether the problem appeared just after a system update, changing the power outlet, or traveling abroad
After noting down this information, you can already roughly lock in the fault direction: for no response at all, first check power supply and contact; for slow charging, first check power and load; for intermittent charging, first check the port and cable; for failure to charge only specific devices, first verify power and port functions.
Do a 30-Second Safety Pre-Check Before Troubleshooting, Stop Immediately If There Is Danger
No matter what fault you encounter, don’t rush to plug and unplug repeatedly to test. Spend 30 seconds doing a safety pre-check — once certain danger signals appear, you must stop using immediately, don’t gamble with safety.
If the charger, cable, or device has a burnt smell, smokes, or sparks; if the casing is deformed, bulging, or has melting marks; or if the USB-C port is blackened, has burn marks, or has obviously bent pins, and you feel a tingling sensation when plugging/unplugging suspected to be electric leakage, be sure to unplug the power immediately and do not try to use it again. If the device’s battery is bulging, the back cover is lifted, the screen is pushed up, or the device restarts abnormally or is too hot to hold while charging, you must also stop using it immediately. In addition, if the device has been exposed to liquid, or the system prompts “port is wet” or “liquid detected”, never force charging, as it can easily cause a short circuit.
Without plugging in power, first spend 10 seconds checking three places to eliminate many obvious problems: check if the charger’s prongs are loose, deformed, or rusted, and if the USB-C port is loose, clogged, or has damaged pins; check if the cable’s outer sheath is damaged, sticky, or bulging, if the base of the plug is cracked, and if charging cuts off when you bend the cable gently; check if there is lint, dust, metal shavings, or liquid traces in the device’s USB-C port, and if the plug cannot be fully inserted, or wobbles very loosely.
Also pay attention to environmental risks: do not test charging in places with poor heat dissipation such as under the covers, under pillows, or in sun-exposed areas inside a car, as this can easily cause overheating that triggers protection, or even pose a danger; do not plug or unplug the charger when your hands are wet, the environment is humid, or the port is not yet dry; if using it for overseas travel or across regions, be sure to check the Input parameters on the charger’s nameplate — only those marked “100-240V~ 50/60Hz” can adapt to the power grids of most countries, don’t judge only by the Output power — travel adapters usually only change the shape of the plug, they are not responsible for stepping up or down voltage, nor do they increase charging power. In thunderstorm weather, when voltage is unstable, when using low-quality power strips, or when left unattended for a long time, it is best to unplug the charger. However, legitimate chargers will not be damaged by short-term standby, so there is no need to plug and unplug frequently.
Beginner’s Must-Know: Why USB-C Doesn’t Always Charge Just Because You Plug It In
Many people think that all USB-C ports look the same, so plugging them in should charge the device, and even fast charge it. In fact, that’s not the case at all. USB-C is just the “shape” of the port, just like how all three-prong plugs look similar, but some are for desk lamps and some are for air conditioners — their power and functions are vastly different. To understand why charging problems occur, you first need to know which parts are involved in the entire charging process, as a problem with any part will affect charging.
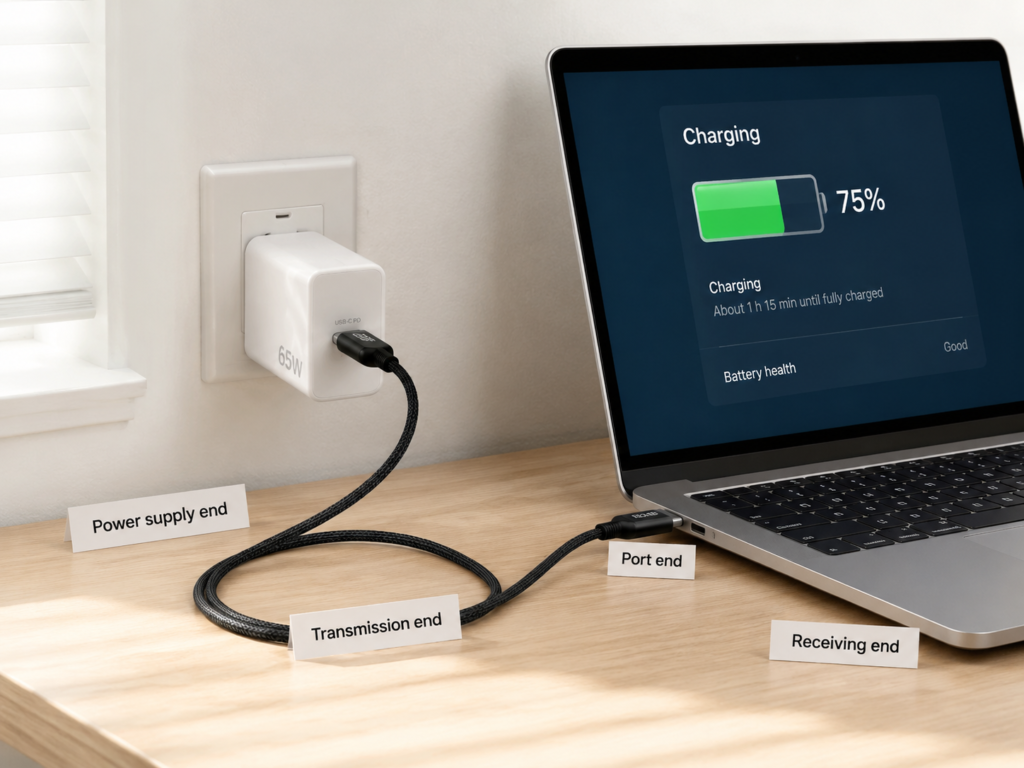
The entire charging chain can be divided into four core links, and a problem with any one will affect charging:
- Power supply end: That is the USB-C charger, which converts alternating current from the wall into direct current usable by the device, and can also provide different voltage and current levels to adapt to different devices.
- Transmission end: That is the USB-C cable. It is not just a “pipe” for transmitting electricity, but is also responsible for transmitting power information between the two parties; high-power cables have a small identification chip (called E-Marker in the industry), which is equivalent to the cable’s “capability ID card”, and can tell the charger and device the maximum current it can withstand.
- Port end: Whether it is a USB-C port on a device or an accessory, not all support charging. Some can only transfer data, some can only transfer video, some can only output power, and some can only input power.
- Receiving end: That is your device. Its internal power management chip, battery, temperature sensor, and system strategies jointly determine whether to charge, how fast to charge, and when to slow down or even stop charging.
Here are three most basic concepts, which can be understood in plain language, no need to memorize by rote:
The first is power (W). You can understand it as the “speed limit” of charging. The larger the number, the faster the charging in theory. The calculation of power is very simple: it is voltage (V) multiplied by current (A). For example, the common 20V voltage and 3.25A current multiply to 65W of power, which is also the standard charging power of many thin and light laptops.
The second is the charging protocol. You can understand it as the “common language” between the charger and the device. After plugging in, they will first “chat” to find a power level supported by both parties, and only start supplying power after reaching an agreement. When a suitable level cannot be negotiated, it may fall back to the default 5V low-power charging, or the device may directly refuse to charge, depending on the device, charger, cable, and port role.
The third is cable capability. Ordinary USB-C cables can generally withstand a maximum of 3A current, corresponding to a maximum power of 60W — the 60W here is usually the value achieved at the 20V PD level. If the charger or device does not support the corresponding voltage level, the actual power will be lower. If you need to exceed 60W or 3A current, you must use a cable with an E-Marker chip. Legitimate high-power cables will mark specifications such as 60W, 100W, 240W on the packaging or the cable itself. A simple way to remember: 60W cables are usually sufficient for troubleshooting most phones and tablets; cables with 100W/240W and clearly marked E-Marker are more suitable for laptops, high-power power banks, USB-C monitor power supply, and docking station scenarios.
You don’t need to memorize all common charging protocols, just know a few core ones: USB PD is the most widely compatible fast charging protocol among USB-C devices, and is very common on many newer phones, tablets, laptops, handheld consoles, and power banks, equivalent to the industry’s common “mandarin”; but low-end devices, old devices, and some small accessories may only support low-power charging, which shall be subject to the device manual. PPS is an advanced function of USB PD, called Programmable Power Supply. Many Android phones’ fast charging relies on PPS to achieve full speed. If the charger does not have PPS, it may still charge, but the speed will be much slower; there is also proprietary fast charging, which is an exclusive protocol developed by each brand. For example, some brands’ 100W-level fast charging requires original or certified chargers and cables to reach peak speed, and cross-brand use usually drops to ordinary PD speed. Also note that although USB-A to USB-C cables can charge many devices, they usually do not support standard USB-C PD high-power fast charging, so when troubleshooting laptop charging problems, do not use this type of cable for testing, as the results will be inaccurate.
To understand the parameters on chargers and cables, you only need to look at a few key ones: Input is used to judge whether it can adapt to the local power grid, and those marked 100-240V are mostly globally compatible; Output will list voltage levels such as 5V, 9V, 12V, 15V, 20V, as well as the maximum current corresponding to each level, to see if it can meet the device’s power requirements; if it is a multi-port charger, also pay attention to whether the nominal power is total power or single-port power. For example, a multi-port charger marked “100W” may have a maximum of only 65W per single USB-C port, and the power will be further divided when two devices are used together. In addition, a PD logo does not mean it has PPS, and a high total power does not mean it supports a certain phone’s proprietary full-speed fast charging. Don’t just look at the marketing.
The charging power requirements of different types of devices vary greatly. Below are common reference ranges, and the specific values shall be subject to the official device instructions:
| Device Type | Common Charging Power Range | Precautions |
|---|---|---|
| Small accessories such as earphones, watches, and fitness bands | 2.5W-10W | Low power requirements; faults caused by dirty contacts are more common |
| Phones | 18W-65W (proprietary fast charging specifications are higher) | Actively slows down when nearly fully charged or when temperature is too high |
| Tablets, handheld consoles, thin and light laptops | 30W-100W | May charge slowly when power is insufficient, and may even drain while charging under high load |
| High-performance laptops | 100W or above, or exclusive adapter | Some models’ USB-C ports only support low-power supplementary charging, and may still drain while charging during full-load scenarios such as gaming and rendering. Confirmation with the original adapter or a higher-power solution is required. |
There are also a few common sense points that many people get wrong, and almost every beginner has fallen for them: First, not all USB-C ports can charge. Some C ports on computers, monitors, and docking stations are only used for data or video transmission, so plugging them in naturally won’t charge; second, just because it fits doesn’t mean it will fast charge. The charger, cable, and device must all support the same or compatible protocols and power levels; third, the indicator light on the charger being on only means it is connected to the mains power, not that it has successfully negotiated with the device, let alone that it is charging normally; in addition, being able to charge a phone does not mean it can charge a laptop, as laptops have much higher requirements for power, protocol, and cables; finally, legitimate high-power chargers will not “burn out” small devices, because compliant products will negotiate power supply first, and small devices only draw the power they need. The real risks are low-quality, falsely labeled, or already damaged chargers.
Troubleshooting from Easy to Difficult: 90% of Common Problems Can Be Identified
Now that we understand the basic principles, we can start from the simplest and easiest to troubleshoot places, and find the problem step by step. No need to disassemble anything, no need to understand circuits, most common problems can be located.
First Check Power Supply: Don’t Ignore Small Problems with Outlets and Power Strips
Many people blame the charger right away, but in fact it may just be that the outlet has no power, or the power strip’s switch is not turned on. You can first try a different outlet that you know has power, for example by plugging in a desk lamp, night light, or a known good charger to confirm the outlet is working. Then check the power strip’s switch, fuse button, extension cord, and travel adapter. Don’t use loose, hot, or extremely cheap low-quality power strips, as poor contact can also prevent charging. Also confirm that the charger’s prongs are fully inserted, and both ends of the USB-C cable are plugged all the way in, so they are not blocked by the phone case, laptop case, or protective cover, which would cause poor contact. When using overseas, remember to check the charger’s Input range and the adapter’s rated specifications as mentioned earlier.
Then Check the Device: Many “Faults” Are Actually Self-Protection
Many times it’s not that the charger is broken, but that the device itself temporarily doesn’t want to charge. For example, if the device’s battery is completely drained, deeply discharged, it may need to charge for 5 to 10 minutes before the charging icon appears. For laptops with deep discharge, you may have to wait even longer. Also when the temperature is too high or too low, the device will stop charging or limit speed — the recommended operating environment for many phones and tablets is about 0-35°C, and the allowable charging range may be about 0-45°C, but different manufacturers have different standards, and the specific values shall be subject to official instructions. For example, if you leave your phone in a hot car in summer, it definitely won’t charge when plugged in, but it will work once it cools down; in winter, outdoors below zero, it may also not charge.
In addition, if the device is running high-load applications, such as gaming, video editing, hotspot sharing, or navigation, the charging power is not enough to keep up, so it will naturally seem to charge slowly or even drain. Try closing these applications. Also, restart the device — sometimes the system has a temporary identification error, and a restart fixes it. For laptops, you can try charging while turned off, or long-press the power button for more than ten seconds to reset power management. Finally, check if there are any system prompts, such as “Optimized Battery Charging”, “80% Battery Protection”, “Moisture Detected”, or “Accessory Not Supported” — these are all normal system prompts, not a broken charger.
Test with a Different Cable: Cables Are the Most Common Fault Point
Cables are the most common link in charging faults, bar none, so prioritize testing with a different cable. It’s best to use the original cable, or a legitimate C-to-C cable with clearly marked power, don’t use random free gift cables of unknown origin. For phones and tablets, a 60W cable is sufficient for troubleshooting; for laptops, it is recommended to use a 100W or 240W cable with E-Marker to avoid inaccurate testing due to insufficient cable specifications.
When testing, unplug all adapters, docking stations, magnetic heads, extension cables, and car adapters, directly connect the charger and device with the cable for a shortest-chain test to eliminate interference from adapters. If charging works normally after changing the cable, that means the original cable either has a broken core, poor contact, insufficient specifications, or does not support the required protocol.
Test with a Different Charger: Eliminate Power Supply End Problems
If changing the cable still doesn’t work, try changing the charger. It’s best to use a legitimate PD charger with power close to or higher than your original adapter. For example, if your laptop is 65W, test with a 65W or higher PD charger. Don’t use a 20W low-power phone charger to test a laptop, as the result will be inaccurate — a low-power charger may not be able to power the laptop at all, which doesn’t mean the original charger is broken. Also note that testing with low-power devices such as earphones or watches can only verify whether the basic 5V output is normal, and cannot prove that high-power PD levels are intact. If it is a multi-port charger, only plug in one device during testing, don’t let other devices share the power. If charging works normally after changing the charger, then the original charger is either broken, triggered protection and hasn’t recovered, has insufficient power, has a protocol mismatch, or its multi-port power distribution doesn’t meet your needs.
Clean the Port: Lint and Dust Are Common Culprits of Phone Faults
If changing to a good cable and good charger still doesn’t work, check if the device’s port is clogged. Phones are often put in pockets, so lint and dust can easily get inside. When enough builds up, it will block the plug, preventing it from being fully inserted, causing poor contact. You can look at the port under strong light to see if there is lint, dust, metal shavings, and whether the plug cannot be fully inserted.
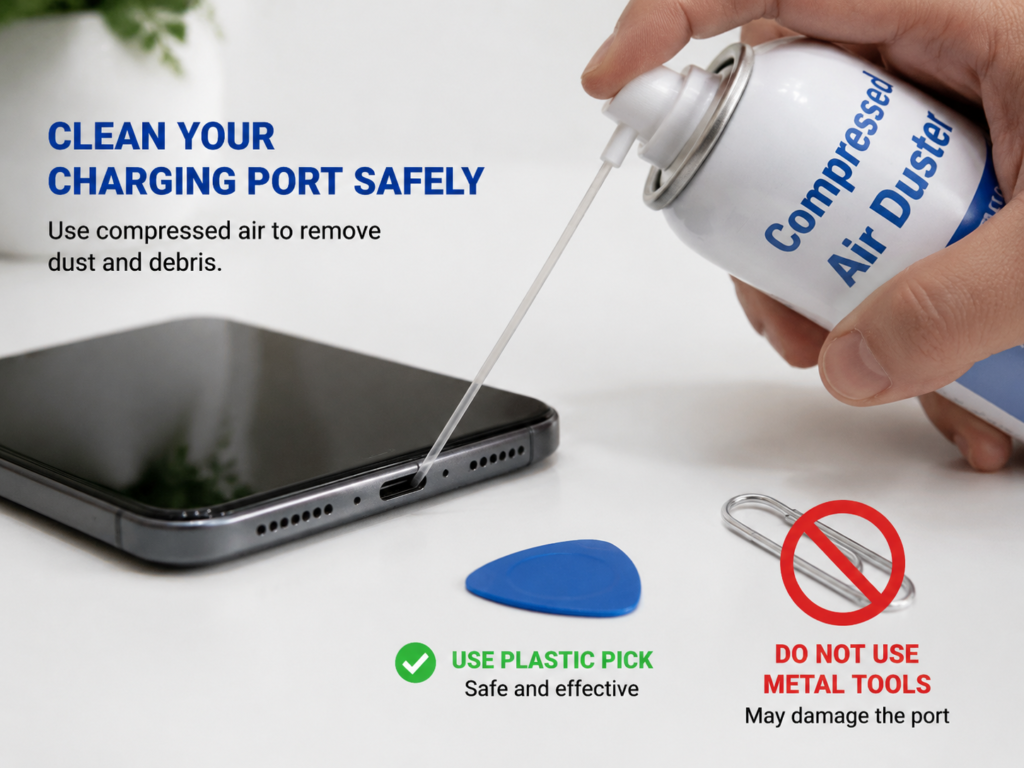
When cleaning, be sure to disconnect power first. Use a soft toothpick, plastic pick, or compressed air to gently clean it. Never use metal needles, paper clips, blades, etc., as they can easily cause a short circuit or scratch the internal pins, damaging the device instead. If after cleaning, the plug fits tighter when inserted and charging is restored, then the problem was a clogged port. If the port itself is loose, has bent pins, is rusted, or has been exposed to liquid, don’t try to fix it yourself, send it for repair directly.
Cross-Verification: Precisely Lock the Fault Point
If you haven’t figured it out after the previous steps, use the cross-verification method. The core principle is: replace only one variable at a time. Don’t change both the cable and the charger at the same time, otherwise you won’t know which one is the problem. For example, if a good charger + good cable + your device can charge, that means your device is fine. Then go back and test the original cable and original charger separately to find out which one is broken; if a good charger + original cable + good device cannot charge, but can charge after changing to a good cable, then the original cable is broken or has insufficient specifications; if the original charger + good cable + good device cannot charge, but can charge after changing to a good charger, then the original charger has a problem; if a good charger + good cable + your device still cannot charge, then it is most likely a problem with your device, such as a broken port, broken battery, broken power management chip, system problem, or damage from liquid exposure.
In-Depth Breakdown of Fault Causes: Why Do Good Accessories Break?
After narrowing down the general direction, you may be curious: how do good accessories develop problems? Let’s look at common fault causes along the four links of charging, so you can avoid them as much as possible in the future.
Cable Faults: Most Easily Misjudged as a Broken Charger
Cables are the most common fault point, and there are several common causes: the most common is physical damage. Cables are often bent, pulled, pressed in door gaps, or run over by chair wheels. Over time, the copper wires inside break, which manifests as charging working at a specific angle but cutting off with a light touch, especially at the base of the plug, which is most prone to bending damage. Second is poor contact. Oxidation or dirt on the plug after long use, or a too-thick phone case that blocks the plug from being fully inserted, can all cause poor contact. There is also the problem of insufficient specifications. For example, using an ordinary 60W cable to charge a 100W laptop will definitely not reach full speed, and may even not charge at all. Many people also confuse data cables with fast charging cables. Some gift cables or cheap cables are only suitable for low-power charging or data transmission, with very thin inner cores that cannot withstand large currents, so naturally they cannot fast charge. In addition, adapter accessories such as magnetic heads, docking stations, adapters, and extension cables connected in the middle may affect PD protocol negotiation, leading to slow charging, intermittent charging, or even no charging.
Charger Itself Faults
Charger problems are less common than cable problems, but they are still common: The first is protection triggering, commonly known as “false death”. If a short-circuited cable is plugged in, the charger overheats, the voltage suddenly fluctuates, or it is overloaded, the charger’s protection circuit will automatically cut off the output to avoid danger. This is not a breakdown — unplug all cables, let it sit for 10 to 30 minutes, and after the protection circuit resets, it may work again when you try. The second is abnormal high-power levels. Some chargers have a good basic 5V output that can charge earphones and phones, but high-power levels such as 15V and 20V are broken, so they cannot charge laptops. This is also why you can’t use low-power devices to test whether a charger is good or bad. The third is physical damage, such as loose prongs, cracked casing, deformed C port, abnormal noise inside, burnt smell, or blackening. Don’t use these, replace them directly. The fourth is internal aging or damage. Long-term use in high-temperature, high-load environments, dropping, bumping, water exposure, or the use of low-quality components will reduce the service life. It may not break after a specific amount of use, but if it has been used for many years, frequently overheats, or has intermittent charging, you can consider replacing it. The fifth is falsely labeled or low-quality products. Some cheap chargers are labeled 65W or 100W, but in reality they can’t reach that at all. They have no certification, are extremely light, and are significantly cheaper than normal ones. These are not only unstable, but also pose safety risks.
Device-End Faults
Don’t suspect the motherboard or battery right away, but device-end problems are also very common, especially clogged phone ports, liquid exposure, or incorrect laptop port roles. The most common is port clogging, which is especially common on phones. Lint and dust from pockets accumulate in the port, blocking the plug from being fully inserted, causing no charging or intermittent charging. Second is port damage, such as bent pins, loose solder joints, wobbly port, or corrosion after liquid exposure, all of which can cause failure to charge. There are also software or policy restrictions, such as power management problems after a system update, optimized charging stopping at 80%, battery protection mode, or management policies installed by enterprises on devices that limit charging — these are not hardware failures. Temperature protection is also very common. Overheating or low temperatures will limit charging power, or even stop charging. For example, charging while using the phone causes it to get hot, or being outdoors in winter, will trigger protection. Finally, if the battery is aging, bulging, has jumping battery levels, or the charging IC is damaged, or there is a short circuit from liquid exposure, these require repair.
Power/Protocol Mismatch: Not Broken, Just Incompatible
There is another situation where the item is not broken, but the power or protocol is mismatched, that is, incompatible. For example, insufficient power: using a 20W phone charger to charge a 65W laptop may show charging but the battery drains, or the laptop may even refuse to charge directly; some devices require 9V, 15V, or 20V PD levels, and if the charger only has 5V output, it definitely won’t work; if PPS or proprietary protocol is missing, the device can charge normally, but cannot reach the original fast charging speed; cables also limit power: in a compliant USB-C PD chain, a 100W charger paired with a 60W cable will usually be limited to 60W or lower according to the cable’s capability; if the cable is low-quality, has no clear marking, or has abnormal negotiation, it may also directly result in slow charging, instability, or even no charging; there is also the problem of incorrect port role. For example, the upstream port of a monitor, the upstream port of a docking station, or a pure data port on a computer may not be able to supply power to the device. Laptops usually only support charging via USB-C ports marked with a plug icon or lightning bolt icon, so plugging into the wrong port naturally won’t charge.
Special Problems with Multi-Port Chargers and Docking Stations
Multi-port chargers and docking stations have some special problems due to their complex structure: the most common is total power distribution. The nominal power of a multi-port charger is generally the total power of all ports combined. For example, a dual-port charger marked 100W, when two devices are plugged in at the same time, may only allocate 65W to the laptop and 25W to the phone, so naturally it is slower. Second is plug/unplug re-negotiation. When another device is plugged into or unplugged from a multi-port charger, it will redistribute the power of all ports. At this time, there may be a 1 to 3 second charging interruption, which is a normal phenomenon, not a breakdown. There is also the loss of the docking station. For example, if you plug a 100W charger into a docking station and then power the laptop, the docking station itself consumes power, so the output to the laptop may only be 85W or even lower. Finally, if the chain is too long, such as charger to docking station, docking station to device, each section of cable must meet power and protocol requirements. If any section is insufficient, the speed will drop. For daily testing, try to plug in only one device to eliminate shunting interference. The specific distribution rules can be found in the port combination table in the manual, which is more reliable than just looking at the total power on the packaging.
Advanced Judgment Tips: Locate Faster and Avoid Detours
If you often encounter charging problems, or want to locate faults faster, these tips can help you avoid wasted effort.
Most Time-Saving Replacement Order
You don’t have to follow the steps in order when troubleshooting. Replacing in this order saves the most time: first change the cable, because cables are the most likely to break, have the lowest cost, and have the highest fault probability; then change the charger, prioritize choosing a legitimate PD charger with sufficient power and clear protocol; finally check the device. If a good cable and good charger don’t work, then focus on the device’s port, system, battery, and motherboard. Also note that comparisons can only be made in similar scenarios. For example, test results for a phone cannot represent a laptop, and being able to charge earphones does not prove that the charger’s 100W output is good. Don’t apply results indiscriminately.
Distinguish Between “Real Faults” and “Compatibility/Settings Problems”
Many times abnormal charging is not because the item is broken, but a compatibility or settings problem. How to distinguish? If it is a real fault, generally all combinations have no response, or there are danger signals such as burnt smell, deformation, liquid exposure, abnormal overheating, and the port is obviously damaged; if it is a compatibility problem, generally it can charge but slowly, only fails with specific combinations of brands, cables, or docking stations, and returns to normal when original accessories are used; if it is a settings or protection problem, generally it stops at 80%, the system prompts optimized charging, slows down when the temperature is high, or cannot charge in low-temperature environments; if it is a load problem, generally the battery level increases normally during standby, and drains while charging when gaming or using high-performance mode.
Distinguish Between Charger “False Death” and Real Damage
Sometimes the charger will trigger protection and enter a “false death” state. Don’t throw it away thinking it’s broken. False death usually has a clear trigger scenario, such as having previously plugged in a short-circuited cable, charger overheating, sudden power outage and restoration, overload, or occurring after abnormal re-negotiation of multi-port devices; the recovery method is also simple: unplug the charger from the outlet, unplug all cables, let it sit for 10 to 30 minutes, then plug it back in and try, it usually recovers. If after sitting idle, testing with a good cable and good device still has no response, or it already has appearance damage, burnt smell, abnormal noise, or abnormal high temperature, then it is really broken. Also note that even if low-power devices can charge, it only means the basic output has recovered, not that the high-power PD levels are completely normal. You still need to test again when using it for a laptop.
Why Multi-Port Chargers Are Sometimes Fast and Sometimes Slow
Multi-port chargers are convenient to use, but many people encounter the situation of “sometimes fast, sometimes slow”. In fact, most of this is normal power distribution logic, and should not be treated as a fault:
When a single device is plugged in, it usually gets the maximum available power of that port, but the actual charging speed is still affected by the device’s battery level, temperature, and supported protocols, and may not always run at the full nominal value.
When multiple devices are plugged in at the same time, the total power is distributed according to the manufacturer’s preset strategy, and high-power devices may slow down. For example, if a 100W dual-port charger is plugged into a laptop and a phone at the same time, the laptop may only get 65W.
When any device is plugged in or unplugged, the charger will re-negotiate the power of all ports, and there may be a 1-3 second brief charging interruption. This is a normal re-negotiation process, not a breakdown.
To know the specific distribution rules, look at the port combination table in the manual, which is much more reliable than just looking at the “total power” number on the packaging.
Quick Check of High-Frequency Faults for Different Devices
Different types of devices have different high-frequency causes of charging faults: for phones and tablets, the most common are cable damage, dust in the port, phone case blocking the plug, temperature protection, incompatible proprietary fast charging, and charging while using; for laptops, the most common are insufficient charger power, cable not supporting 100W/240W, C port not supporting charging, docking station power shunting, and BIOS or battery protection restrictions; for small accessories such as earphones, watches, and fitness bands, the most common are dirty contacts, charging case not closed tightly, and some low-power small devices have poor compatibility with some C-to-C chargers — you can first use the original cable included with the device, and if the original solution is A-to-C, you can also use a legitimate USB-A charger and A-to-C cable for troubleshooting; for monitors and docking stations, the most common are reversed upstream and downstream ports, insufficient PD output power, cables only supporting data or video, and the docking station’s own power consumption; for car and travel scenarios, the most common are unstable car charger output, loose cigarette lighter contact, power outage when the vehicle starts and stops, loose hotel outlets, and poor quality adapters. Also note that travel adapters only convert the plug shape, they cannot step up, step down voltage, or increase charger power. When using across regions, you still need to first confirm that the charger’s Input supports the local voltage.
Common Misconceptions and Pitfall Avoidance Guide
Many people have misunderstandings about USB-C charging, which not only easily leads to misjudgment of faults, but may also damage accessories or even pose safety risks. Here are a few of the most common pitfalls.
Most Common “False Fault” Misconceptions
Plugging in and getting no response means the charger is broken? Actually, it may be a deeply drained device, broken cable core, clogged port, or the charger has triggered protection. Follow the previous troubleshooting steps step by step to locate it.
All USB-C ports look the same so they must be compatible? Actually, USB-C is just the port shape; functions, power, and protocols can be vastly different.
High-power chargers will burn out small devices? When using a compliant, intact high-power charger, small devices usually only draw power according to the negotiation result, and will not be “damaged by overcharging” just because the charger’s nominal power is higher; risks mainly come from low-quality, falsely labeled, damaged, or non-compliant products.
Slow charging means the charger is broken? Temperature, battery level range, battery aging, cable, protocol, and high load all affect charging speed.
Showing fast charging means it must be at full speed? It will actively slow down when nearly fully charged, overheating, under high background load, or when power is shared by multiple ports.
Being able to charge earphones means the charger is completely normal? Earphones can only verify low-power output; high-power devices such as laptops still need to be tested with a full-power PD solution.
Bad Habits That Easily Damage Charging Accessories
Many charging faults are caused by daily bad habits: pulling the cable to unplug instead of pinching the plug can easily break the internal wires; cables that are sharply bent for a long time, pressed in door gaps, or run over by chair wheels will soon have broken cores; continuing to use a charger after it has been dropped, squeezed, or exposed to water poses safety hazards; high-load charging in sun-exposed cars, under pillows and blankets, or in closed bags has poor heat dissipation and easily accelerates aging; plugging or unplugging the charger with wet hands, or forcing charging when the port is wet, can easily cause a short circuit; long-term use of loose, hot, uncertified power strips and travel adapters is not only prone to damage, but also dangerous.
Key Points for Choosing Replacement Accessories
If you really need to replace accessories, remember these key points to avoid pitfalls: when choosing a charger, first check if the Input supports the voltage of your region, then check if the Output levels and power can meet your device’s needs, and also check if it supports the PD, PPS, or proprietary protocol you need; safety certification is very important, different regions have different certifications, for example UL/ETL for North America, CE for Europe, UKCA for the UK, CCC for China, PSE for Japan — don’t just look at the word “fast charging”; when choosing cables, a 60W cable is sufficient for phones, and for tablets, laptops, and docking stations, it is recommended to choose 100W or 240W cables with E-Marker; for multi-port chargers, please verify according to the single-port maximum power and port combination table mentioned above, don’t just look at the total power on the packaging; travel adapters only change the plug shape, do not adjust voltage or power, and for high-power devices, please choose legitimate models with sufficient rated current; finally, don’t buy obviously low-priced high-power products — those without a brand and without certification are most likely falsely labeled, not only unusable, but also pose safety risks.
Handling Boundaries: What You Can Fix Yourself, What to Replace, and What to Send for Repair
Finally, clarify the handling boundaries: what situations you can handle yourself, what situations require replacing accessories, and what situations must be sent for repair. Don’t mess around and cause danger.
Situations That Can Be Handled by Yourself
No power in the outlet, power strip switch not turned on, plug not fully inserted — can be restored after adjustment; deeply drained device, too high/low temperature, temporary system identification error — recovers after waiting, cooling down/warming up, or restarting; lint or dust in the port — returns to normal after cleaning with non-metallic soft tools; charger triggers protection — returns to normal after standing idle, with no peculiar smell, deformation, or abnormal overheating; mismatched cable or charger specifications — just replace with accessories that meet power and protocol requirements.
Situations Where Accessories Should Be Directly Replaced
Cable outer sheath damaged, plug base cracked, charging cuts off when bent, plug loose; charger casing cracked, prongs loose, C port deformed, still unable to work after standing idle; chargers or cables that are uncertified, have falsely labeled parameters, abnormal overheating, or obviously rough workmanship; charger only works occasionally, has frequent intermittent charging, and cable and device problems have been eliminated.
Situations Where Use Must Be Stopped and Device Sent for Repair
Device port loose, pins broken, rusted, unable to charge after liquid exposure; device battery bulging, casing deformed, battery level jumping, abnormal restart or too hot to hold while charging; after using qualified chargers and cables, the device still completely fails to charge and has no response; for unexplained charging faults within the warranty period, prioritize official after-sales service to avoid self-disassembly affecting the warranty.
These Operations Should Never Be Tried by Yourself
Do not disassemble the charger for repair — there are high-voltage capacitors inside, which may retain dangerous voltage even after power is cut off; do not use metal tools to poke inside the USB-C port, as it may cause a short circuit, scratch off pins, and turn a small problem into a big one; after the device is exposed to liquid, do not bake it with a high-temperature hair dryer, as it may accelerate corrosion and damage the battery and sealant; do not continue to use accessories with burnt smell, smoke, bulging, or sparks for testing.
Summary
In general, when encountering a USB-C charging fault, don’t rush to assume the charger is broken. First match the symptoms to the 5 categories — complete failure to charge, slow charging/draining while charging, intermittent charging, failure only with specific combinations, accompanied by danger signals — to lock in the general direction first.
Follow the 6-step troubleshooting from easy to difficult: first check the outlet power supply, then eliminate false faults such as deeply drained device, temperature protection, and high load, then change the cable, change the charger, clean the port, and finally use cross-verification to lock the fault point — 90% of problems can be answered. During the process, as long as you can understand basic parameters such as Input, Output, PD, PPS, E-Marker, 60W/100W/240W, can distinguish the differences between different scenarios such as phones, laptops, small accessories, monitors/docking stations, and car/travel, and don’t apply test results of small devices to high-power devices, you can avoid most misjudgments.
Finally, be sure to remember the safety boundaries: when encountering situations such as burnt smell, smoke, bulging, liquid exposure, port burn marks, or battery deformation, stop using immediately. Replace accessories when needed, send for repair when needed, don’t gamble with safety. When choosing replacement accessories, as long as they match the device’s power, protocol, and usage scenario, choose legitimate and compliant products, there’s no need to blindly pursue the highest power.