
Introduction
If you’ve ever watched a professional stream and wondered how they switch between wide shots, close-ups, and demo angles in real time—you’re watching a multi camera live streaming setup at work. Once reserved for TV studios and big-budget events, multi-camera production is now accessible to creators, small businesses, and hobbyists with even a modest budget. This guide walks you through everything you need to know, from basic gear picks to step-by-step setup, troubleshooting, and budget-friendly builds that work for every use case.
Key Takeaways
- Multi-camera streaming has a much lower barrier to entry than you think: two phones plus free OBS software is enough to build a basic system, and beginners should start with 2 cameras to learn the ropes.
- The core workflow has only 4 steps: video capture → signal conversion → live switching → encoding & push to streaming platforms. Every part of the chain needs to match for stable performance.
- Audio quality matters more than video quality. Viewers will forgive average visuals, but they will leave if your stream has static, echo, or out-of-sync audio. Prioritize microphones and audio gear in your budget.
- Choose software or hardware switching based on your needs: free OBS offers the best value for solo creators and small teams, while hardware switchers deliver better stability for 3+ camera commercial streams.
- Stability always beats more cameras. 2-3 well-planned cameras cover 80% of use cases. Pre-show testing and backup plans are what prevent embarrassing on-air failures.
1. What Is Multi-Camera Live Streaming, Exactly?
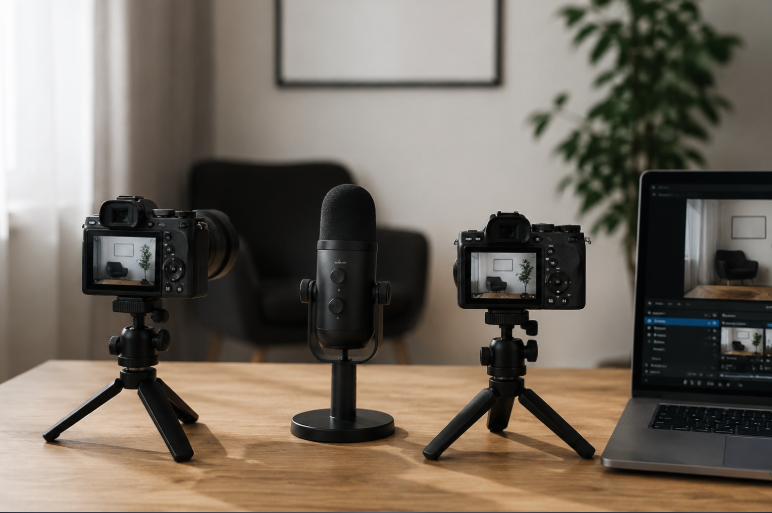
At its simplest, multi camera live streaming means using two or more cameras to film different angles of your scene, then switching between those feeds in real time during your broadcast. Think of it like editing your stream live—wide shots establish the scene, medium shots show interaction, and close-ups highlight details or emotion—giving viewers the same polished feel as a professional TV broadcast.
Single-Camera vs. Multi-Camera: What’s the Difference?
| Category | Single-Camera Streaming | Multi-Camera Streaming |
|---|---|---|
| Viewer experience | One fixed angle, can feel stale over time | Dynamic angle switches, keeps viewers engaged |
| Information density | Only shows one scene at a time | Covers people, products, and environment simultaneously |
| Fault tolerance | One broken device ends your stream | Switch to a backup camera instantly if one fails |
| Perceived professionalism | Casual, hobbyist feel | Significantly more polished, higher viewer retention |
Who Should Use Multi-Camera Setups?
- Content creators & podcasters: Interview shows, educational streams, beauty and tech reviews
- E-commerce sellers: Host wide shot + product close-up + overhead demo angle for better product visibility
- Education & training: Instructor shot + whiteboard/PPT slide + hands-on demo view for better learning retention
- In-person events: Weddings, small product launches, community performances
- Business & faith organizations: Company meetings, lectures, church services for remote attendees
3 Main Setup Approaches (Pick What Fits You)
| Setup Type | How It Works | Best For | Budget (excluding cameras) | Difficulty |
|---|---|---|---|---|
| Software switching (OBS) | Cameras → capture cards → computer → free software handles switching | Beginners, solo creators, 2-4 camera setups | $0–$300 | ★★☆ |
| Hardware switcher | A hardware switcher is a standalone video switching device that works without relying on computer software. All cameras feed into the unit, which outputs directly to your stream. | 3+ cameras, commercial events, high-reliability needs | $300–$2000+ | ★★★ |
| Wireless NDI setup | NDI is a technology that transmits high-definition video over a local network, eliminating the need for long HDMI cables. Cameras send feeds via WiFi or Ethernet. | Hard-to-wire venues, moving cameras, fast deployments | $500–$1500 | ★★★ |
💡 Beginner tip: Start with free OBS and 2 cameras first. Master the workflow before upgrading to more gear—there’s no need to buy everything at once.
2. Gear Selection: How to Buy Without Wasting Money
2.1 Cameras: Use What You Already Own First
Any device that outputs a clean video signal works as a camera source. You don’t need to buy new cameras to get started.
| Camera Type | Pros | Cons | Best For |
|---|---|---|---|
| Smartphones | Zero/low cost, always available | Prone to overheating during long streams | Beginners testing the waters, mobile streams |
| USB webcams | Plug-and-play, no capture card needed | Limited image quality, fixed lenses | Desktop chat streams, business meetings |
| Mirrorless/DSLR cameras | Excellent image quality, shallow depth of field | Requires external power, needs a capture card | Professional creators, e-commerce streams |
| PTZ cameras | Remote pan/tilt/zoom control, no operator needed | Higher upfront cost | Classrooms, conference rooms, fixed venues |
Buying Order Recommendation
- Test your workflow with equipment you already own first
- Upgrade cameras only after you confirm your streaming needs
- Pick the same brand/model for all cameras when possible—this makes color and parameter matching far easier
⚠️ Important note: Video output support depends on the specific USB-C implementation, not just the port shape. Not all USB-C phones can output raw video directly over the port.
Core rule: Use what you have, master the process first, then upgrade. The only hard requirement is a clean HDMI output (no camera menu overlays on the feed).
2.2 Capture Cards: Get Camera Feeds Into Your Computer
A capture card converts your camera’s HDMI signal into a video format your computer can recognize.
Types of Capture Cards
- External USB capture cards: Plug-and-play, portable, the top choice for beginners. You need one card per camera.
- Internal PCIe capture cards: Lower latency, multi-channel support, best for fixed studio setups. Most casual users don’t need this level.
- Switcher-integrated capture: If you buy a hardware switcher, it has capture built in—no separate cards needed.
3 Key Things to Check When Buying
- Supports the maximum resolution and frame rate your camera outputs (1080p60 is the mainstream sweet spot for most creators)
- USB 3.0 minimum—avoid cheap USB 2.0 models, they cause dropped frames
- Stick to reputable brands: Elgato, Magewell, Blackmagic Design for consistent reliability
2.3 Switching Systems: Free Software Works Great for Most People
Software Switchers (Beginner First Pick)
- OBS Studio: 100% free, open source, massive plugin ecosystem. 90% of beginners start here, works on all operating systems.
- vMix: More professional features, supports isolated recording and virtual sets. Windows only, for advanced studios.
- Ecamm Live: Polished Mac-native experience, simple to use. Great for podcasters and interview shows.
Hardware Switchers (Consider for 3+ Cameras)
- Entry level: Blackmagic ATEM Mini series (4 HDMI inputs, typically falls in the few-hundred-dollar price range)
- Mid tier: Blackmagic ATEM Mini Pro ISO (supports isolated recording of every camera feed for post-production)
Hardware vs. software breakdown: Use free software for personal streaming. Choose a hardware switcher for commercial events and in-person productions—they have lower latency and won’t crash if your computer has issues.
2.4 Essential Small Accessories
- Tripods: One per camera. Fluid head models are best for smooth panning and stable shots.
- Cables: Keep HDMI runs under 15 meters. Always pack spare cables—they break more often than you think.
- Tally lights (optional): Let on-camera talent know which camera is live. Useful for professional setups.
2.5 Streaming Computer Requirements
Multi-camera streaming doesn’t just depend on your cameras—your computer’s performance determines whether the whole system runs reliably.
| Use Case | Recommended Specs |
|---|---|
| 2-camera 1080p stream | Intel i5 / Ryzen 5 processor, 16GB RAM |
| 3-4 camera stream | Intel i7 / Ryzen 7 processor, 32GB RAM |
| Professional multi-cam production | High-performance CPU + dedicated GPU |
Focus on these components most:
- CPU encoding performance
- Available USB port bandwidth
- GPU hardware encoding support
- Cooling capability (overheating causes dropped frames and crashes)
3. Audio System: 90% of Beginners Mess This Up
Here’s a hard truth about streaming: most viewers will listen to your stream without watching the screen, but they will leave immediately if your audio has static, echo, or sync issues. For multi-camera setups, you must manage all audio centrally instead of recording separate audio on each camera.
3 Audio Setup Approaches (From Simple to Pro)
| Approach | How It Works | Best For | Audio Quality |
|---|---|---|---|
| Single mic direct input | One microphone plugs straight into your computer/switcher, shared across all cameras | Solo streams, small setups | Basic, functional |
| Switcher built-in mixing | All mics plug into your switcher, volume adjusted centrally then output as one feed | Hardware switcher setups, small to medium productions | Good, saves you from buying a separate mixer |
| Dedicated audio mixer | All mics run through a standalone mixer first, then the mixed signal goes to your switcher | Multi-person streams, professional events | Excellent, maximum control |
Beginner Trick: The Clap Test for Audio Sync
- Point all your cameras at the same person’s hand
- Have them clap once loudly, making a sharp, visible motion
- Check in your streaming software whether the clap motion lines up with the sound on every camera feed
- If they don’t match, adjust the audio delay offset setting until lip sync is perfect across all angles
💡 Universal rule: Set all audio devices to a 48kHz sample rate. This eliminates most sync issues automatically.
4. Step-by-Step Setup Guides
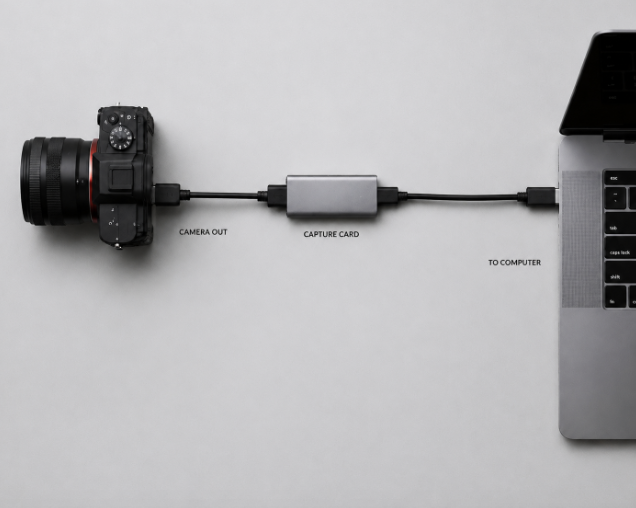
Below are common OBS multi camera setup workflows. Start with the entry-level build if you’re new to this.
4.1 Entry Level: 2-Camera OBS Setup (Zero Experience Needed)
Best for: Two-person podcasts, interview shows, solo creators. One person can run the whole setup.
What you need: 2 phones/cameras, 2 USB capture cards, 2 tripods, 1 laptop, 1 microphone
- Set up both cameras on tripods, frame one for wide shot and one for close-up, then lock the tripod heads
- Connect each camera’s HDMI output to its corresponding capture card, then plug the capture cards into USB 3.0 ports on your computer (use different controller ports if possible)
- Open OBS Studio and add two “Video Capture Device” sources, one for each capture card
- Add your microphone audio source, then run the clap test to fix audio sync
- Set up scene switching hotkeys, run a 10-minute test stream, and you’re ready to go live
4.2 Intermediate: 3-Camera ATEM Switcher Setup (Professional Stability)
Best for: E-commerce streams, small events, church broadcasts. Prioritizes reliability.
What you need: 3 same-model cameras, 1 Blackmagic ATEM Mini switcher, 3 tripods, audio mixer system, monitor
- Set up three cameras: wide, medium, close-up. Match white balance and exposure settings across all three
- Connect each camera to input ports 1-3 on the ATEM Mini via HDMI cables
- Plug the ATEM Mini’s USB-C output into your computer (it will be recognized as a standard webcam)
- Connect the ATEM’s HDMI OUT port to your monitor for program viewing
- Plug your audio system into the switcher’s audio input and adjust levels centrally
- Switch cameras using the physical buttons on the switcher, configure stream settings in the companion software, and go live
4.3 Wireless: NDI Multi-Camera Setup (No Cable Runs)
Best for: Venues where you can’t run cables, fast deployments, lots of moving cameras
Core requirement: All devices connect to the same stable high-speed local network. WiFi 6/6E or wired Ethernet gives the best results.
- Use NDI-native cameras, or standard cameras paired with HDMI-to-NDI converters
- Install the OBS NDI plugin on your computer—it will automatically discover all camera feeds on your network
- Add NDI sources directly in OBS. No capture cards or long HDMI cables required
- Always keep at least one main camera wired as a backup in case the wireless connection drops
4.4 Basic OBS Encoding Settings
The most common beginner issue isn’t camera problems—it’s encoding overload causing stream lag.
Recommended settings:
- 1080p30: H.264 codec, 4500–6000 Kbps bitrate
- 1080p60: H.264 codec, 6000–8000 Kbps bitrate
If you have an NVIDIA graphics card: Use NVENC hardware encoding first. It offloads encoding work from your CPU and drastically reduces system load.
5. Camera Layout & Lighting: Make Your Stream Look Pro Instantly
5.1 Standard 3-Camera Layout Formula
You don’t need to overcomplicate this. Use this universal layout for almost any scenario:
- Main camera: Dead center front, wide/medium shot — your primary view of the full scene
- Close-up camera: 45° side angle, close-up shot — captures expressions, product details
- Overhead camera: Directly above, top-down shot — shows desk work, hands-on demos, craft tutorials
5.2 Basic Lighting Rules for Multi-Camera Setups
- Match color temperature: Use all warm (3200K) or all cool (5600K) lights across the scene. Mixed temperature makes color jumps obvious when you switch cameras.
- Three-point lighting baseline: Key light for main illumination, fill light to soften shadows, backlight to separate your subject from the background.
- Even exposure: Don’t let one camera’s shot be much brighter than another’s. Jerky brightness changes when switching feel very unprofessional.
5.3 Color Matching Tips
- Same-brand, same-model cameras match colors natively with far less work
- Set white balance and exposure manually on every camera—never use auto mode for multi-cam work
6. Internet Requirements: The Secret to Lag-Free Streams
6.1 Bandwidth Reference Chart
| Stream Quality | Video Bitrate | Minimum Upload Speed | Recommended Headroom |
|---|---|---|---|
| 720p30 | 3–4 Mbps | 6 Mbps | 10 Mbps |
| 1080p30 | 4–6 Mbps | 10 Mbps | 15 Mbps |
| 1080p60 | 6–8 Mbps | 12 Mbps | 20 Mbps |
| 4K30 | 12–15 Mbps | 30 Mbps | 50 Mbps |
Calculation formula: Total required bandwidth = stream bitrate × number of platforms you stream to × 1.3 (30% headroom for network fluctuations)
⚠️ Critical note: This is upload speed, not download speed. Home internet plans usually have fast downloads but slow uploads. Always run a speed test before going live.
6.2 Network Stability Tips
- Use a wired Ethernet connection whenever possible. Never rely on public WiFi.
- Keep your streaming network dedicated—don’t let other devices share the connection during your broadcast.
- Keep a mobile hotspot as backup for important streams. If your wired line drops, you can switch instantly.
- For commercial events, use dual ISP lines plus a 5G bonded router for near-zero downtime.
6.3 Recommended Settings by Platform
| Platform | Recommended Settings | Best Use Case |
|---|---|---|
| YouTube Live | 1080p60 | High-quality long-form content |
| Twitch | 1080p60 | Gaming, interactive streams |
| TikTok Live | Vertical format preferred | Mobile-first short-form streaming |
| Facebook Live | 1080p | Community and event streams |
7. Common Mistakes: 10 Traps New Streamers Fall Into
| Common Mistake | What Goes Wrong | The Fix |
|---|---|---|
| More cameras = more professional | You’ll fumble switches and look less polished, not more | 2-3 cameras are enough for most use cases. Master switching before adding more. |
| All USB-C ports support video capture | You might plug into a USB 2.0 port and get dropped frames | Confirm you’re using USB 3.0+ ports that match your capture card specs. |
| A “4K” capture card always captures 4K | It might only pass through 4K, while actual capture tops out at 1080p | Check the “capture resolution” spec, not just the marketing headline. |
| Free software means zero cost | Your computer might crash under load, costing you viewers and reputation | Have a hardware backup for commercial streams. Total cost of ownership matters. |
| Just enough bandwidth is fine | Small network fluctuations cause buffering and dropped frames | Leave at least 30% headroom. Double it for important broadcasts. |
| Buy cameras first, worry about audio later | Great picture with terrible audio will still drive viewers away | Budget for microphones and audio gear before upgrading cameras. |
| You don’t need sync to switch | Jumpy cuts and misaligned audio look unprofessional | Run the clap test to calibrate sync before every stream. |
| Run cameras on battery power | Your camera dies mid-stream and you go dark | Use dummy batteries connected to wall power for long broadcasts. |
| No test run before going live | You discover no signal / no audio once you’re live, wasting time | Test the full workflow at least 30 minutes before your scheduled start time. |
| No local recording backup | If your internet cuts out, you lose the entire event | Always record a high-quality local copy as backup. You can upload it later. |
8. Live Streaming Equipment Builds by Budget
8.1 Entry Build ($100–$500, Beginner Test Run)
- Setup: 2 existing phones/used webcams + 2 basic USB capture cards + free OBS Studio + entry-level USB mic + 2 basic tripods
- Best for: Hobbyists, students, small knowledge-share streams
- Advantage: Extremely low cost. You can test the full multi-cam workflow using gear you already own.
8.2 Mid-Tier Build ($500–$2000, Small Teams & Studios)
- Setup: 3 entry-level mirrorless cameras + Blackmagic ATEM Mini switcher + wireless lavalier mics + basic lighting kit
- Best for: E-commerce streams, small production studios, small to medium events
- Advantage: Reliable hardware switching, noticeably better image and production quality, capable of handling paid commercial work.
8.3 Professional Build ($2000+, Commercial Events)
- Setup: 4+ professional cameras/PTZ units + mid-to-high end switcher + multi-channel digital mixer + dual backup internet + monitoring system
- Best for: Weddings, product launches, large events, professional production teams
- Advantage: Multiple layers of redundancy, maximum reliability, supports complex effects and multi-scene production.
9. Pre-Stream Checklist (Check Every Box)
Equipment Check
- [ ] All cameras output a clean signal, framing is locked in
- [ ] Capture cards/switcher connected properly, switching works smoothly
- [ ] Microphone audio is clear, audio sync calibrated across all feeds
- [ ] All devices are on external wall power, no batteries in use
Network Check
- [ ] Upload speed test passes, with headroom left over
- [ ] Backup network (mobile hotspot) is ready and tested
Test Confirmation
- [ ] 10-minute test stream runs without lag or dropped frames
- [ ] Local recording is enabled, enough storage space is available
- [ ] Full switching walkthrough completed, no misconfigured scenes
10. Frequently Asked Questions
How many cameras do I need minimum for multi-cam streaming?
Two cameras already create a noticeable improvement in production value. Three cameras (wide + medium + close-up) is the standard professional configuration.
Can one person run a multi-camera stream alone?
Absolutely. For 2-3 camera setups, you can handle everything with keyboard shortcuts or a physical switcher by yourself.
Can I use phones as cameras for multi-camera streaming?
Yes. Modern smartphones work as low-cost camera sources via streaming apps, wireless transmission solutions, or capture accessories. Always test your specific phone’s video output method, latency, and long-form power stability before relying on it for a real broadcast.
Do I need a capture card for every camera?
If you’re using software switching via OBS, yes. If you use a hardware switcher, no—the switcher has capture built in.
What’s the maximum number of cameras OBS can handle?
OBS itself has no fixed limit. The real number depends on your computer performance, USB bandwidth, capture hardware, and video resolution. Most consumer computers run 2-4 1080p camera feeds reliably.
Why are hardware switchers better than software?
They’re more stable, have much lower latency, and physical buttons make switching faster and more intuitive. They also won’t crash if your main computer has issues.
Why does my screen flicker when I switch cameras?
Almost always because your cameras are set to different resolutions or frame rates. Match all settings across every camera and the flicker will go away.
Is wireless NDI reliable?
NDI delivers fairly stable video transmission on a high-quality WiFi 6/6E or wired local area network. Always keep a wired backup camera for critical broadcasts.
How powerful does my computer need to be for multi-cam?
A standard laptop works fine for 2 cameras. For 4+ cameras, you’ll get much better results with a dedicated hardware switcher instead of upgrading your computer.
How do I stop my camera from overheating during long streams?
Use a dummy battery for wall power, turn off internal recording, point a small fan at the body, or use a dedicated camcorder built for long run times.
Why should I always record locally?
If your internet drops out mid-stream, the platform won’t save a copy. A local recording lets you re-upload the full show later or repurpose clips.
What’s the #1 tip for someone doing their first multi-cam stream?
Keep it simple. Stick to 2 cameras, test everything 30 minutes early, and don’t try fancy transitions on your first run.
Final Principles for Great Multi-Camera Streams
- Start simple: Begin with 2 cameras and free OBS. Upgrade only after you’ve mastered the basics.
- Audio comes first: Spend your budget on microphones and sound gear before you spend more on cameras. The improvement in viewer experience is far bigger.
- Stability wins: Wired is always more reliable than wireless. Testing ahead of time beats fixing problems live. Always have a backup plan.
- Match your gear to your needs: Software setups give the best value for personal streaming. Hardware switchers are the smart pick for commercial events.
The best multi camera live streaming setup isn’t the one with the most gear—it’s the one that fits your use case, your budget, and your skill level perfectly.