
Have you ever had this experience: you get a new USB-C display, or use a docking station to connect an external screen, plug the cable in firmly, but the display is completely black and shows “No Signal”? You mess around for ages without finding the problem, and even end up requesting a return.
In fact, most USB-C display failures are not caused by hardware damage, but by a deep-seated misconception many people have: that USB-C is an “all-in-one interface” and you can plug in a display as long as the shape matches. But in reality, USB-C is just the physical shape of the interface — just like round jacks, some are headphone jacks and some are charging jacks, their internal functions are entirely determined by internal protocols and pins.
First, Get the Basics Straight: USB-C Display Doesn’t “Work Right After Plugging In”
To troubleshoot efficiently, you first need to sort out the basic logic of USB-C display.
USB-C Is Just the Interface Shape; Function Depends on Internal Protocols
A USB-C port that looks identical may only support charging, may only transfer files, or may support charging, data, and video at the same time. How to tell?
The most straightforward method is to look at the markings next to the interface:
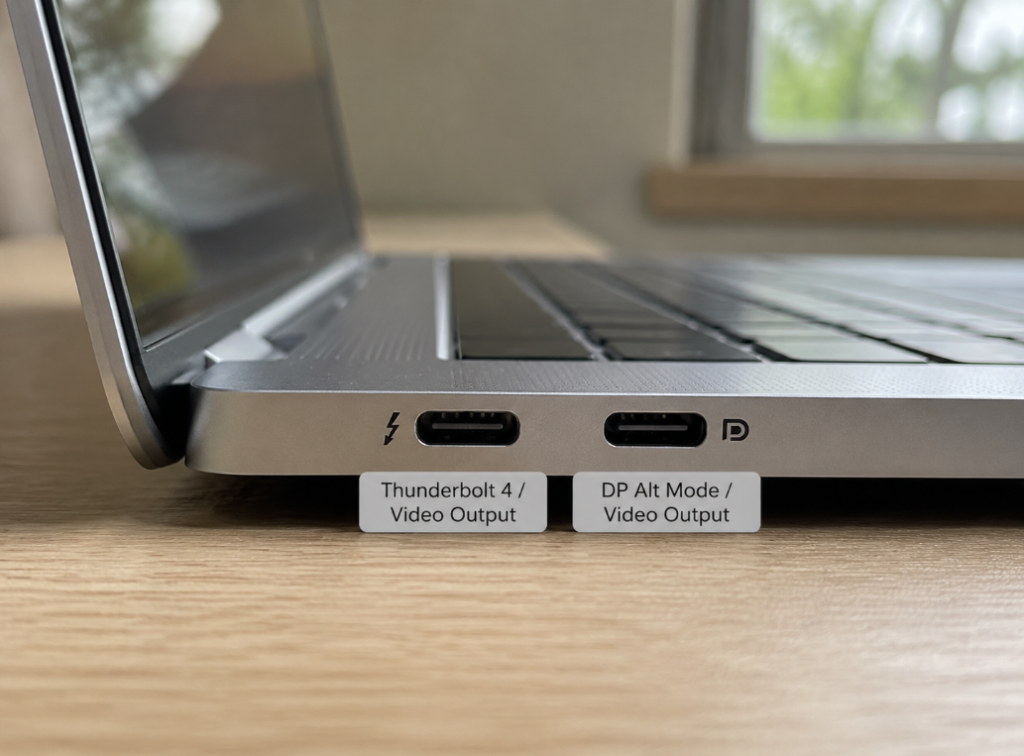
if there is a lightning-shaped mark, it usually indicates support for the Thunderbolt protocol, which can mostly carry DP video output — but the final confirmation should still be based on the official specification page, and it requires matching cables, peripherals, and confirmation of the display end’s input capability; if there is a D-shaped video icon, it supports DP Alt Mode and can also connect to a display.
If there are no markings next to the interface, never guess — even for the same laptop model, USB-C ports on different configurations may have different functions. Be sure to check the device’s official specification page to see if that USB-C port is marked with “supports video output”, “DP Alt Mode”, or “Thunderbolt”.
Normal Display Requires 3 Core Conditions to Be Met Simultaneously
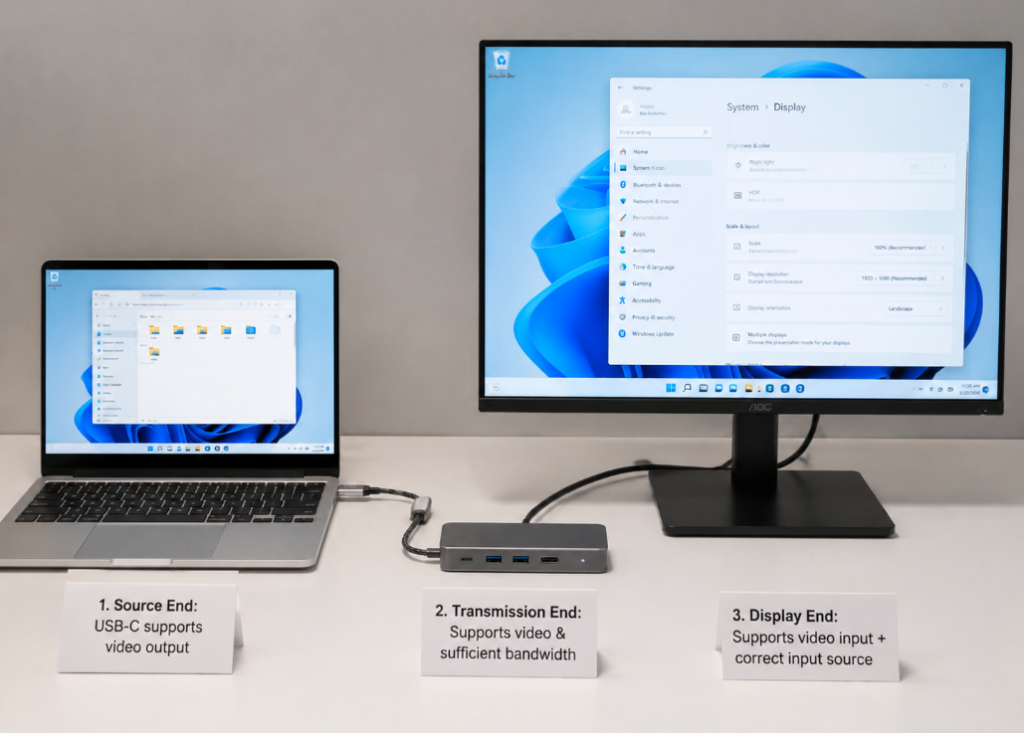
USB-C display is like a water pipe: from the faucet to the outlet, every section must be unobstructed, and if any link is missing, there will be no picture:
- Source end (computer/phone/tablet): The USB-C port must support video output, equivalent to the faucet having water;
- Transmission end (cable/docking station/adapter): Must support video signal transmission and have sufficient bandwidth, equivalent to the water pipe being thick enough and not clogged;
- Display end (monitor): The USB-C port must support video input, and you have selected the correct input source, equivalent to the outlet being open and connected to the correct pipe.
As long as one link does not match, various problems such as no signal, black screen, flickering screen, or low resolution will occur.
3 Common USB-C Video Modes
You may have seen various professional terms on product pages, but in plain language there are only three types:
- DP Alt Mode: The most universal solution, equivalent to “borrowing” USB-C pins to transmit DP display signals. It can be used as long as the device is marked to support this mode, and no additional drivers are required.
- Thunderbolt/USB4 Mode: A high-speed multi-function protocol that, in addition to fast data transfer, is also compatible with DP video and can drive multiple displays. It is generally used on high-end laptops and docking stations.
- Regular USB Data Mode: Can only connect peripherals like USB flash drives and mice, and cannot transmit video at all. Many low-cost devices have USB-C ports of this type.
Different Fault Symptoms Corresponding to Initial Troubleshooting Directions
You don’t have to test everything at once. First look at what your fault looks like, which can directly narrow down the scope:
| Fault Symptom | Priority Troubleshooting Direction |
|---|---|
| No signal at all / black screen | Interface function, cable, display input source |
| Screen flickering / intermittent connection | Power supply, cable contact, interface dust |
| Only low resolution / low refresh rate | Cable specification, docking station bandwidth, system settings |
| Docking station USB works but display has no response | Docking station video channel support |
Most Common Cause: Peripheral Side Issues (Troubleshoot in 3 Minutes)
Many USB-C display failures occur on directly accessible peripherals — cables, docking stations, displays. Most of these problems can be troubleshooted in 3 minutes.
USB-C Cable: Don’t Use a Charging-Only Cable to Connect a Display
This is the number one cause of black screens. Many people grab a charging cable that came with their phone to connect to the display, and of course it doesn’t light up — charging-only cables or low-speed data cables simply don’t have the pins needed to transmit video, just like ordinary electrical wires can’t be used as network cables.
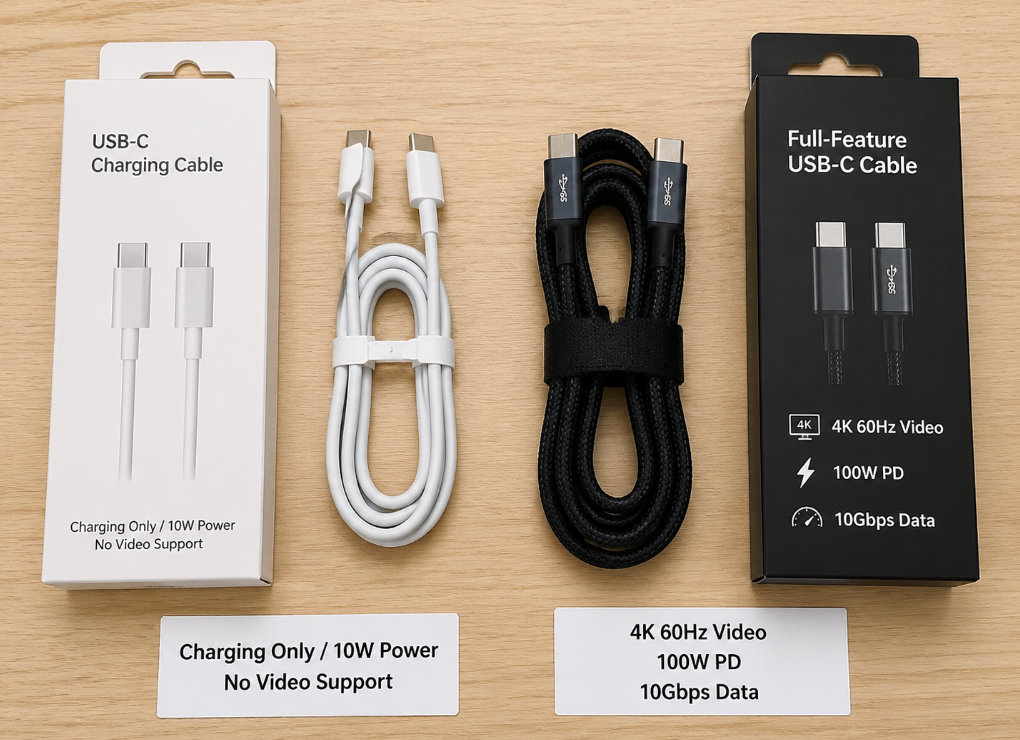
Even if the cable supports video, its specifications may be insufficient: for example, if you have a 4K 144Hz display and use an old cable that only supports low-spec video, the bandwidth simply can’t keep up, which will cause flickering, low resolution, or even a black screen.
There is also an easily overlooked situation: the cable looks fine on the outside, but the internal pins may be broken due to frequent bending or rough plugging and unplugging; or dust has gotten into the interface, causing poor contact.
Quick judgment method: Clean the interface dust with a clean soft brush, unplug both ends of the cable and plug them back in tightly. It is best to test with a USB-C cable that is confirmed to transmit video normally — for example, a cable that has been used to connect a display and worked normally before. Don’t just grab a random new cable to test.
Docking Station/Adapter: Not All Docking Stations Can Output Video
Many people buy docking stations only looking at “how many ports there are”, ignoring whether there is a video function. As a result, they can read USB flash drives and access the internet when plugged in, but the display just won’t light up.
First of all, cheap docking stations often only have USB and network ports, with no video channel at all, so naturally they can’t output a picture.
Secondly, even if the docking station supports video, most only have the upstream port (the USB-C port that connects to the computer) supporting video transmission. Other downstream USB-C ports on the docking station can only be used for charging or data transfer, and cannot connect to a display — many people buy a docking station with a C port, thinking they can plug in a display casually, and fall into this trap.
There is also the issue of specification limits: for example, if the docking station is nominally only capable of single-screen 4K 30Hz, and you insist on running 4K 60Hz, it will definitely cause a black screen or frequency reduction.
Also note two different video solutions: native DP solution does not require driver installation, has low latency, and is suitable for gaming and high refresh rates; DisplayLink solution relies on software to compress video, requires driver installation, is suitable for office multi-screen setups, but is not suitable for gaming or using high-refresh displays.
Quick judgment method: Skip the docking station and adapter, and connect the display directly to the source device’s USB-C port with a cable. If direct connection works, the problem lies with the docking station or adapter.
Display Side: Don’t Overlook Input Source and Interface Function
Many people mess around with the computer for a long time, only to find that the display just wasn’t switched to the correct input source — for example, you plugged into the USB-C port, but the display is still in HDMI input mode, so of course there’s no signal.
There is another situation: the USB-C port on the display does not support video input at all. Some displays have USB-C ports that are only used for reverse power supply to the computer, or as a USB upstream port (the USB ports on the display only work after connecting), and cannot transmit video. You will fall into a trap if you don’t check clearly when buying.
If you are using a “one-cable solution” display (where one USB-C cable transmits video, charges the computer, and transfers data at the same time), you also need to pay attention to power supply power: if the reverse power supply power of the display is lower than your laptop’s power consumption (for example, a gaming laptop needs more than 90W, but the display only provides 65W), flickering or intermittent disconnection may occur.
For a few models of displays, you also need to manually enable “USB-C video” or “high-speed mode” in the OSD menu (the built-in setting menu of the display, which can be called up by pressing the physical buttons on the display), otherwise the video function is turned off.
Quick judgment method: Take a device that clearly supports USB-C video output (such as an Android model that supports DP Alt Mode/desktop mode, iPhone 15 series with a compliant cable, or a USB-C iPad that supports external display), plug it directly into the display’s USB-C port. If it displays normally, the display is fine.
Second Most Common Cause: Source System and Settings Issues (Troubleshoot in 5 Minutes)
If the peripherals are all fine, you can next troubleshoot the settings of the source end (computer/phone/tablet). This is the second most common cause of failure, and can be troubleshooted in about 5 minutes.
Display Settings Not Enabled: External Display Naturally Won’t Receive Signal
Most of the time it’s not that the hardware is broken, but that you haven’t turned on the external display switch.
Windows computers may default to “PC screen only”, so the external display can’t receive a signal at all. Press the Win+P key combination on the keyboard to switch to “Extend” or “Duplicate” mode.
For Mac computers, sometimes the system won’t automatically detect an external display. You need to open “System Settings – Displays”, hold down the Option key on the keyboard, and the “Detect Displays” button will appear on the interface. Click it to search manually.
There is another common situation: you set the resolution or refresh rate too high, exceeding the display’s support limit, which will cause a black screen or flickering. For example, if the display only supports 4K 60Hz, and you force 4K 120Hz, there will definitely be a problem.
In addition, the laptop will go to sleep when the lid is closed, so the external display will naturally have no signal. If you want to use an external display with the lid closed, you need to change the “action when closing the lid” to “do not sleep” in the power settings.
Quick adjustment method: First switch to extend/duplicate display mode, lower the resolution to 1080p, refresh rate to 60Hz, turn off HDR, and see if it lights up.
Power and Permission Restrictions: System Actively Turns Off Video Output
Sometimes the system will actively turn off the USB-C video function for power saving or security reasons, not because it’s broken.
The most common is power saving mode: if your computer is not plugged in and the battery is low, the system will automatically turn off USB-C video output to save power. At this time, plugging in the display will definitely have no response.
There is also the authorization issue for Thunderbolt/USB4 devices: when you plug a Thunderbolt device into the computer for the first time, the system will pop up an authorization prompt. If you clicked “Deny” at that time, the device can only charge or transfer data, and cannot output video.
If you are using a company-issued enterprise computer, it is also possible that the IT department has disabled external display through group policy (security rules set uniformly by the enterprise) to prevent data leakage. This situation cannot be changed by individuals, you need to confirm with IT.
Quick adjustment method: Plug the computer into power, turn off power saving mode, and check if there are any missed Thunderbolt device authorization popups.
Drivers and System Are Too Old: Compatibility Lags Behind
If your system or graphics driver has been used for several years, it may not support the new USB-C video specification, which will cause problems such as recognition failure, flickering, or incorrect resolution.
Especially for graphics drivers, USB-C video output is mostly handled by the graphics card. If the driver is too old, newly released displays or docking stations may not be recognized.
Also, the DisplayLink solution docking station we mentioned earlier must have the corresponding driver installed to output video normally, otherwise it will either be black screen or only use a very low resolution.
Quick fix method: Update the system, graphics driver, and the official driver of the docking station to the latest official stable version. Do not use beta versions or drivers installed by third-party driver tools.
Advanced Troubleshooting: Why “Everything Supports It But It Still Doesn’t Work”?
If you have confirmed that the computer, cable, and display are all marked to support USB-C video but it still doesn’t work, it is most likely a compatibility or bandwidth issue.
Video Mode or Firmware Incompatibility
Although they are all USB-C video, different devices may support different modes. For example, your computer only supports DP Alt Mode, while a certain display only supports Thunderbolt video input (this situation is rare, but it does exist). If the modes on both sides don’t match, naturally there will be no picture.
Another common situation is that the device’s firmware is too old: the factory firmware version of the display or docking station is low, which is not compatible with the video specification of new devices, resulting in problems such as being recognized but having no picture, or flickering.
Judgment method: Go to the official specification pages of both devices to compare whether their supported video modes are consistent; then go to the official website to find the firmware update for the corresponding device, update to the latest version and try again.
Insufficient Bandwidth: The Barrel Effect Determines the Upper Limit
The total bandwidth of USB-C video is determined by the one with the lowest specification among the source end, cable, and display end, just like how much water a barrel can hold depends on the shortest wooden board.
Here is a simple reference, the actual shall be subject to the product’s nominal specification:
| Common Display Specification | Minimum Requirement (Uncompressed) |
|---|---|
| 1080p 60Hz | DP 1.0 or above |
| 4K 60Hz | DP 1.2 or above |
| 4K 120Hz / 8K 60Hz / HDR | DP 1.4 or above |
The above is only a rough reference for uncompressed signals. The actual upper limit is also affected by DP version, cable specification, USB-C channel allocation, DSC compression technology, HDR color depth, chroma subsampling format, and the docking station’s nominal capability; when troubleshooting, still refer to the product’s official specification page and the actual test results of reducing resolution/refresh rate.
In addition to the hardware specifications themselves, there are two situations that can cause insufficient bandwidth:
First, peripherals occupying bandwidth: In many USB-C DP Alt Mode docking stations, video and high-speed USB share limited channels. At this time, if high-speed USB devices such as mobile hard drives and 2.5G network cards are connected, they will occupy video channel bandwidth, leading to problems such as flickering and reduced refresh rate; Thunderbolt/USB4 docking stations have higher bandwidth, but are still limited by the nominal upper limit and multi-screen configuration.
Second, insufficient video channels at the source end: For example, some thin and light laptops are only equipped with 2 DP video channels for the USB-C port for power saving, which can only support up to 4K 30Hz. If you force 60Hz, it will definitely cause a black screen.
Judgment method: Unplug all other USB peripherals on the docking station, leaving only the display; then lower the resolution and refresh rate, turn off HDR. If it displays normally, it is a bandwidth problem.
Video Restrictions on Special Devices
Not all devices with USB-C ports can output video. Pay attention to several types of common special devices:
- Phones/tablets: Not all Android phones support DP output, and many budget phones have USB-C ports that can only charge and transfer data; USB-C iPads can usually connect to external displays, but mirroring, extended desktop, resolution, and window management capabilities depend on the iPad model, chip, and iPadOS version. For example, the full extended screen function based on Stage Manager is not supported by all iPadOS 16+ devices; iPhone 15 and above series support DP output, but accessories must meet specifications.
- Gaming handhelds: For devices like the Steam Deck, you need to use a dock that supports video output, or enable the corresponding settings for external display in the system, to connect to the display normally.
- Desktops: The USB-C ports on many desktop motherboards only support data transmission by default; whether video can be output depends on whether the motherboard supports USB-C DP Alt Mode/Thunderbolt/USB4, and whether it is connected to the DP signal of the integrated graphics or discrete graphics card. Prioritize direct HDMI/DP connection from the graphics card; if you want to output via USB-C, be sure to check the official specifications of the motherboard and graphics card first.
Low-Probability Cause: How to Tell If Hardware Is Damaged?
The probability of hardware damage is very low. Be sure to rule out all the previous problems before checking this part. Don’t assume the device is broken right away.
Source USB-C Port Damage
If your device has been frequently dropped, the interface has been exposed to water, or you frequently plug and unplug roughly, it may cause damage to the USB-C port.
Judgment method: Use the same USB-C port to plug in other devices such as a USB flash drive and charger. If none of them respond, it is likely that the port is broken.
There is also a special case: charging and data transfer are normal, but video doesn’t work — this may be that the pins responsible for video in the interface are separately damaged, while other pins still work. This situation also requires repair.
Peripheral Hardware Failure
If the display works normally when connected to other devices via HDMI or DP cable, but only the USB-C port doesn’t work, then the display’s USB-C port is broken.
If the display works normally when directly connected to the computer, but no video ports (including HDMI and DP) on the docking station can output a picture after connecting to the dock, then the docking station’s video chip may be broken.
Graphics Card Hardware Failure
If all external display interfaces (USB-C, HDMI, DP) don’t work, and the device’s built-in screen also has artifacts, flickering, or stuttering, then it is likely that the graphics card hardware has a problem. This situation requires repair service.
10-Minute Step-by-Step Troubleshooting Process (Follow Along for Beginners)
Beginners can directly follow the troubleshooting process below from easy to difficult, and locate most problems in about 10 minutes.
Step 1: Check Peripherals (3 Minutes, No Settings Changes Needed)
Start with the peripherals that are most prone to problems, without touching the computer settings:
- Confirm that the display has been switched to the USB-C input source;
- Clean the interface dust with a clean brush, re-plug both ends of the cable tightly, or replace with a USB-C cable that is confirmed to support video;
- Skip the docking station and adapter, and connect the display directly to the source device’s USB-C port.
Result judgment: If it lights up, the problem is with the cable or docking station; if not, proceed to the next step.
Step 2: Check Settings (5 Minutes, Adjust System Parameters)
If the peripherals are fine, check the system settings:
- Switch display mode: For Windows, press
Win+Pto select Extend/Duplicate; for Mac, open Display Settings, hold the Option key and click “Detect Displays”; - Plug the computer into power, turn off power saving mode, and set the laptop lid close action to “do not sleep”;
- Lower the resolution to 1080p, refresh rate to 60Hz, and turn off HDR.
Result judgment: If it lights up, the problem is with settings or bandwidth; if not, proceed to the next step.
Step 3: Cross-Validation (Determine Compatibility)
This step is used to determine whether it is device incompatibility or hardware damage:
- Confirm via official specification pages that the USB-C ports of the source end and the display both support video output;
- Unplug all other USB peripherals, leaving only the display;
- Test the display with another device that is confirmed to support USB-C video.
Result judgment: If other devices can light up, the problem is with the source device or the compatibility between the two; if none light up, proceed to the next step.
Step 4: Determine Hardware Damage
If it still doesn’t light up at this step, it is most likely a hardware problem:
- The same USB-C port on the source end has no response to all devices → source port is damaged;
- Only the USB-C port of the display doesn’t work, other ports are normal → display USB-C port is damaged;
- All external displays don’t light up, and the built-in screen has artifacts/flickering/stuttering → graphics card is damaged.
Hardware damage generally cannot be repaired by yourself, just contact official after-sales service.
Quick Troubleshooting for Common Scenarios
If you are in the following common situations, you can directly check correspondingly:
- Laptop directly connected to USB-C display has no signal: First check if the laptop’s USB-C port supports video, then check the display input source, and replace with a full-feature video cable;
- Docking station can charge but display is black: Focus on checking whether the docking station supports video output, whether the corresponding driver (such as DisplayLink) is installed, and whether the resolution exceeds the docking station’s upper limit;
- 4K display only works at 30Hz or flickers: Most likely the cable or docking station has insufficient bandwidth. Try turning off HDR and lowering the refresh rate. If that doesn’t work, replace with a higher-specification cable;
- Phone/tablet fails to connect to display: First confirm whether your device supports DP output, then check the accessory specifications and whether the power supply is sufficient;
- Picture is intermittent / goes black when touching the cable: Prioritize checking whether the cable is plugged in tightly, whether there is dust in the interface, or whether the cable’s pins are broken.
Pitfall Avoidance and Fault Decision-Making (Advanced Improvement)
After mastering the troubleshooting methods, you can also avoid common pitfalls through the following tips, and make reasonable decisions after a failure.
How to Avoid Pitfalls When Buying Accessories
- When buying cables or docking stations, be sure to check if the product page has clear markings such as “supports video output”, “DP Alt Mode”, “4K 60Hz”. Don’t just place an order because it says “USB-C” — many cheap cables only have a charging function.
- Just choose the specifications according to your needs, there is no need to buy high-end accessories that far exceed your device’s requirements. For example, if you only have a 1080p 60Hz display, a regular DP Alt Mode cable is enough, no need to spend a lot of money on a Thunderbolt 4 cable.
- When buying a docking station, distinguish between native DP and DisplayLink solutions: if it’s for office multi-screen use, DisplayLink is cost-effective; if it’s for gaming or using high refresh rates, choose the native DP solution. If you want to connect multiple monitors, also confirm that the docking station supports MST (Multi-Stream Transport, transmitting multiple independent pictures through one cable) or daisy chaining (displays connected in series, one cable connecting multiple screens), otherwise you can only duplicate the picture.
- When buying a USB-C display, be sure to confirm that the USB-C port is a video input port, not a port that only supplies power or acts as USB upstream. Check the product specification description, don’t just look at the appearance.
Daily Usage Precautions
- Do not roughly plug or unplug USB-C cables, especially when moving the device, as it is easy to break the pins inside the interface.
- When using a docking station, don’t connect too many high-speed USB peripherals at the same time (such as multiple mobile hard drives, 2.5G network cards) to prevent occupying video bandwidth and causing picture stuttering.
- For high-power gaming or creator laptops, when using a one-cable solution display, it is best to connect a separate power supply to the laptop, and don’t rely on the display’s reverse charging, to avoid power shortage causing disconnection or performance degradation.
Clarification of Common Misconceptions
Here are a few points that everyone is most likely to get wrong, don’t fall into the trap again:
- Misconception: All USB-C ports can connect to displays → Wrong, only those with video function work. Many devices’ C ports can only charge and transfer data.
- Misconception: A USB-C cable that can charge can transmit video → Wrong, video requires additional pins and bandwidth, and charging-only cables cannot transmit video at all.
- Misconception: Faster USB data speed means stronger video capability → Wrong, video uses independent DP channels, and there is no direct correlation with USB data transfer rate; to judge a cable’s video capability, check whether it clearly marks video support, DP Alt Mode, Thunderbolt/USB4, or corresponding resolution and refresh rate; regular USB 2.0 charging/data cables usually cannot be used for direct display connection.
- Misconception: Thunderbolt ports can only connect to Thunderbolt devices → Wrong, Thunderbolt ports are compatible with DP Alt Mode, and regular USB-C video displays can also be plugged in and work perfectly.
- Misconception: A display that doesn’t light up is broken → Wrong, in common cases it is a cable, settings, or compatibility problem, and the probability of hardware damage is very low.
- Misconception: All devices with USB-C can be used as a host to connect to a display → Wrong, the device itself must support video output. Many budget phones and tablets have C ports without video function.
How to Make Decisions After a Fault
After finding the cause, you don’t need to spend money randomly, just handle it according to this logic:
- If the source end does not support video: use an HDMI/DP port to connect the display, or replace with a device that supports video output.
- If the cable is not up to standard: replace with a full-feature USB-C cable clearly marked to support video output and with sufficient bandwidth for your use.
- If the docking station has insufficient specifications: replace with a docking station that supports the corresponding resolution, refresh rate, and number of monitors.
- If the power supply is unstable: connect a separate power supply to the laptop, and don’t rely on the reverse charging of the display or docking station.
- If the hardware is damaged: contact official after-sales service for repair, don’t disassemble it yourself, as it is easy to void the warranty.
Summary
The core logic of USB-C display is very simple: only when the video functions and bandwidth of the three links — source end, transmission end, and display end — all match, can the picture be output normally.
By troubleshooting in order from easiest to hardest, you can quickly locate most non-hardware faults, and also avoid common pitfalls when purchasing accessories.