
Meta Description :
Wondering how to check USB-C charging wattage or why your charger is so slow? This beginner-friendly guide covers 3 reliable methods to test real USB-C charging speed, verify PD/PPS protocols, spot cable bottlenecks, and fix slow charging — no engineering degree required.
Quick Summary
- Core takeaway: There are 3 testing tiers for every skill level; a USB-C power meter (USB-C charger tester) is the most reliable tool for most users.
- 3-step quick check: Plug in a power meter on the source side → read voltage, current, and wattage → compare against your device’s official specs.
- Key metrics to track: Voltage, current, real-time power, peak power, average power, total energy, and charging efficiency.
- Standard test conditions: 18–30°C stable room temperature, 20–30% starting battery, screen off, no background apps.
- Common bottlenecks: Charger output limits, missing E-Marker chips, protocol mismatches, thermal throttling, and conversion losses.
1. Introduction: Stop Guessing — Know Your Real USB-C Charging Speed
1.1 The Frustrating Truth About “Fast Charging”
We’ve all been there: you buy a sleek 100W GaN charger, plug in your laptop, and somehow it still takes forever to charge. Your phone says “Fast Charging” on the lock screen, but it feels just as slow as your old 18W brick.
In the USB-C ecosystem, advertised wattage is not guaranteed performance. Charging speed isn’t decided by the charger alone — it’s the result of a digital “negotiation” between your charger, cable, and device. One weak link in the chain, and your expensive fast charger is stuck delivering basic speeds.
1.2 Why Test Your USB-C Charging Speed?
Testing isn’t just for tech enthusiasts. It helps you:
- Verify if a charger or cable actually meets its advertised specs
- Pinpoint exactly why your device is charging slowly
- Compare third-party accessories against original equipment
- Confirm if fast charging protocols like USB PD or PPS are actually active
- Stop wasting money on overhyped, underperforming accessories
1.3 Who This Guide Is For
This guide is built for everyday users and hobbyists alike. We start with zero-cost methods anyone can try today, move up to affordable hardware for precise readings, and touch on professional tools for those who want to dig deeper. No electrical engineering degree required.
2. USB-C Charging Fundamentals: Core Concepts You Need to Know
2.1 The Golden Formula: How Charging Speed Works
Charging speed boils down to one simple, universal equation:
Power (Watts) = Voltage (Volts) × Current (Amps)
Think of it like water through a pipe: voltage is the water pressure, current is how much water flows through, and total power is how much water you get overall.
Common real-world examples:
- 5V × 3A = 15W (basic standard charging)
- 9V × 3A = 27W (entry-level phone fast charging)
- 20V × 3A = 60W (mid-range laptop charging)
- 20V × 5A = 100W (high-performance laptop fast charging)
- 48V × 5A = 240W (gaming laptops, PD 3.1 EPR standard)
2.2 Key Terms & Core System Components
Before testing, it helps to understand the four parts that work together to set your charging speed.
2.2.1 Charger Output & PDO Profiles
Every charger advertises its capabilities via PDOs (Power Data Objects) — the official list of fixed voltage and current combinations it can safely deliver. You’ll find these printed on the charger’s label under “Output.” For example, a 65W charger might list 5V⎓3A, 9V⎓3A, 15V⎓3A, 20V⎓3.25A.
2.2.2 USB-C Cable Specs & the E-Marker Chip
Cables are the most overlooked bottleneck in the charging system. Their current rating sets a hard upper limit on power:
- Standard 3A cables: Max out at ~60W (20V × 3A), no special chip required.
- 5A high-power cables: Can carry up to 100W (20V × 5A) and require a built-in E-Marker chip — a tiny circuit inside the connector that tells the system “I can safely handle 5A.”
- EPR-certified 5A cables: Required for 140–240W charging under USB PD 3.1.
Cheap uncertified cables often skip the E-Marker chip, locking you to 60W even with a top-tier 100W charger.
2.2.3 Fast Charging Protocol Compatibility
Protocols are the “language” chargers and devices use to negotiate power.
- USB PD 3.0: The dominant universal charging standard, supporting up to 100W via the Standard Power Range (SPR). It includes PPS for fine-tuned phone charging and works with most modern laptops, tablets, and phones. Note: some manufacturers use proprietary fast charging systems (like Oppo SuperVOOC, Xiaomi HyperCharge, Huawei SCP) for their top speeds, which may not work at full performance over generic USB PD.
- USB PD 3.1 EPR: Introduced the Extended Power Range, pushing maximum power beyond 100W up to 240W for gaming laptops and workstations.
- USB PD 3.2: The latest revision, which refines voltage regulation with SPR AVS (Adjustable Voltage Supply) for better efficiency, and updates branding while maintaining full backward compatibility with all earlier PD versions.
- PPS (Programmable Power Supply): A PD add-on that fine-tunes voltage in tiny 20mV steps, ideal for efficient Android phone fast charging.
- AVS (Adjustable Voltage Supply): A higher-power adjustable voltage mode, first introduced with PD 3.1 and expanded in PD 3.2, for dynamic power delivery to laptops and high-wattage devices.
2.2.4 Device-Side Power Management
Your device is always in control, not the charger. To protect long-term battery health, it deliberately slows down charging as the battery fills up, and it will dial back power if it gets too warm. A 100W laptop will rarely pull a full 100W for more than a few minutes at a time.
2.3 Source vs. Sink: Bidirectional USB-C Power
Unlike older USB cables that only send power one way, USB-C supports bidirectional power flow:
- Source: The side supplying power (e.g., a wall charger, power bank in output mode).
- Sink: The side receiving power (e.g., a phone, laptop being charged).
This is why power banks, USB-C monitors, and docking stations can both charge other devices and be charged themselves. For consistent testing, always measure from the source side (near the charger) for comparable results.
2.4 Why Advertised Wattage ≠ Real-World Speed
You will almost never see the full advertised number on your meter, and this is normal — the size of the gap depends on where you measure and what’s limiting the connection:
- At the charger output (source side): A 3–5% gap from the advertised rating is typical, caused by minor voltage droop and component tolerances.
- At the battery inside your device (sink side): A 10–20% difference is common, due to DC/DC conversion losses, battery management system overhead, and heat dissipated during charging.
Larger gaps usually indicate a specific bottleneck — like a cable limit, protocol mismatch, or thermal throttling — rather than normal efficiency loss.
3. How USB-C PD Negotiation Works During Charging
When you plug in a device, the charging system follows a strict, automatic sequence over the CC (Configuration Channel) pin inside the USB-C connector. This process is called the PD handshake, and it happens in 1–2 seconds.
3.1 The Normal PD Handshake Step-by-Step
- Default 5V safety mode: The charger starts at a universal safe 5V to avoid damaging any connected device, no matter what it is.
- Connection detection: The charger detects a connected device via pull-up/pull-down resistors on the CC pin.
- Source Capability message: The charger sends its full list of supported power profiles (PDOs) to the device.
- Request message: The device reviews the list and picks the best matching voltage/current combination it can safely use.
- Accept & Power Contract: The charger acknowledges the request, and both sides confirm a formal power contract.
- Voltage switch: The charger ramps up to the requested voltage, and fast charging begins.
This is why your power meter will always show 5V briefly before jumping to a higher fast-charging voltage.
3.2 What Happens When PD Handshake Fails?
If negotiation breaks down, the system falls back to safe, slow 5V charging. This is the most common cause of “mysterious slow charging.” Typical failure points:
- The cable has no CC pin or E-Marker chip, so the charger never sends its PDO list.
- The charger and device share no compatible common voltage level.
- A dirty or damaged connector interrupts CC pin communication.
- A cheap dongle or hub breaks the PD communication path.
4. Pre-Test Prep: Standardize Your Setup for Accurate, Repeatable Results
Bad test conditions give bad results. Follow these rules to make sure your tests are fair, consistent, and useful.
4.1 Look Up Official Specs First
Before you test, find two reference points:
- Your device’s maximum input power (check the manufacturer’s website or user manual)
- Your charger’s output PDO list (printed on the label under “Output”)
You can’t call a result “slow” if you don’t know what “fast” is supposed to be for your specific hardware.
4.2 Pre-Check Your Cable
- Look for labels like “100W,” “5A,” or “USB-IF Certified” on the cable or packaging
- If there’s no marking, assume it’s a 3A 60W cable until proven otherwise
- Use your original OEM cable as a “control” for all comparison tests
4.3 Standardize Your Test Environment
- Battery level: Start at 20–30% charge. This is the sweet spot where devices pull the most power.
- Temperature: Test in 18–30°C (64–86°F) stable room temperature. Keep devices out of direct sunlight and hot surfaces.
- Device state: Turn the screen off, enable airplane mode, and force-close background apps.
- Power source: Plug directly into a wall outlet. Avoid extension cords, car chargers, or USB hubs for baseline tests.
4.4 Rules for Reliable Testing
- Change one thing at a time. When comparing cables or chargers, keep everything else identical.
- Use a baseline. Always test with your original official cable/charger first for reference.
- Run 2–3 tests. Battery behavior varies slightly between charges. Averaging reduces random error.
5. Three Testing Methods: From Zero-Cost to Lab-Grade Precision
Pick the method that matches your needs, budget, and technical comfort level.
5.1 Method 1: Software & Timing Tests (No Extra Hardware)
Best for quick checks and casual users who don’t want to buy extra gear.
5.1.1 How to Test on Different Devices
- Android phones: Apps like AccuBattery or Ampere read battery current and voltage to estimate charging power. Note: these read battery-side data, not wall-side power, so they’re 5–15% lower than a hardware meter. They also cannot detect PD handshake, PDO profiles, or E-Marker status.
- iPhones: iOS does not expose raw charging data to third-party apps. Your best zero-cost check is the 30-minute charge timing test below.
- Windows PCs: Use tools like USBDeview to check USB port power states, or look in Device Manager under USB Root Hub properties for power data.
- macOS: Run
system_profiler SPPowerDataTypein Terminal, or check About This Mac → System Report → Power for adapter details.
5.1.2 The 30-Minute Charge Timing Test
- Drain your device to ~20% battery.
- Plug in the charger/cable you want to test.
- Leave it undisturbed for exactly 30 minutes.
- Note how much battery percentage you gained.
- Repeat with a different cable or charger to compare.
This is the most real-world test of all — it measures actual charging speed exactly as you experience it day to day.
5.1.3 Pros, Cons & Best Use Case
- Pros: Free, no extra gear, reflects real user experience
- Cons: Low precision, can’t show protocol info or identify the exact bottleneck
- Best for: Quick comparisons, basic troubleshooting, casual users
5.2 Method 2: USB-C Power Meter (Recommended for Most Users)
A USB-C power meter (also called a USB-C charger tester or USB PD tester) is the sweet spot of accuracy, price, and ease of use. For $25–$60, you get lab-adjacent precision that fits in your pocket.
5.2.1 What a Power Meter Does
It sits inline between your charger and cable, and in real time shows you:
- Voltage (V)
- Current (A)
- Real-time power (W)
- Total energy transferred (Wh/mAh)
- Advanced models also decode PD protocols, read PDO profiles, and detect E-Marker chips.
Reliable models for consumers:
- Plugable USB-C Voltage and Current Tester (beginner-friendly)
- FNIRSI FNB48 (great value, supports protocol decoding)
- ChargerLAB KM003C (popular among tech reviewers)
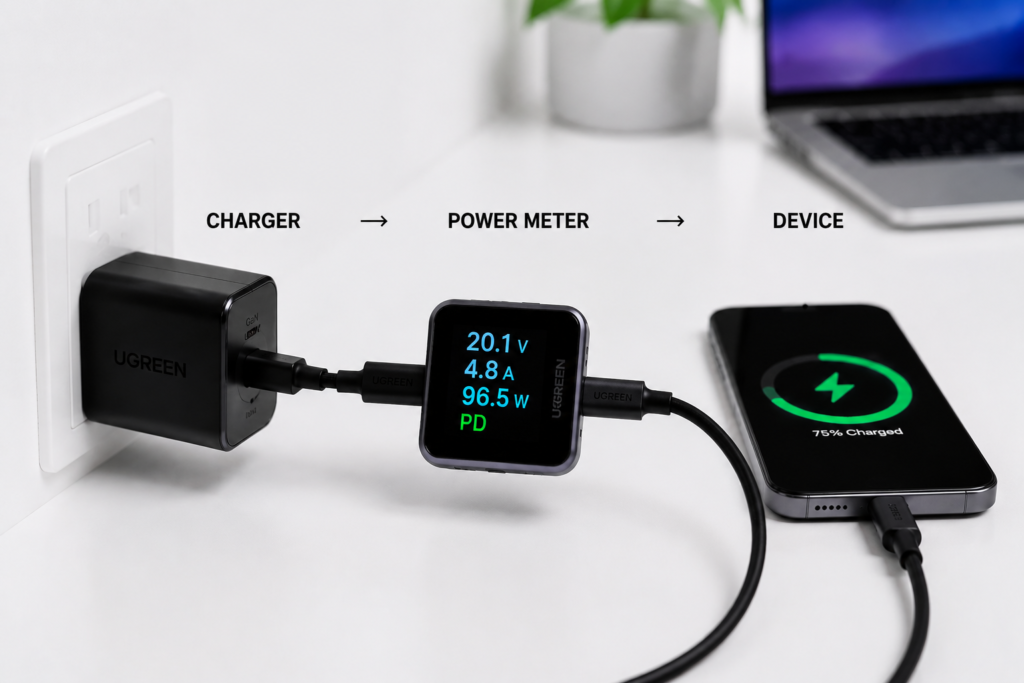
5.2.2 Correct Wiring Order
Connection order and position matter. Always follow this sequence:
Wall Charger → Power Meter → USB-C Cable → Your Device
Why source-side measurement is standard: Placing the meter on the charger side measures the raw output power from the charger, before any cable loss. If you place the meter right next to the device (sink side), your readings will be slightly lower because they exclude power lost as heat in the cable. For consistent, comparable charger and cable performance tests, source-side measurement is the industry standard.
5.2.3 Basic Test Step-by-Step
- Plug the charger into the wall, then connect the power meter’s input port to the charger.
- Connect your USB-C cable to the power meter’s output port, then plug the cable into your device.
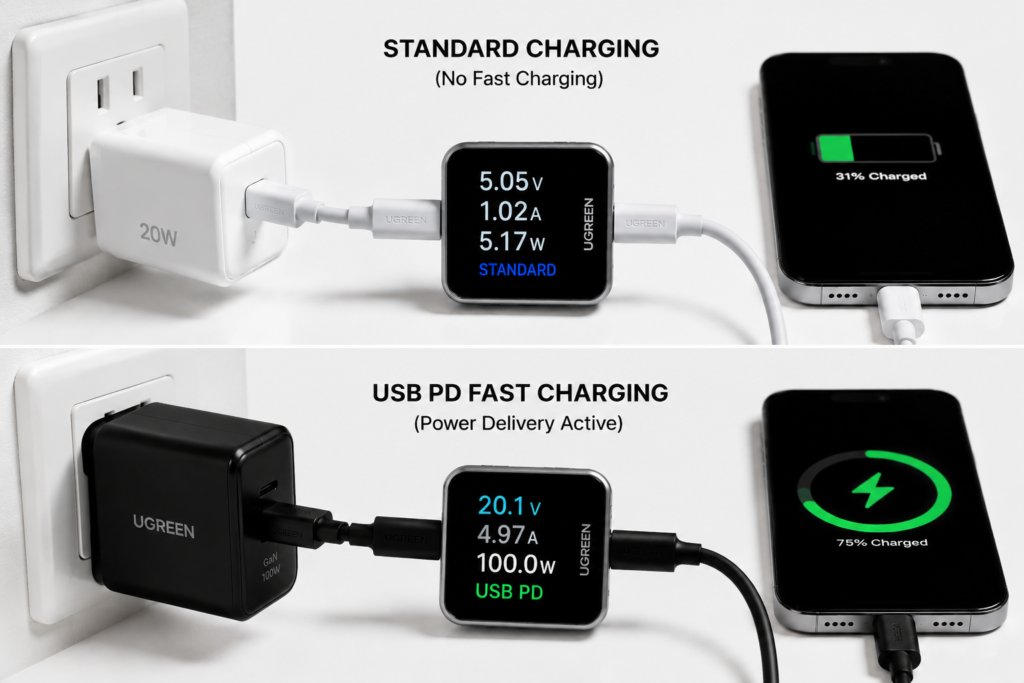
- Watch the display: you’ll first see 5V (default safe voltage), then it will jump up after 1–2 seconds as PD negotiation completes.
- Wait 30 seconds for readings to stabilize, then record the steady wattage.
- Write down the peak power you see in the first 2 minutes, and the average power after 5 minutes.
5.2.4 Advanced: Log a Full Charging Curve
For the full picture, use a meter with data logging (Bluetooth or PC software):
- Record power levels from 20% to 80% battery
- Note at what battery percentage the power starts dropping
- Save the data as a CSV or graph for side-by-side comparisons
A full charging curve tells you far more than a single peak wattage number.
5.2.5 Pros, Cons & Best Use Case
- Pros: High accuracy, shows real-time negotiation, identifies bottlenecks, affordable
- Cons: Requires purchasing a separate tool
- Best for: Anyone who buys third-party accessories, troubleshoots slow charging, or wants precise data
5.3 Method 3: Professional Lab-Grade Testing
For hardware enthusiasts, product reviewers, and engineers.
5.3.1 Core Professional Tools
- Programmable electronic loads: Simulate a device pulling power, so you can test a charger’s maximum output independent of any phone or laptop. Put simply, it acts like a fully customizable “fake device” that can draw as much power as you tell it to — perfect for testing if a charger can actually hit its advertised wattage for extended periods.
- High-speed data loggers: Sample voltage and current hundreds of times per second for precision-grade charging curves and transient analysis.
- USB PD Analyzer: The gold standard for protocol testing. It captures and decodes every message sent over the CC pin, including Source Capability packets, Request messages, Power Contract confirmations, and APDOs (Augmented Power Data Objects) used for PPS. This lets you debug exactly why a negotiation fails, not just that it failed.
5.3.2 PD Trigger Boards (Use With Caution)
PD trigger boards (sometimes called “decoy boards”) force a charger to output a specific voltage. They are useful for testing raw charger capability, powering DIY projects, and pairing with electronic loads.
Safety note: Never connect a PD trigger board to consumer phones, laptops, or batteries unless you fully understand the device’s voltage requirements. Applying the wrong voltage can permanently destroy your device. This is an advanced charger-only test tool.
6. How to Test USB-C Cable Power Capability
Cables are the #1 hidden cause of slow charging. Use these methods to verify if your cable can actually deliver the wattage you expect.
6.1 E-Marker Chip Detection
The fastest way to check a cable’s rating:
- Use a mid-range or advanced USB-C power meter with E-Marker reading capability
- Plug the cable into the meter, and the meter will display the cable’s rated current (3A or 5A) and supported features
- If the meter shows “3A” or no E-Marker detected, the cable will cap out at ~60W
6.2 Load Test Method (Most Reliable)
To confirm real-world performance:
- Use a charger and device that you already know can support 100W (e.g., a 100W PD charger and a 100W laptop)
- Plug the unknown cable into the test setup
- If the system only reaches ~60W (20V × 3A), the cable is a 3A cable with no E-Marker
- If it reaches 90W+, the cable supports 5A high-power charging
6.3 Long Cable & Resistance Test
Extra cable length adds electrical resistance, which reduces real-world power:
- Test a short 1m cable first to establish a baseline power reading
- Replace it with the longer cable, keeping everything else identical
- If power drops by more than 5–7%, the long cable has high resistance and is limiting your charging speed
- For cables 2m or longer, always choose certified 5A models with thicker wire gauge
7. Scenario-Specific Testing Guides
7.1 Testing Phone Charging Speed
- Focus on: Peak power, PPS activation, and thermal throttling onset
- How: Start at 20% battery, record power for the first 30 minutes
- What’s normal: Many flagship phones hit their peak wattage for only 2–5 minutes, then step down to manage heat. Don’t judge a phone’s charging speed by peak wattage alone.
7.2 Testing Laptop USB-C Charging
- Focus on: PD voltage level, 5A cable detection, and power under load
- How: Test once at idle, once under heavy CPU load (e.g., exporting a video)
- Red flag: If you see a steady 20V but only 3A (60W) with a 100W charger, your cable is almost certainly missing an E-Marker chip.
7.3 Testing Multi-Port USB-C Chargers
- Focus on: Dynamic power sharing between ports
- How: Test each port alone first, then test with two or more devices plugged in
- What to expect: Total power is shared. A 100W dual-port charger might deliver 65W + 35W when both ports are in use — this is normal, not a defect.
7.4 How to Verify PPS Charging
Standard PD uses fixed voltage steps (5V, 9V, 15V, 20V). PPS allows the device to request small, fine-tuned voltage adjustments for more efficient phone fast charging.
To confirm PPS is active:
- Use a power meter that supports PPS protocol decoding.
- Watch the voltage during the first 10 minutes of charging a PPS-compatible phone (e.g., Samsung Galaxy, Google Pixel).
- Instead of jumping to a fixed 9V and staying there, you’ll see the voltage slowly climb or adjust dynamically (e.g., 5.6V → 7.2V → 8.1V) as the device optimizes charging speed and heat.
Dynamic, non-step voltage changes during the fast charge phase are the clearest sign PPS is working.
8. Interpreting Your Test Results
8.1 Basic Data Checks
- Protocol activation: Voltage above 5V = fast charging is active. Stuck at 5V = PD handshake failed, basic charging only.
- Normal tolerance: Expect 3–5% lower measured power at the charger output than the advertised rating.
- Bottleneck warning: If you’re seeing less than 90% of expected power at the charger output, you have a specific bottleneck to diagnose.
8.2 The Three Stages of a Normal Charging Curve
Every healthy lithium-ion battery follows this CC-CV (Constant Current – Constant Voltage) pattern — it’s not a bug, it’s intentional battery protection.
- Constant Current (CC) Fast Charging (approx. 20–70% battery) The device pulls near-maximum power. This is where you see your peak wattage and the fastest percentage gains.
- Constant Voltage (CV) Taper Charging (approx. 70–100% battery) Voltage holds steady while current gradually decreases. Charging speed slows steadily as the battery fills, to avoid overvoltage stress. This phase covers most of the top 30% of the battery.
- Maintenance Charging (near 100% battery) At very high states of charge, the device uses tiny, periodic pulses of current to top off the battery and maintain 100% without overcharging. True “trickle charge” only occurs at this final stage, not the entire 90–100% range.
8.3 Bottleneck Diagnosis Framework
Use this framework to narrow down the root cause of slow charging, before moving to fixes.
| Symptom | Likely Bottleneck Category |
|---|---|
| Stuck at ~5W, stays on 5V permanently | Protocol / handshake failure |
| Caps at ~60W with a 100W+ charger | Cable (3A limit, no E-Marker) |
| High peak power that drops sharply after 2–5 minutes | Thermal / device management |
| Power only low when multiple ports are used | Charger power sharing (normal) |
| Power flickers up and down repeatedly | Connection / cable integrity issue |
8.4 How to Fairly Compare Results
- Always compare tests run under identical conditions
- Use 5-minute average power, not just peak wattage
- Accept a ±5% margin of error for consumer-grade meters
9. USB-C Charging Speed Test Example: Real Measurement Results
To put this all in context, here’s a real-world test of a popular 100W GaN charger with a 14-inch MacBook Pro.
Test Setup
- Charger: 100W USB PD 3.0 GaN charger (rated 20V⎓5A)
- Cable: Certified 5A E-Marker USB-C cable (1m)
- Device: 14-inch laptop with 100W max charging support
- Starting battery: 22%
- Room temperature: 23°C (73°F)
- Device state: Off, idle
Measured Results
- Peak power (first 2 minutes): 91W (20.1V × 4.53A)
- 5-minute sustained average: 88W
- Charger-side efficiency: ~91% of the advertised 100W rating
Why It’s Not a Full 100W
This ~9% gap is completely normal, and it has three main causes:
- Minor voltage droop under full load (standard for all chargers)
- Component tolerance within manufacturing specifications
- The device’s own power management algorithm pulling slightly below the absolute maximum for long-term battery health
If the same setup only reached 60W, that would indicate a clear cable bottleneck. If it only reached 5W, that would be a failed PD handshake.
10. Troubleshooting: Fix Slow USB-C Charging
Match your symptom from the diagnosis framework above, then work through these fixes.
10.1 Protocol & Handshake Failures (Stuck at 5V)
- Try flipping the USB-C connector (CC pins are on one side; a dirty pin can break communication)
- Replace the cable with a known-good certified cable
- Test the charger with a different device to rule out a charger fault
- Clean the USB-C ports with compressed air to remove lint and dust
10.2 Cable-Related Bottlenecks (Capped at ~60W)
- Replace the cable with a certified 5A E-Marker cable
- Avoid ultra-long unbranded cables, which often have high resistance
- If using an adapter or dongle, make sure it also supports 5A and USB PD
10.3 Thermal Throttling (Power Drops Quickly)
- Move the device and charger to a cooler, well-ventilated area
- Remove any thick phone cases that trap heat
- Avoid charging while running heavy apps, games, or video exports
- If the battery is very warm, let it cool down for 10 minutes before resuming charging
10.4 Device & Software Limits
- Disable battery saver or optimized charging modes if you want maximum speed
- Check for battery health degradation — old batteries cannot accept full charging speed
- Update your device firmware; manufacturers sometimes adjust charging profiles via software
11. Common Testing Mistakes & Safety Rules
11.1 Six Mistakes That Ruin Your Test Results
- Only looking at peak wattage. A 2-second peak tells you almost nothing. Watch the 5-minute average.
- Testing at 80%+ battery. You’re in the taper phase by then — you’ll never see full speed.
- Using the device while testing. You’re measuring charging minus system power draw, not raw charging speed.
- Assuming a bigger charger is always faster. Your device only pulls what it’s designed for. A 100W charger won’t charge a 20W phone any faster than a 30W charger.
- Testing once and calling it done. Small temperature changes shift results. Repeat 2–3 times.
- Blaming the charger first. The cable is the bottleneck far more often. Test the cable first.
11.2 Safety Guidelines
- Never use damaged, frayed, or unbranded no-name cables and chargers.
- If anything gets uncomfortably hot (too hot to hold) during testing, unplug immediately.
- Never open or modify chargers, batteries, or power meters.
- PD trigger boards and electronic loads are for charger testing only — never connect them directly to consumer devices unless you fully understand voltage requirements.
12. USB-C Testing Tool Buying Guide
12.1 Pick the Right Tier for You
| Tier | Tool Type | Who It’s For | Approx. Price |
|---|---|---|---|
| Entry | Free software + timing test | Casual users, basic checks | $0 |
| Recommended | Basic USB-C power meter / USB-C charger tester | Most consumers, troubleshooting | $20–$35 |
| Enthusiast | PD-capable power meter with logging | Hobbyists, accessory reviewers | $40–$70 |
| Professional | Electronic load + USB PD Analyzer | Engineers, product testing | $200+ |
12.2 What to Look For in a Power Meter
- Bidirectional current measurement (works for charging and discharging)
- Clear, readable display
- Support for PD 3.0 and PPS decoding
- E-Marker chip detection
- Data logging / CSV export (worth paying extra for)
12.3 What to Avoid
- Ultra-cheap $5 meters from random sellers — they’re often wildly inaccurate
- Meters with flimsy connectors that break easily
- Models with no firmware updates — new protocols come out regularly
13. Frequently Asked Questions (FAQ)
13.1 Basic Questions
Q: Is a USB-C power meter worth buying for regular people?
If you own multiple USB-C devices or ever buy third-party chargers and cables, absolutely. A $30 meter will pay for itself by helping you avoid wasted purchases and identify bad accessories.
Q: Will a 100W charger always output 100W?
No. The device decides how much power to draw. The charger just provides what’s requested — up to its maximum.
Q: Does the USB-C cable actually affect charging speed?
Dramatically. A cable without an E-Marker chip caps out at ~60W, no matter how powerful your charger is.
Q: Can I test USB-C charging speed without a meter?
Yes, but with limited precision. You can use the 30-minute timing test or battery monitoring apps to get a rough sense of speed. You won’t be able to see protocol details or pinpoint exact bottlenecks, but it’s enough for basic comparisons.
13.2 Testing & Accuracy
Q: How do I check USB-C charging wattage?
The most accurate way for most people is to plug a USB-C power meter between your charger and cable. It will display real-time wattage directly. For a rough estimate, you can also use the 30-minute charge timing test.
Q: How accurate are consumer USB-C power meters?
Good-quality models are accurate to within ±3–5%, which is more than enough for everyday use. Professional lab equipment reaches ±1% or better.
Q: Can I use a regular multimeter to test USB-C charging?
Not easily. USB-C uses dynamic voltage negotiation, and probing the connector safely requires special adapters. A dedicated power meter is simpler, safer, and cheaper for most people.
Q: What’s a normal margin of error between tests?
Expect ±5% variation between runs due to temperature and battery state differences.
Q: How do I check if my USB-C charger supports 100W?
First, check the output label on the charger itself — look for a 20V × 5A line, which equals 100W. For confirmation, use a USB-C power meter with PDO decoding to see the full list of power profiles the charger advertises over USB PD.
13.3 Cables & Compatibility
Q: How do I know if my USB-C cable supports 100W?
Check for “5A” or “100W” labeling, or use a power meter with E-Marker detection. The most reliable test: plug it between a 100W charger and a 100W laptop and see if you get ~20V/5A.
Q: Do longer cables charge slower?
Often yes, especially cheap long cables. Extra length adds electrical resistance. For 2m+ cables, look for certified 5A models with thicker wire gauge.
Q: Why does the same charger charge different devices at different speeds?
Every device has its own power limit and charging curve. The charger can only provide what the device asks for.
13.4 Problems & Anomalies
Q: Why is my USB-C charger so slow?
The most common causes are: a 3A cable limiting power to 60W, a failed PD handshake stuck at 5V, thermal throttling from heat, or your device simply not supporting higher charging speeds. Work through the diagnosis framework in this guide to pinpoint the cause.
Q: Why does charging slow down after 80%?
This is intentional battery protection. To reduce wear and heat, devices switch to a slower constant-voltage phase as they approach full charge. It’s normal, not a defect.
Q: How much does temperature affect charging speed?
Higher temperatures reliably reduce charging speed, as devices dial back power to protect battery health and avoid overheating. The exact amount varies widely by device, depending on battery chemistry, thermal design, and manufacturer throttling rules.
Q: Why does my power flicker up and down?
Usually this is the device re-negotiating power, or thermal protection kicking in and out. It can also be caused by a loose connection or a low-quality cable.
Q: Why is my 65W charger only charging at 30W?
This usually has one of three causes: your device only supports 30W max, your cable can’t carry more than 3A at higher voltages, or the charger and device don’t share a compatible fast charging protocol. Thermal throttling from high temperatures can also reduce sustained power.
14. Final Thoughts & Next Steps
14.1 Which Method Should You Use?
- Quick “is this working?” check: Timing test + device software
- Accurate troubleshooting and comparisons: USB-C power meter
- Deep-dive charger reviews and engineering work: Electronic load + USB PD Analyzer
14.2 Key Principles to Remember
The USB-C charging system is only as strong as its weakest link. Charger, cable, protocol, and device — all four have to align for you to get full speed. Always test with known-good original accessories first, then swap one component at a time to hunt down bottlenecks.
And finally: don’t chase peak wattage. What matters is real-world charging time and sustained average power, not a big number that only lasts 10 seconds.
14.3 Your First Step
Grab the charger and cable you use every day, run a 30-minute timing test, and see what you get. Then pick up an affordable USB-C power meter — you might be shocked to find which of your accessories is secretly holding you back.